Ultrasonic Waves Reflection
| A service provided by |
|---|

|
| Polymer Service GmbH Merseburg |
| Tel.: +49 3461 30889-50 E-Mail: info@psm-merseburg.de Web: https://www.psm-merseburg.de |
| Our further education offers: https://www.psm-merseburg.de/weiterbildung |
| PSM on Wikipedia: https://de.wikipedia.org/wiki/Polymer Service Merseburg |
Ultrasonic waves reflection
Physical fundamentals
Alongside transmission and absorption, the reflection of sound waves is a phenomenon that occurs at the external or internal boundary surfaces of materials or test pieces.
The law of reflection (Eq. 1) means that the angle of reflection β is identical to the angle of incidence α, and both lie with the normal (plumb line) in one plane, the so-called plane of incidence. To fulfil this, the wavelength λ must be considerably greater than the distances between the scattering centres in the material.
| α = β or sin α = sin β | (1) |
The ultrasonic waves are altered at interfaces in terms of their wave propagation type (longitudinal or transverse wave), size or amplitude, and the direction and frequency of wave propagation (dispersion and mode conversion). The interface itself is formed by adjacent layers (e.g. metal or air with water) that have different characteristic impedances or acoustic impedances W or Z.
An incident sound wave is thus partially reflected at an interface and also partially transmitted or transferred to the neighbouring layer (overcoupling). The prerequisite for this is that both neighbouring layers have different sound impedances W, whereby it is not the absolute value but the difference in sound impedances ΔW that is decisive. In the general case, the volumes and thus the adjacent layer thicknesses are large compared to the wavelength λ of the ultrasound, which is why the sound propagation here depends only on the angle of incidence of the sound wave and the difference in sound impedances.
However, if the second medium is limited in thickness d in the direction of wave propagation (d ≈ λ), then the interface effectively doubles (cracks, doublings and delaminations) and the behaviour of the sound waves then depends on the ratio of thickness to wavelength d/λ.
The sound wave resistance or sound impedance of materials, as the product of density ρ and sound velocity c with Z or W = ρ c, is of particular importance for the reflection and transmission behaviour of sound waves. This parameter therefore describes the elastic material properties typical of the material, whereby materials with a high W value are described as sound-hard (Fe, Cu, Ni) and those with low W values (PMMA, Al, H2O) as sound-soft [1–4].
Reflection of sound waves at interfaces
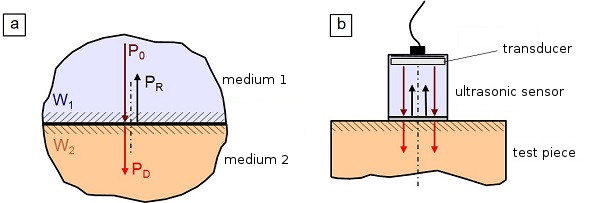
When an ultrasonic wave enters from a sound-hard (W1) to a sound-soft (W2) medium or vice versa, reflection and transmission will occur, provided that the longitudinal wave strikes the interface between the two media perpendicularly (Fig. 1).
| Fig. 1: | Reflection and transmission at the interface between two media a) and between the ultrasonic sensor and the specimen surface b) with perpendicular sound incidence [9] |
The transmission content is greater when the differences between the sound impedances W1 and W2 are smaller. However, if the difference between W1 and W2 is very large, as is the case with a vacuum or air as the second medium, then a large to total content of the incident sound wave is reflected. This effect has a major influence on the detectability of defects in ultrasound testing technology, both in the pulse-echo ultrasonic technique and transmission technique methods.
The reflection factor R (Eq. 2) indicates how much of the incident sound pressure P0 is reflected and how large the transmitted or passed content PD is (Fig. 1a), whereby this parameter depends significantly on the difference between the sound impedances W1 and W2 [4].
| (2) |
When using longitudinal waves with vertical sensors, a large part of the sound waves can also be reflected at the interface between the sensor and the workpiece if the surface is very rough and uneven and unsuitable coupling agents are used (Fig. 1b). This problem does not occur with the immersion bath and squirter techniques or when using air ultrasound. However, since a part of the sound is always reflected back into the sensor depending on the sound impedances, the influence on the transmission signal (SE) must be minimised by using suitable damping layers [5–9].
By relating R to the sound pressure P, this characteristic value can take on positive or negative values, whereby a negative sign for R (acoustically soft medium) indicates the reversal of the phase compared to the incident wave. When sound waves strike flat boundary surfaces perpendicularly, no wave conversion occurs, and for identical media (W1 = W2), R = 0 and T or D = 1, i.e. there is unimpeded sound transmission.
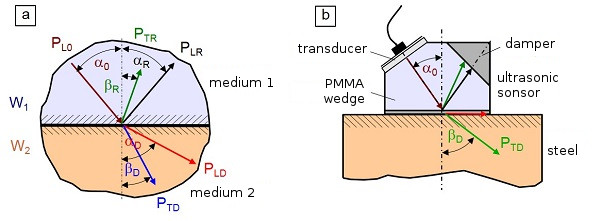
| Fig. 2: | Reflection and transmission at the interface between two media a) and between the ultrasonic sensor and the specimen surface b) with oblique sound incidence [9] |
If the ultrasound strikes oblique interfaces (Fig. 2), mode conversion or wave conversion, reflection, transmission and refraction occur in conjunction with frequency dispersion. Mode conversion is very important for some ultrasonic testing techniques, such as angle sensors. In this case, a transverse wave is additionally generated for both the reflected and transmitted waves. In the case of the angle sensor, depending on the difference in acoustic impedances and the angle of incidence, the longitudinal wave in medium 2 is totally reflected and the reflected transverse and longitudinal waves are attenuated in the sensor by an intermediate layer. In this case, the reflection factor R is calculated according to Eq. (3) as:
| (3) |
Detectability of defects in ultrasound testing
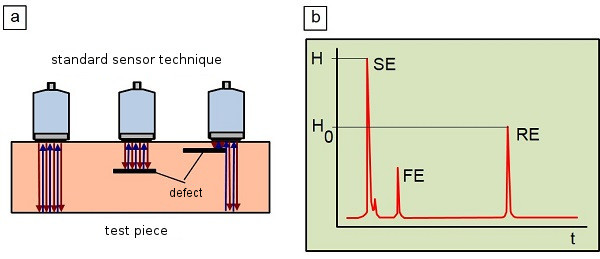
In ultrasonic defectoscopy, defects or discontinuities in the material are more easily detectable the greater the differences in sound waves (echo detectability) are (e.g. steel − air: R >> -1). On the other hand, thin layers of air already result in complete reflection of the ultrasonic wave at 1 MHz due to the large differences in W, even with plane-parallel air gaps of 10 nm between the test sensor (steel) and a rough surface (air). In pulse-echo ultrasonic technique, the detection of the test piece thickness or the fault depth (voids, inclusions, delaminations, doublings or cracks) of discontinuities is based on the reflection of the pulsed transmitter pulse to the sensor, which thus serves as both transmitter and receiver. A signal image (A-scan) is generated from the measured time or path difference and displayed on a monitor. This A-scan (see: imaging ultrasonic testing) shows the location and size of the defect in comparison to a substitute reflector (e.g. circular disc reflector). This normally allows defects (discontinuities) with a size of approx. 0.6 mm to be detected. If there are no defects, the wall thickness is determined on the basis of the rear wall echo (RE) or the defect location is indicated by total or partial reflection of the defect echo (FE) (Fig. 3). The pulse-echo method can be used in standard, transmitter-receiver (SE) and angle testing techniques.
| Fig. 3: | Pulse-echo ultrasonic method on a test piece with defect a) and A-scan of the surface defect (imperfection) with partial coverage of the rear wall b) with perpendicular sound incidence [9] |
See also
- Refraction sound waves
- Dispersion
- Transmission sound waves
- Absorption sound waves
- Sound emission experimental conditions
References
| [1] | Krautkrämer, J., Krautkrämer, H.: Ultrasonic Testing of Materials. Springer, Berlin (1990) 4th Edition, (ISBN 978-3-540-51231-8) |
| [2] | Lerch, R., Sessler, G., Wolf, D.: Technische Akustik – Grundlagen und Anwendung. Springer, Berlin (2009) (ISBN 978-3-540-49833-9) |
| [3] | Möser, M.: Technische Akustik. Springer, Berlin (2015) (ISBN 978-3-662-47704-5) |
| [4] | Matthies, K. u. a.: Dickenmessung mit Ultraschall. DVS Media Verlag, Berlin (1998) 2nd Edition (ISBN 978-3-87155-940-2; see AMK-Library under M 44) |
| [5] | Šutilov, V. A.: Physik des Ultraschalls. Springer, Berlin (2013) p. 155 ff. (ISBN 978-3-70918-750-0) |
| [6] | Deutsch, M.; Platte, V.; Vogt, M.: Ultraschallprüfung. Grundlagen und industrielle Anwendungen. Springer, Berlin (1997) (ISBN 3-540-62072-9; see AMK-Library under M 45) |
| [7] | Steeb, S. (Eds.): Zerstörungsfreie Werkstück- und Werkstoffprüfung. Expert Publishing, Ehningen (1993), 2nd p. 253 (ISBN 3-8169-0964-7; see AMK-Library under M 42) |
| [8] | Busse, G.: Non-destructive Polymer Testing. In: Grellmann, W., Seidler, S. (Eds.): Polymer Testing. Carl Hanser, Munich (2022) 3rd Edition, pp. 431–495 (ISBN 978-1-56990-806-8; E-Book: ISBN 978-1-56990-805-5; see AMK-Library under A 22) |
| [9] | Bierögel, C.: Lecture Notes: Materials Diagnostics – Hybrid Testing Methods. Vienna University of Technology (2015) |


![{\displaystyle R={\frac {P_{R}}{P_{0}}}={\sqrt {\frac {{\frac {1}{4}}[{\frac {W_{1}}{W_{2}}}-{\frac {W_{2}}{W_{1}}}]^{2}\sin ^{2}{\frac {2\pi d}{\lambda }}}{1+{\frac {1}{4}}[{\frac {W_{1}}{W_{2}}}-{\frac {W_{2}}{W_{1}}}]^{2}\sin ^{2}{\frac {2\pi d}{\lambda }}}}}}](https://wikimedia.org/api/rest_v1/media/math/render/svg/057a9e8f506b18895a16d8b55968c6040c4c2775)
