Ultrasonic Immersion Bath Technique
| A service provided by |
|---|

|
| Polymer Service GmbH Merseburg |
| Tel.: +49 3461 30889-50 E-Mail: info@psm-merseburg.de Web: https://www.psm-merseburg.de |
| Our further education offers: https://www.psm-merseburg.de/weiterbildung |
| PSM on Wikipedia: https://de.wikipedia.org/wiki/Polymer Service Merseburg |
Ultrasonic Immersion Bath Technique
Principle of the passive immersion bath technique
The ultrasonic immersion bath technique, whose is a special case of the ultrasonic immersion technique, can be operated with different specifications:
- immersion-technique,
- flowing water coupling,
- puddle technique,
- guided squirter-technique and
- free squirter-technique [1].
For the non-destructive ultrasonic testing via immersion technique are needed an immersion bath, whose size and depth in depending on the dimensions of the testing object, a scan-system (3-axis-scanner or robot), an ultrasonic transceiver probe as well as an appropriate computer technique for programming, evaluating and visualisation of data [2, 3]. These testing systems are appropriate for special materials with high acoustic attenuation and/or scattering, as well as very thin structures. By the coupling of ultrasound with a water delay line, very low (concretes) as well as very high frequencies (fibre-reinforced composites) up to 200 MHz are possible, whereas focussing and broad-band transducers as well as transducer arrays (phased array technique) are used. The amplitude-time signals A(t) will be processed by digital techniques and shown for instance as HF-Scans, A-Scans as well as B-, C-, D- and F-Scans. In practice, two applications are used preferred, which are known as active and passive immersion bath technique [4].
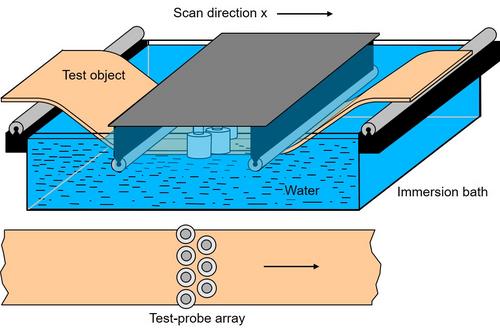
| Fig. 1: | Schematic presentation of the passive ultrasonic immersion technique |
If the set-up is a passive one, then the testing object (plates or tubes) passes a stationary immersion bath continuously, which can also serve as cooling bath, and fixed probes or an array detect flaws online in the production process (Figure 1).
Principle of the active immersion bath technique
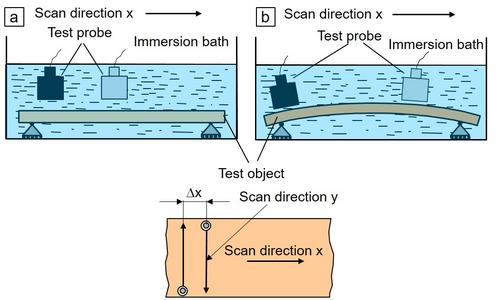
The “active” set-up also uses an immersion bath, which have to be matched to the test object geometry too. However, this is fixed in the bath and the ultrasonic probe will be moved by the scanner (Figure 2). Scanning the testing object at defined positions on the y-axis, the A(t)-signals will be registered and after the scan the scanner is moved by a certain distance and the scan parallel to the y-axis begins and so on (Figure 2a). At curved objects, the contour of the surface have to be determined before the scan begins. For a vertical intromission of sound, the probe is to rotate in such a way that its acoustical axis is always perpendicular to the surface of the testing object (Figure 2b).
| Fig. 2: | Schematic drawing of the active ultrasonic immersion bath technique for (a) plane and (b) curved testing objects |
Measurement system for active ultrasonic immersion bath technique
The recorded amplitudes and run-times can be processed graphically as A-, B-, C-, D- or F-scans. Thus, the operator can evaluate the run-times, the attenuation and the frequency behaviour of the ultrasonic signals. With these methods, not only back-walls and delaminations can be detected precisely but also the geometry of tubes (ovality and eccentricity) [5] or the quality of coatings.
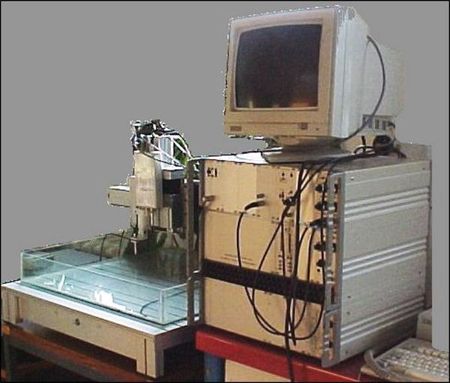
With use of phased array systems, high testing velocities in online-processing are avail-able for detecting flaws and geometries, whereby for quality management important advantages exist. In Figure 3 is to see an ultrasonic testing unit with immersion bath (Company Dr. Hillger, Braunschweig).
| Fig. 3: | Ultrasonic immersion bath system HFUS 2000 (Dr. Hillger, Braunschweig) |
See also
- Ultrasonic direct coupling
- Pulse-echo ultrasonic technique
- Ultrasonic weld inspection
- Ultrasonic runtime measurement
- Ultrasound – Elastic parameters
References
| [1] | Deutsch, V., Platte, M., Vogt, M.: Ultrasonic Testing. Fundamentals and Industrial Applications. Springer Berlin (2012), (ISBN 978-3-642-63864-0; see AMK-Library under M 45) |
| [2] | Chen, C. H.: Ultrasonic and Advanced Methods for Nondestructive Testing and Material Characterization, World Scientific Press (2007), (ISBN: 978-981-270-409-2) |
| [3] | Hillger, W.: A Testing Equipment for Automatic Quality Control of Precast Concrete Components. Proceedings, International Conference on Structural Faults and Repair, July (1987), London, Volume 1, 91–99 |
| [4] | Hillger, W., Oster, R., Schuller, J., Stößl, R., Lang, S., Bosse, J. Thaler, B., Ilse, D., Bühling, L.: Automated Air-Coupled Ultrasonic Technique for the Inspection of the EC145 Tail Boom. 4th Int. Symp. On NDT in Aerospace (2012), Tu.2B.3 |
| [5] | Matthies, K.: Thickness Measurement with Ultrasound. DVS-Media GmbH, Berlin (1998), (ISBN 978-3-87155-941-9) |


