Ultrasonic Weld Inspection
| A service provided by |
|---|

|
| Polymer Service GmbH Merseburg |
| Tel.: +49 3461 30889-50 E-Mail: info@psm-merseburg.de Web: https://www.psm-merseburg.de |
| Our further education offers: https://www.psm-merseburg.de/weiterbildung |
| PSM on Wikipedia: https://de.wikipedia.org/wiki/Polymer Service Merseburg |
Ultrasonic weld inspection
Weld inspection with ultrasound
In the weld inspection with ultrasound on metals, especially on steels, testing methods are successful and established for decades in practical use. Weld inspection with polymers have diverse problems, which results of its visco-elasticity, the high damping and scattering inside the materials.
Thereby, the ultrasound experiences a high absorption (sound damping) during transmission through the polymer and comparatively low refraction of sound waves at the transition from the ultrasonic transducer over the coupling medium in the polymer.
Principle of the angular beam
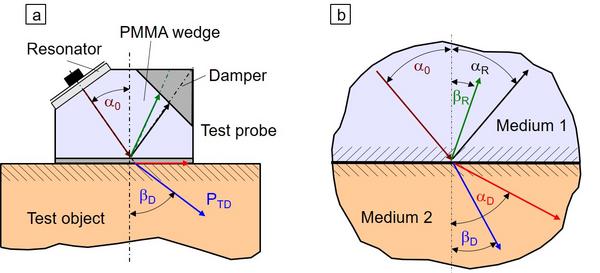
A favoured method for the weld inspection is the angular radiation by angle-beam probes. Though the angles are mostly fixed depending on the material, which is to be tested. At the interface of transducer/material, a transformation of wave modes happens. According to the law of refraction by Snellius at the interface of two media the longitudinal wave is refracted (and reflected) as well as is also converted in a transversal wave.
| Fig. 1: | Schematic drawing of (a) an angular radiation by means of an angle-beam probe and (b) the transformation of wave modes at the interface between probe (transducer) and the test object |
Therefore, in a solid specimen, two types of wave propagating: 1. the longitudinal wave (compression wave) and 2. the transversal wave (shear wave). The longitudinal wave propagates lengthwise and the transversal wave crosswise to the direction of propagation.
This process for the critical angle of the total reflectance is shown in Fig. 1a. There the refracted longitudinal wave have the critical angle of the total reflectance (red arrow) and only the transversal wave (blue arrow) propagates in the object volume, wherewith only the transversal wave exists in the material, which simplified the interpretation of the received signal. The general case for an incident angle, which deviated from the critical angle, is shown in Fig. 1b.
Angular beaming on polymers
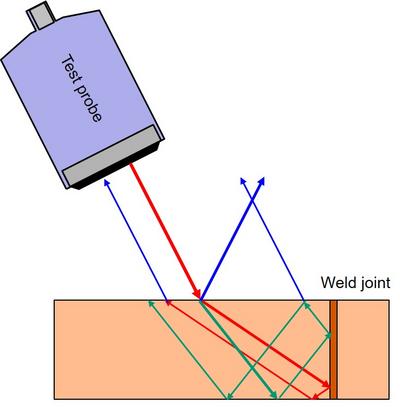
The disadvantage of the angular radiation on polymers over metals is founded in the relative low difference of impedance among the transducer (with matching layer) and the polymer. Therewith, two wave modes exist in the polymeric material, which complicate the interpretation notably. Here, an analysis of the beam path helps. A normal-beam probe is shown in Fig. 2 that simulate an angle-beam probe by intro-mission in a defined angle to the surface of the specimen. By means of the law of refraction by SNELLIUS (Equation (1)) and the geometrical conditions, the sound paths are calculated.
| (1) |
For minimising the sound loss at direct coupling on polymers, between probe and specimen water will be used as coupling medium. The longitudinal wave emitted from the probe or transducer (red beam) is refracted on the sample surface and hive the incident wave in a longitudinal wave (red) and a transversal wave (green). Both sound beams are reflected at the back wall and the weld joint (dark stripe) and get off the specimen reach the ultrasound probe partly. Though, it is to see that the diameter of the probe influences importantly the size of the measurable surface of the weld joint. It is assumed, that flaws in the weld joint trigger a signal off at the ultrasound probe, because these flaws begins to oscillate with the ultrasound and beam in all directions, then more small transducer can be used.
| Fig. 2: | Principle of ultrasonic weld inspection; the red beams stand for the incident longitudinal wave, the green ones for the transversal waves and the blue ones the reflected waves back in the coupling medium |
Example for ultrasonic weld inspection on poly(methylmethacrylate) (PMMA)
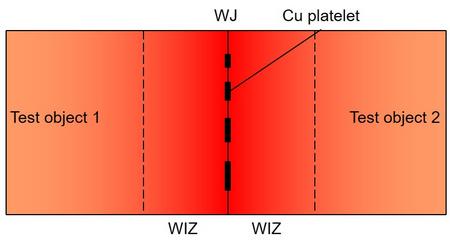
Which interpretative difficulties a measurement of weld joints is making, shows the following example. In Fig. 3 the upper surface of a welded polymer sample (of two identical materials) is shown. The welding joint (WJ) is manufactured by hot plate butt welding method.
| Bild 3: | Schema of a specimen on poly(methylmethacrylate) (abbr.: PMMA) with weld joint where copper stripes are embedded as flaws (top view) |
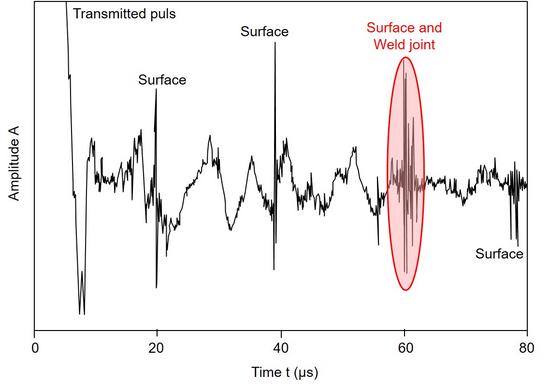
In the Figure 3 the welded influence zone (WIZ) is shown (reddening), which makes difficult the evaluation of the measurement's result by changed material properties. Because of the high sound absorption and the inclined incidence of sound, the signal (Fig. 4) is very noisy. By means of a sound beam analysis, the individual echoes can be assigned to the defined incidents.
| Fig. 4: | Example of a HF-Scan at angular radiation with immersion bath technique in a PMMA specimen with weld joint and embedded copper stripes as flaws |
According to the measuring set-up, four surface echoes are found in different depths whereby one of that interfere with a (simulated) flaw, which can be confirmed by an analysis of the sound beam.
See also
- Ultrasonic direct coupling
- Pulse-echo ultrasonic technique
- Ultrasonic immersion bath technique
- Ultrasonic runtime measurement
- Ultrasound – Elastic parameters
References
| [1] | Leger, A., Deschamps, M.: Ultrasonic Wave Propagation in Non-Homogeneous Media. Springer Berlin Heidelberg (2009), (ISBN 978-3-540-89104-8) |
| [2] | Krautkrämer, J., Krautkrämer, H.: Attenuation of Ultrasonic Waves in Solids. In: Ultrasonic Testing of Materials. Springer Berlin (1990), (ISBN 978-3-662-10682-2) |
| [3] | Deutsch, V., Platte, M., Vogt, M.: Ultrasonic Testing. Fundamentals and Industrial Applications. Springer Berlin (1997), (ISBN 978-3-540-62072-9) |


