Ultrasonic Runtime Measurement
| A service provided by |
|---|

|
| Polymer Service GmbH Merseburg |
| Tel.: +49 3461 30889-50 E-Mail: info@psm-merseburg.de Web: https://www.psm-merseburg.de |
| Our further education offers: https://www.psm-merseburg.de/weiterbildung |
| PSM on Wikipedia: https://de.wikipedia.org/wiki/Polymer Service Merseburg |
Ultrasonic runtime measurement
Definition
The ultrasonic runtime method describes the measurement of the path length by the time it takes for a sound pulse (wave packet) to travel from the transmitter (sound source) through at least one medium to the receiver (sound sink).
This measurement method is fundamental for all ultrasonic imaging inspection methods, which also includes the further developed ultrasonic time-of-flight diffraction (TOFD) method.
Basic Principles
The proportionality factor between the time t and the way s is the ultrasound velocity c and is calculated according to the equation
| (1) |
This equation is identical to the way-time law and is the basis for wall thickness measurements, as well as for measurements to determine the ultrasound velocity.
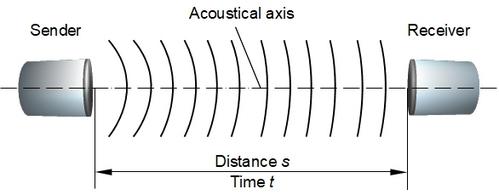
| Fig. 1: | For the definition of the runtime method (through-transmission technique) |
The Figure 1 shows the principle of the runtime measurement. The emitter and the receiver are aligned with each other on the acoustic axis so that an optimal sound transmission exists between the two sensors. This arrangement is called the ultrasonic through-transmission method. The sound passes through the way to be measured only once, which is a particular advantage for testing highly sound-attenuating thermoplastics.
However, the runtime method is also possible with the pulse-echo ultrasonic technique. Here, only one sensor (probe) is used, which registers the reflected sound waves. [1].
Applications
The time-of-flight method is used wherever point measurements are required. This is the case for wall thickness measurements and for the precise location of any flaws in the material to be inspected (defectoscopy). Here, the pulse-echo ultrasonic technique is very important.
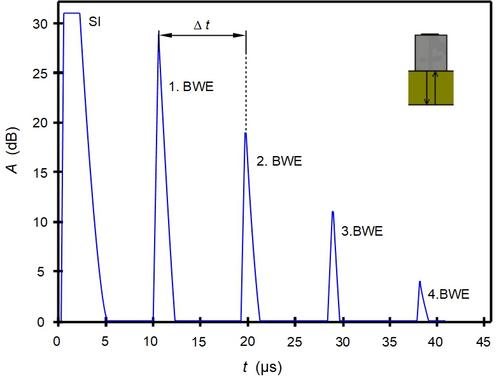
An example of a wall thickness measurement using the pulse-echo method on a 10 mm thick steel plate in the form of an A-scan is shown in Figure 2. At the beginning of the time axis, the sending pulse SI can be seen (whose amplitude is cut off at 32 dB due to over-modulation). This is followed after 10.0 µs by the signal sequence of four back-wall echoes (BWE). The time difference Δt between the echoes is the time it takes for the sound wave to travel from the surface contacted by the probe to the back wall and back to the probe. It is determined by taking the distances between the maxima of two successive back-wall echoes, and, often more accurately, also taking the distances between the rising edges at a given relative echo height instead of the maxima. This pulse-echo method is the most commonly used method in ultrasonic testing [2]. Once the Δt has been determined, the wall thickness can be calculated according to (1), whereby twice the wall thickness is to be used for the sound way.
In order to calculate the ultrasound velocity, the wall thickness must be known. This is achieved by runtime measurement on a calibration test specimen of the same material or on an accessible plane-parallel position of the component to be tested, where the wall thickness is known or can be easily determined with other measuring tools.
| Fig. 2: | Measurement of the ultrasound velocity through 25 mm steel in pulse-echo method |
The ultrasonic through-transmission method also allows the measurement of the sound travel time. Due to the simple sound propagation way, it has a better signal quality and is used in particular for testing pipes and containers with highly sound-attenuating media and where precise results are required on the wall thicknesses or the condition of these media. In this case, the zero point has to be calibrated first because the rising edge or the maximum of the sending pulse does not correspond to the zero point for technical reasons.
Importance
The runtime measurement method has not lost its importance in recent years, despite the increased automation of ultrasonic testing methods. Rather, it is integrated into the calculation algorithms of ultrasonic imaging inspection and is particularly indispensable for defectoscopy on components. Thereby, the accuracy of the numerically determined acoustic runtime depends on the measuring rate of the respective transient recorder to a considerable extent.
See also
- Ultrasonic direct coupling
- Pulse-echo ultrasonic technique
- Ultrasound – Elastic parameters
- Ultrasonic immersion bath technique
- Ultrasonic weld inspection
References
| [1] | Krautkrämer, J., Krautkrämer, H.: Werkstoffprüfung mit Ultraschall. Springer Berlin Heidelberg, 5th Edition (2013) (ISBN: 978-3-662-10910-6) |
| [2] | Kohlrausch, F.: Praktische Physik: Zum Gebrauch von Unterricht, Forschung und Technik. B. G. Teubner, 24. neubearb. und erw. Auflage (1996) |


