Tensile Test
| A service provided by |
|---|

|
| Polymer Service GmbH Merseburg |
| Tel.: +49 3461 30889-50 E-Mail: info@psm-merseburg.de Web: https://www.psm-merseburg.de |
| Our further education offers: https://www.psm-merseburg.de/weiterbildung |
| PSM on Wikipedia: https://de.wikipedia.org/wiki/Polymer Service Merseburg |
Tensile Test
Tensile test, purpose and importance
Tensile tests are one of the most frequently performed test methods in mechanical materials testing, alongside hardness measurement. They are used to characterize the strength and deformation behaviour under uniaxial stress.
Tensile tests are
- performed on machined slender test specimens to determine the material behaviour under uniaxial tensile stress distributed evenly across the cross-section,
- on notched test specimens to simulate multiaxial stress states – notch tensile test or
- on products such as wires, yarns, films, ropes, moulded elements, components, or even component groups.
In the tensile test, the material behaviour is tested
- under continuously increasing (“impact-free”) load – “classic” quasi-static tensile test
- under constant static load – tensile creep test
- under alternating stress to determine the cyclic stress–strain curve (LCF – low cycle fatigue) (see: fatigue)
- at room temperature
- at increased temperatures
- at low temperatures
- at very low test speeds – creep tensile tests – or also
- at increased test speeds – fast tensile tests – (see: high-speed tensile test)
The material values determined in the tensile test
- form the basis for the calculation and dimensioning of statically stressed components and structures,
- are required for characterizing the processing behaviour of materials,
- are used in quality control to assess the uniformity of production, and
- are used in material selection to compare materials and material condition
Reference
- Dripke, M., Michalzik, G., Bloching, H., Fahrenholz, H.: Mechanische Prüfverfahren und Kenngrößen – kompakt und verständlich. Band 1: Der Zugversuch bei quasistatischer Beanspruchung. Castell Verlag GmbH, Wuppertal (2002), (ISBN 3-934255-50-7; see AMK-Library under C 14)
Tensile test, stress–strain diagram
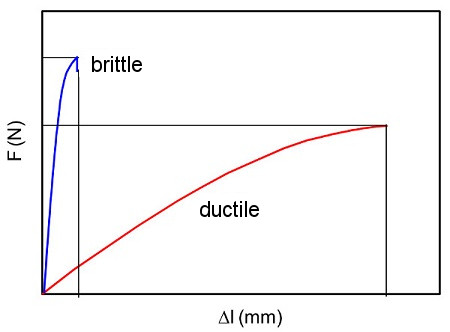
The measured variables of the tensile test recorded simultaneously are the force F and the elongation Δl. By plotting the measured force on the vertical axis and the resulting elongation on the horizontal axis of a chart recorder (x-y plotter), the force–elongation diagram F (Δl) of the material under investigation is obtained. Older material testing machines usually record the force on the vertical axis of a roller recorder and define the crosshead path from the recording speed vP of the recorder. The vertical path of the roller recorder y (t) corresponds directly to the force signal of the measuring amplifier F (t). The horizontal recording length x (t) depends on the ratio of the velocity of the roller and the crosshead vT. For slow tests, a low recorder speed is selected in order to compress the diagram on the x-axis. For brittle materials (see also: brittle fracture promoting factors), on the other hand, a high recording speed is used in order to obtain an elongated diagram for evaluation purposes. The horizontal axis division is calculated as follows:
| Δl (t) = (vT/vP) * x (t) | (1) |
In newer incremental measuring systems, force and elongation are recorded in digital form and displayed directly on the monitor of the connected computer as a force-elongation diagram F (Δl) (Fig. 1).
| Fig. 1: | Force-elongation diagrams of a brittle and a ductile material |
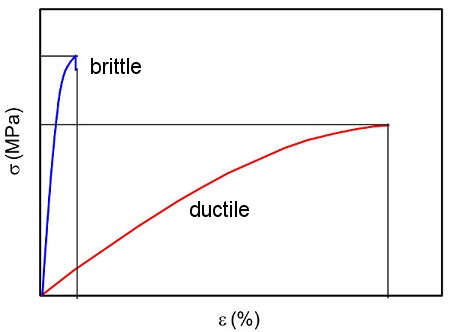
Since this diagram depends on geometric parameters such as the cross-sectional area A0 and the initial measurement length l0, the axes are normalized using equations (2) and (3), which, in the case of traverse path measurement, results in the stress–strain diagram σ (εt) based on the nominal strain εt (Fig. 2). The diagrams are identical, only the axis division has been changed.
| σ = F / A0 | (2) |
| εt = (ΔL/L) ⋅ 100 % | (3) |
If strain extensometers or clip-on gauges are used, the normative strain is calculated and the stress–strain diagram σ (εt) in Fig. 2 is obtained.
| Fig. 2: | Stress–strain diagrams of brittle and ductile material |
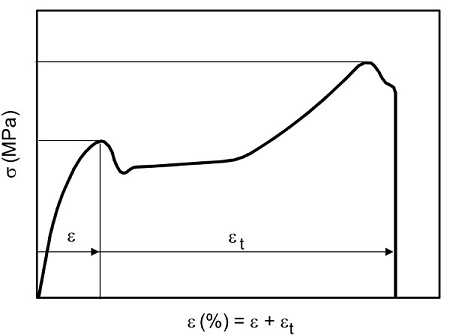
In polymer testing, the normative strain ε (using strain extensometers) is recorded for ductile, stretching materials up to the yield point, and then the nominal strain is used from the crosshead path (Fig. 3). The strain axis therefore contains both types of strain, although modern materials testing machines can also record the resulting strains separately.
| Fig. 3: | σ-ε diagram of a ductile material with a yield point |
Tensile test, heat toning
Heat toning in quasi-static tensile testing of plastics
In addition to a change in internal energy, every deformation of a material is also associated with heat toning. If the test is carried out in a ‘temperature-sensitive’ range, even slight thermal effects or temperature changes can have an influence on the deformation behaviour. This reaction of the heat toning on the deformation behaviour is the reason for the so-called ‘cold stretching’ with flow zone formation.
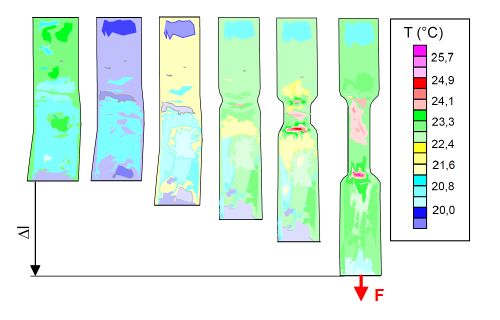
The plastic elongation that occurs after the yield point is exceeded starts from one or two locally limited necking points. The material is stretched and pulls itself out of the unstretched material, as it were. The resulting flow zones extend across the entire prismatic part of the test specimen up to the shoulders, significantly increasing the molecular orientation in the stretched area. This effect can be verified by density measurements in the unstretched and stretched deformation areas. At the same time, it can be observed that the local deformation rate (see also: test speed) decreases or remains constant in these areas. The constant crosshead speed is implemented in both flow fronts, resulting in significantly increased deformation speeds at these positions due to the short initial length, which manifests itself in heat toning. If we consider the mechanical work required to convert, for example, 1 g of unstretched material into stretched material in the area of constant stress in the stress-strain diagram (plateau), we obtain the following result. Neglecting enthalpy changes, an amount of energy arises which, expressed as heat, is sufficient to increase the temperature of the material. For many plastics, this temperature increase is already sufficient to noticeably influence the deformation process. This behaviour is illustrated by the following IR image (Fig. 4), which shows the temperature distribution of a PA specimen in a tensile test at various deformations.
| Fig. 4: | Surface temperature of a PA 6 specimen at various deformations |
The temperature measured at the surface initially decreases slightly in the elastic and viscoelastic deformation range as a result of the thermoelastic effect, before rising again. As the necking zone develops, the deformation behaviour becomes localised and a hotspot forms in this area. As the deformation increases, two flow fronts develop, which move at different speeds towards the shoulders of the test specimen and therefore exhibit different temperature increases. This process is speed-dependent and can initiate temperature differences of up to 10 °C on the surface. It follows that cold elongation is actually warm elongation.
Tensile test, fully automatic
With modern universal testing machines, the tensile test, i.e. the stressing of the test specimen and the recording and evaluation of the measured values, is already carried out automatically. All the user has to do is position the test specimen in the clamping devices (see: specimen clamping), press the start button and remove the test specimen fragments after the test specimen breaks. Before the test, the cross-sectional dimensions of the test specimens must usually be determined. These measured values are measured using digital measuring sensors or callipers and transferred directly to the testing machine's PC at the touch of a button.
In testing laboratories with a high volume of test specimens, there has been a growing demand in recent years for further rationalisation of the testing process with the following constraints:
- Increased machine utilisation
- Reduced testing costs
- Improved accuracy and reproducibility of test results
- Rapid availability of test results
- Direct data transfer to LIMS systems (laboratory information and management systems) for statistical quality control (SPC) or process control
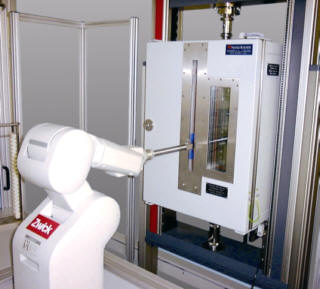
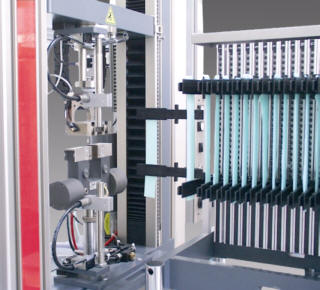
The degree to which mechanical testing methods are integrated into the manufacturing process is determined on the one hand by the performance of the components integrated into the testing system and the quality of the testing software, and on the other hand by the time-dependent availability of the standardised test specimens that are usually required. For fully automatic testing, the testing machine is supplemented by a computer-controlled handling system that removes the test specimens from a magazine and places them in the holder of the testing machine (Fig. 5).
| Fig. 5: | Test systems for fully automatic tensile testing a) with test robot, b) with cassette feed (working photo ZwickRoell GmbH & Co. KG, Ulm]) |
In between, a thickness or cross-section measuring device and, when testing metallic materials, a hardness testing machine for determining the surface hardness of the test specimens can be integrated. This naturally requires appropriately equipped measuring systems and test specimen holders. The test specimen residues are disposed of semi-automatically when the specimen parts slide into a waste container under their own weight after the holder is opened.
For environmentally friendly recycling, the test piece residues can also be separated according to material (separation according to steels, non-ferrous metals, plastics, etc.). In special cases, the residues are picked up by an additional handling system and placed back into a magazine in a defined manner so that further tests can be carried out on them.
A common sorting variant is:
- Container 1: Test specimen residue test result within tolerance;
- Container 2: Test specimen residue test result outside tolerance;
- Container 3: Test specimen residue specimen fracture outside the measuring length
Fully automatic testing is becoming increasingly important:
- The feed systems are becoming ‘smarter’ and therefore more universal, so that even small series can be tested efficiently.
- Fully automatic testing avoids subjective influences of the user on the test arrangement (e.g. ‘crooked’ test specimen clamping) and the test specimens (e.g. heating due to body heat).
- The accuracy and reproducibility of the test results is further increased.
arried out on them.
Reference
• Dripke, M., Michalzik, G., Bloching, H., Fahrenholz, H.: Mechanische Prüfverfahren und Kenngrößen – kompakt und verständlich. Band 1: Der Zugversuch bei quasistatischer Beanspruchung. Castell Verlag GmbH, Wuppertal (2002) (ISBN 3-934255-50-7; see AMK-Library under C 14)
Tensile test, force measurement technique
The measured variables recorded simultaneously during the tensile test are the force F and the elongation Δl.
Two basic principles are used to measure the force, resulting in different types of measuring transducers:
Electro-mechanical force transducers are usually of the linear or bending beam type, which are connected to the crosshead (see: material testing machine) or the extension rods and clamping systems (see: specimen clamping) via connecting bolts (Fig. 6). These force transducers consist of a deformation body which, under load, undergoes a proportional deformation (elongation or deflection) which is recorded by strain gauges. The spring constant c and the elasticity limits determine the nominal load of the force transducer, whereby appropriate safety factors are implemented to prevent overloads.
Such measuring cells are really deformation bodies whose display is calibrated in force units due to the linear relationship between force and elongation. Because of this, the force transducers always contribute to the machine compliance of the selected testing machine configuration as a result of the deformation that occurs.
| Fig. 6: | Operating principle of electro-mechanical force transducers |
The operating principle here is mechanical-electrical signal conversion based on applied strain gauge (DMS), whereby these measuring cells are mostly used for static or quasi-static tests. Two DMS are usually used to record the measurement signals and two for temperature compensation, whereby the measurement signal represents the elastic elongation of the deformed body. Since the resistance of the DMS changes under stress, the output voltage proportional to the applied force can be recorded using a WHEATSTONE bridge circuit. In accordance with the linear relationship between voltage and strain (HOOKE's law), the force transducer can thus be calibrated directly in force units. These force transducers are very well suited for static and quasi-static tests, as they exhibit only minimal drift even over longer test periods. Figure 7 shows different designs of electro-mechanical force transducers.
| Fig. 7: | Types of electro-mechanical force transducers (ZwickRoell GmbH & Co. KG, Ulm and Instron Deutschland GmbH Pfungstadt) |
The piezoelectric force transducers, on the other hand, use NEWTON's principle and are mostly used for dynamic loads, as these require higher signal dynamics. During acceleration, a charge proportional to the load is generated via the seismic mass on the piezo crystal, which can be registered with a charge amplifier. Piezoelectric crystal discs are mostly used in smaller ring load cells (Fig. 8).
| Fig. 8: | Principle of operation of piezoelectric force transducers |
Compared to electro-mechanical force measuring cells, piezoelectric transducers have very low inherent deformation due to their high stiffness, resulting in a high resonance frequency. Such high frequencies are only achieved with electro-mechanical force measuring cells at very high nominal loads. For this reason, and due to their high signal dynamics, piezoelectric sensors are suitable for dynamic applications (instrumented impact or puncture impact tests) and comparatively small forces. Figure 9 shows different versions of these force measuring cells.
| Fig. 9: | Types of piezoelectric force transducers (Kistler Instruments AG Winterthur, Hottinger Baldwin Messtechnik GmbH Darmstadt and BCT Technology AG Willstätt |
Tensile test, path measurement technique
Various path measurement techniques are used on universal testing machines to record elongation:
- Absolute path measurement systems and
- Differential path measurement systems.
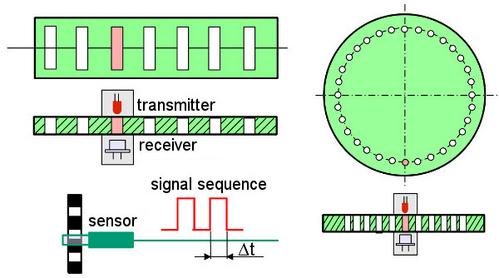
Regardless of the age of the testing machines, measuring rods are almost always installed. On older machines, these are used to display the absolute displacement with a resolution of ± 1 mm on the material testing machine, while on newer systems they are used to determine the emergency stop and traverse position. With analogue measurement techniques, a time- and displacement-proportional voltage signal is available at all times, whereas with incremental techniques, discrete counting pulses are applied, which are added up in a memory to give the elongation value. Newer absolute position measuring systems for measuring the traverse path are mostly based on incremental (counting) technology and can achieve resolutions of up to 0.1 µm. The traverse path or extension is measured by sensors that move with the traverse or by converting the vertical movement to a perforated circular disc (Fig. 10), which then allows the nominal strain εt to be calculated in relation to the clamping length. The translation of the measuring scale or the rotation of the circular disc produces a digital signal sequence with a resolution of ± 1 digit. The hole spacing is then used to obtain the path resolution in µm.
| Fig. 10: | Incremental path measurement systems for measuring the traverse path |
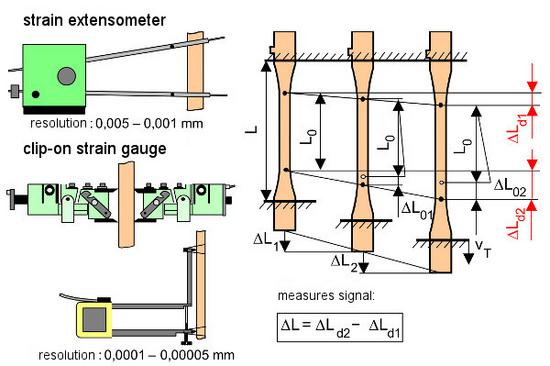
Differential path measurement systems, which measure the elongation directly on the test specimen and are used to determine the normative strain, are divided into strain extensometers and clip-on strain gauges.
- Strain extensometers require an external fixed point (fixed or movable support plate) and mass compensation to balance the weight of the sensor.
- The clip-on strain gauges are attached directly to the test specimen via the measuring edges and place an additional load on it depending on their own weight. Depending on the design, this measuring system can achieve a resolution of 0.1 µm to 0.05 µm, whereby analogue and incremental measuring principles are also available here.
With strain gauges, both sensors can always move, whereas with clip-on strain gauges, one pair of cutting edges is often fixed. The actual measurement signal is formed from the difference in path between the two measuring cutting edges in differential path measurement. It is irrelevant whether both pairs of cutting edges are movable or one is fixed (Fig. 11).
| Fig. 11: | Designs and measuring principle of strain extensometers and clip-on strain gauges |
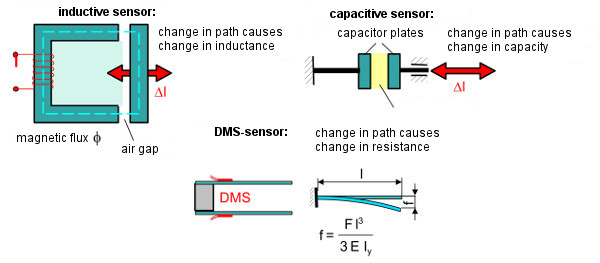
The operating principles used in these measuring devices are based on (Fig. 12)
- inductive
- capacitive or
- strain gauge
path measurement technology.
Inductive measuring sensors are mostly used for larger elongations and utilise the change in inductance of the moving air gap, which causes a change in current. Differential transducers with two inductors can significantly increase the resolution.
Capacitive sensors, like DMS sensors, are precision measuring devices particularly suitable for smaller elongations. The change in path causes a change in capacitance between the capacitor plates. Rotary capacitors, which are commonly used in radio technology, can also be used for longer paths.
The DMS transducers use, for example, small bending beams on which the DMS are applied. From the relationship between peripheral fibre strain and deflection, a differential signal for both sensor arms can be formed via the resistance changes of the WHEATSTONE bridge in the case of linear-elastic deformations.
| Fig. 12: | Illustration of the operating principles of strain extensometers and clip-on strain gauges |
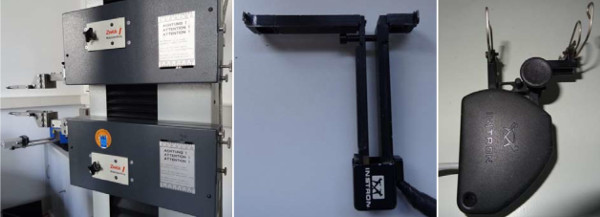
Figure 13 shows various strain measurement systems for universal testing machines.
| Fig. 13: | Multisens strain gauges (ZwickRoell GmbH & Co. KG, Ulm) and clip-on strain gauges with variable and fixed clamping length (Instron Deutschland GmbH, Pfungstadt) |
See also
- Tensile test and acoustic emission analysis
- in-situ-tensile test in ESEM with AE
- in-situ-tensile test in NMR
- Mikro-damage limits
- Round specimen
Reference
- Bierögel, C.: Tensile Test on Polymers. In: Grellmann, W., Seidler, S. (Eds.): Polymer Testing, Carl Hanser, Munich (2022), 3rd Edition, pp. 106–123 (ISBN 978-1-56990-806-8; e-book: ISBN 978-1-56690-807-5; see AMK-Library under A 22)

