Stiffness
| A service provided by |
|---|

|
| Polymer Service GmbH Merseburg |
| Tel.: +49 3461 30889-50 E-Mail: info@psm-merseburg.de Web: https://www.psm-merseburg.de |
| Our further education offers: https://www.psm-merseburg.de/weiterbildung |
| PSM on Wikipedia: https://de.wikipedia.org/wiki/Polymer Service Merseburg |
Stiffness
General information
The term stiffness is often used relatively uncritically in materials or polymer testing, and stiffness is frequently equated with the modulus of elasticity, even though the units of measurement for moduli and stiffness are different. In materials testing, there are two fundamental factors that influence the determination of characteristic values. These are the so-called machine stiffness as a property of a material testing machine and the stiffness of the test specimen, both of which influence the determination of characteristic values.
Depending on the type of material testing (tensile, compression, or bending test) and the absolute load level, the universal testing machine must have sufficient resistance to the unavoidable deformation of the load frame and the force measuring cell (see: electro-mechanical force transducer and piezoelectric force transducer). The tensile or compressive compliance of the testing machine with an identical load cell can be assumed to be almost the same, disregarding the clamping and extension elements. In the bending test, the influence of machine compliance is almost negligible, regardless of the direction of travel of the crosshead, since the forces in this test are significantly lower than in the compression or tensile test. A special case arises when torsion or shear tests (see: dynamic-mechanical analysis (DMA) – torsional stress) are performed, as the type of load and compliance of the special hybrid materials testing machine is different in this case. Analogous to the testing of materials with defined test specimen geometry, complex constructions such as machines, apparatus, or bridges, for example, also exhibit stiffness against stress-induced deformation, whereby in this case, different load cases may be dominant regardless of the type of stress (static, oscillating, or impact).
Definition of stiffness
The stiffness of a material is generally understood to be the elastic modulus or shear modulus for the respective type of stress in the linear-elastic or linear-viscoelastic (plastics) stress range. For tensile testing, this is the modulus of elasticity Et, for compression testing Ec, and for bending testing the flexural modulus Ef is used, while for torsion or shear testing the shear modulus G is used. For larger deformations, the elastic modulus is no longer used, but rather the increase in, for example, the stress–strain curve dσ/dε (see: tensile test) to describe the stiffness at a given deformation.
The stiffness of a component in relation to a specific load case is determined by its dimensions (e.g., wall thickness or outer diameter) and its structural design (e.g., geometric design, open or closed profiles, and ribbing). Due to different geometric parameters, the stiffness of a component or its resistance to mostly elastic deformation under varying loads will only match in exceptional cases.
In general, stiffness S in the sense of technical mechanics or strength theory usually represents the product of the stiffness of the material and the construction, which corresponds to a specific geometric variable. As a result, this parameter describes the combined resistance of the material and construction to elastic deformation due to an external force or moment (bending or torsional moment).
The stiffness of a structure or component (test specimen) is usually only defined for small elastic deformations and depends on the elastic properties (modulus M) of the material (plastic) as well as on the geometric conditions (G) relating to the main types of load on the component or test specimen and is generally calculated using Eq. (1). In material and polymer testing in particular, the term compliance C is often used instead of stiffness, which is defined according to Eq. (2) as the reciprocal of stiffness S.
| (1) |
| (2) |
For lightweight constructions, the specific stiffness Ss according to Eq. (3) is often used, as the mass of the component is of great importance here. This parameter is obtained by relating the stiffness to the average density ρ of the materials used in the construction, whereby different units of measurement result depending on the application and load case.
| (3) |
Tensile stiffnes
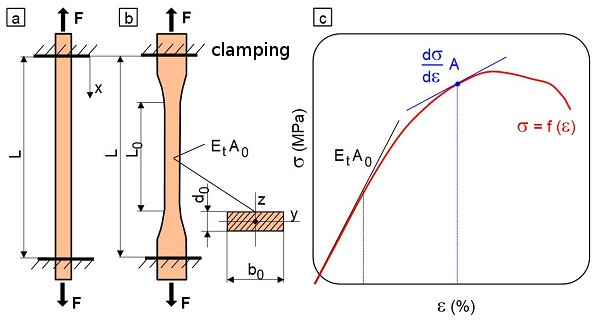
Tensile stiffness, often referred to as elongation stiffness, is the product of the modulus of elasticity under tensile stress Et of the material used in the direction of stress x and the cross-sectional area A0. This area is perpendicular to the direction of stress and is independent of the shape or geometry of the cross-section. For cross-sections that vary over their length, the smallest cross-sectional area must be used to calculate the tensile stiffness. In the case of tensile test specimens, the plane-parallel part of the test specimen must therefore be used.
In tensile testing, prismatic [1] or multipurpose test specimens of type 1A or 1B [2] are sometimes used in polymer testing, whereby the latter have shoulders on both sides for better clamping (Fig. 1) (see: specimen clamping). In the case of prismatic test specimens, the specimen stiffness St is constant within the clamping length L and is calculated according to Eq. (4) for linear-elastic deformation. This equation also applies to shoulder test specimens, but only in the plane-parallel part of the test specimen (Fig. 1a and 1b).
| (4) |
If the strain in the tensile test exceeds the linear-viscoelastic range, initial micro-damage occurs, the stress–strain curve bends, and the test specimen cross-section decreases in accordance with the Poisson's ratio of the respective material.
For this reason, Eq. (5) must be used to describe the current stiffness of the specimen, which is only valid for the instantaneous strain of the test specimen (Fig. 1c). This equation therefore only applies to the unimpeded transverse contraction of the test specimen or component, i.e., in the case where no stresses occur in the y and z directions and the current cross-section A is known (see: uniaxial and multiaxial stress state).
| (5) |
| Fig. 1: | Schematic explanation of tensile stiffness |
The compliance under tensile stress Ct is calculated as the reciprocal of the tensile stiffness St according to Eq. (6) and is expressed in the unit 1/N. Compliance decreases with increasing cross-sectional area and/or increasing modulus of elasticity Et.
| (6) |
Compressive and buckling stiffness
The stiffness under compressive stress (see also: compression test compliance) is calculated in the same way as for tensile stress, but different stress cases arise depending on the test specimen length, cross-section, and storage conditions of the test specimen.
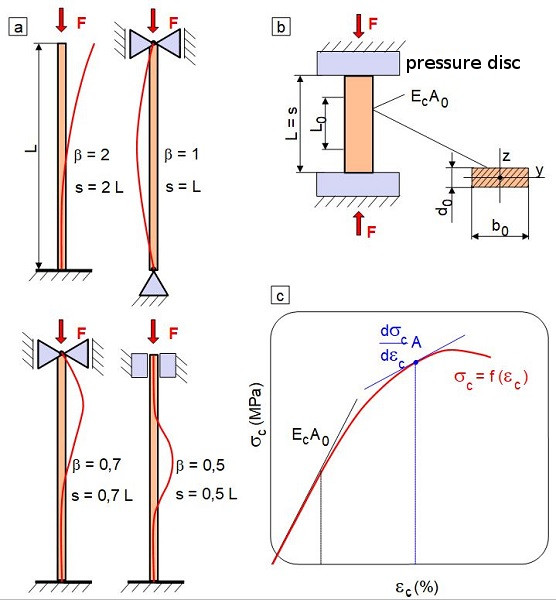
In the case of very long, slender component geometries or test specimens, a special failure case occurs, which is also known as EULER buckling (named after the Swiss mathematician and physicist Leonhard Euler) (Fig. 2a) and represents an instability problem [3]. Depending on the storage conditions, geometry, and modulus of elasticity of the test specimen, lateral buckling (bending buckling) can occur as a result of compressive stress at a critical load. In the case of torsion or bending with torsion, however, twist or bending-twist buckling (tilting) can lead to failure. In the elastic deformation range, the critical buckling load or compressive stress Fk is calculated according to Eq. (7) and the corresponding buckling stress σk is obtained according to Eq. (8).
| (7) |
| (8) |
In Eq. (7), Ec is the modulus of elasticity under compressive stress, Iy is the minimum axial moment of area of the section, and s is the so-called buckling length, which is the product of the buckling length coefficient β and the test specimen length L (s = β L). The value λ is referred to as the slenderness ratio and is calculated according to Eq. (9), where Iy is the so-called smallest radius of inertia according to Eq. (10).
| (9) |
| (10) |
| Fig. 2: | Buckling behaviour and compressive stiffness |
The support conditions in the compression test (Fig. 2b) correspond to the second elastic buckling case in Fig. 2a, whereby s = L applies. To prevent buckling of the test specimens in the compression test, the slenderness ratio λ should be between 6 and 10, which is why the length L of a prismatic test specimen is calculated according to Eq. (11) [4, 5].
| (11) |
For prismatic test specimens or components, the specimen stiffness Sc is constant within the clamping length L and is calculated according to Eq. (12) for linear-elastic deformation.
| (12) |
If the compressive strain in plastics exceeds the linear-viscoelastic range in the compression test, micro-damage occurs and the compressive stress–compressive strain curve becomes increasingly non-linear. Therefore, Eq. (13), which is valid for the instantaneous compressive strain of the test specimen and the true cross-sectional area A, must be used to describe the current stiffness of the specimen (Fig. 2c).
| (13) |
Analogous to tensile stress, compressive stiffness Cc is also calculated as the reciprocal of stiffness Sc according to Eq. (14) and is specified in the unit of measurement 1/N.
| (14) |
Bending stiffness
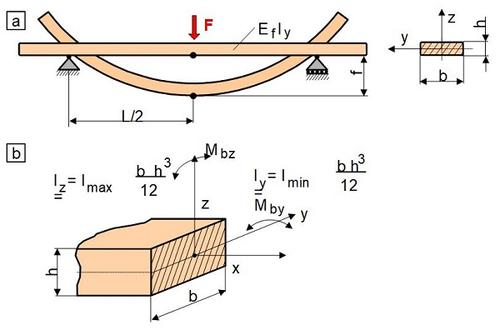
In bend loading, the geometric variable describing stiffness is the axial moment of inertia, regardless of whether three-point or four-point bending is involved. However, it is important to note whether the bending of a component or test specimen occurs around the y-axis or z-axis, as is common in impact bending tests, for example. In these cases, the minimum or maximum axial moment of inertia Iy or Iz must be used (Fig. 3). In this case, the minimum bending stiffness is calculated as the product of the modulus of elasticity under bending stress and the axial moment of inertia Iy (see also: bend test compliance).
In the three-point bending test on plastics [6], bending is usually performed around the y-axis of the prismatic test specimen, so that the specimen stiffness is calculated according to Eq. (15).
| (15) |
In the case of a non-linear flexural stress–peripheral fibre strain curve (see: bend loading and peripheral fibre strain), Eq. (16) is used to describe the current flexural stiffness (see Fig. 3c).
| (16) |
| Fig. 3: | Explanation of bending stiffness |
Information on bending stiffness is more complicated if there is a so-called skew bending at any angle between the y- and z-axes, i.e., two bending moments Mbz and Mby act simultaneously. In this case, the minimum and maximum area moments of inertia Iy and Iz from the geometric limits for the bending stiffness.
Analogous to tensile stress, the compliance Cf under bending is also calculated as the reciprocal value of the specimen stiffness Sf according to Eq. (17) and has the unit of measurement 1/N mm2.
| (17) |
Shear stiffness
In the case of shear stress (see: shear modulus), depending on the specific load case, more complex stress distributions occur than in the case of ideal uniaxial stress. For example, in the case of single or double-cut shearing or coupling connections in pipes, the shear area As = A·γ (Figs 4a and 4b) is particularly important, whereas in the case of bending stress due to transverse forces in the cross-section, especially of layered materials (laminates and prepregs), a parabolic stress distribution τ(h) is recorded (Fig. 4c), with a maximum at h/2.
By definition, the shear stiffness is the product of the shear modulus G and the effective cross-sectional area A and is calculated according to Eq. (18), whereby the correction factor γ is intended to approximately account for the non-uniform parabolic stress distribution τ(h) in the cross-section (Fig. 4c).
| (18) |
The unit of measurement for shear stiffness is given in N, and compliance is determined as the reciprocal value with Cs = 1/Ss.
| Fig. 4: | Explanation of shear stiffness in shear and bending tests |
Torsional stiffness
The torsional stiffness Sto, also referred to as twisting stiffness, corresponds to the product of the shear modulus G and the torsional moment of inertia It, and calculation Eq. (19) only applies in the elastic deformation range for small angles of twist φt.
| (19) |
The torsional moment of inertia It refers to the component or test specimen axis x, around which it is twisted or rotated as a result of an applied torsional moment Mt (Fig. 5a). Depending on the type of torsional stress present–torsion without warping with no normal stress (Neuber theory for closed profiles), torsion with unimpeded warping (Saint-Vernant theory), or warping force torsion—different conditions apply for the exact specification of torsional stiffness.
At the same time, the torsional moment of inertia It is only identical to the polar moment of inertia Ip in special geometric cases, i.e., for closed box, circular, rectangular, or tubular profiles, and can be determined using relatively simple calculation equations according to It = Ip = Iy + Iz (Fig. 5b). In all other cases, especially for complex geometries, approximate solutions must be used to specify the torsional moment of inertia.
In the torsion test, the torsional stiffness of a prismatic test specimen is calculated as the product of the shear modulus G and the polar moment of inertia Ip (Fig. 5b) according to Eq. (20).
| (20) |
The specimen compliance Cto in the torsion test is also defined as the reciprocal value of the specimen stiffness Sto according to Eq. (21) and has the unit of measurement 1/N mm2.
| (21) |
| Fig. 5: | Explanation of torsional stiffness and torsional moment of inertia |
Application of stiffness
When dimensioning more complicated components or complex constructions, the basic requirements for stiffness in the various main stress directions must be taken into account. In particular, consideration must also be given to how the requirement profile changes as a result of media, thermal, corrosive, and erosive influences, as well as ageing. The interactions of the main stresses must be taken into account, as well as the superimposition of different load collectives, such as static and vibrating stresses.
From this perspective, a bridge structure, for example, must have sufficient bending stiffness in both main axes to withstand static and dynamic loads, while also ensuring sufficient tensile and compressive stiffness in detail. Connecting elements must also have sufficient shear stiffness. Additional stresses, such as static or dynamic wind loads, must be taken into account by ensuring the necessary torsional stiffness, e.g. by selecting a suitable basic design and ribbing. Since these requirements are sometimes mutually exclusive, such a complex construction always represents a compromise, which, however, should not have any weak points when subjected to stress.
The collapse of the Tacoma Bridge in the USA in 1940, which was built in 1938, shows the effects of choosing the wrong basic design. By selecting a torsionally flexible open profile instead of a closed box profile, strong winds caused torsional vibrations in the bridge, which ultimately led to its collapse [7]. Amateur film footage impressively documents the strong vibrations of this bridge structure.
See also
- Machine compliance
- Specimen compliance
- Compression test compliance
- Tensile test compliance
- Bend test compliance
References
| [1] | ISO 527-5 (2021-11): Plastics – Determination of Tensile Properties – Part 5: Test Conditions for Unidirectional Fibre-reinforced Plastic Composites |
| [2] | ISO 527-2 (2025-06): Plastics – Determination of Tensile Properties – Part 2: Test Conditions for Moulding and Extrusion Plastics |
| [3] | Szabo, I.: Einführung in die Technische Mechanik. Springer, Berlin (1984) 8th Edition, (ISBN 3-540-13293-7; see AMK-Library under T 15) |
| [4] | Bierögel, C.: Quasistatische Prüfverfahren. In: Grellmann, W., Seidler, S. (Eds.): Kunststoffprüfung. Carl Hanser, Munich (2025) 4th Edition, pp. 106–151 (ISBN 978-3-446-44718-9; E-Book: ISBN 978-3-446-48105-3; see AMK-Library under A 23) |
| [5] | ISO 604 (2002-03): Plastics – Determination of Composite Properties |
| [6] | ISO 178 (2019-04): Plastics – Determination of Flexural Properties |
Weblinks
| [7] | https://www.youtube.com/watch?v=3mclp9QmCGs |


