Tensile Test Compliance
| A service provided by |
|---|

|
| Polymer Service GmbH Merseburg |
| Tel.: +49 3461 30889-50 E-Mail: info@psm-merseburg.de Web: https://www.psm-merseburg.de |
| Our further education offers: https://www.psm-merseburg.de/weiterbildung |
| PSM on Wikipedia: https://de.wikipedia.org/wiki/Polymer Service Merseburg |
Tensile test compliance
Machine compliance
In tensile tests to characterise the deformation behaviour or elastic properties of plastics, it may not be possible to use measuring devices for direct measurement of the strain on the test specimen (strain extensometer, clip-on extensometer or optical sensors; see tensile test path measurement). This is the case, for example, if measurements are to be taken in a temperature control chamber or if the deformation behaviour of plastics with graduated glass or carbon fibre contents is to be compared. When performing conventional tensile tests with a constant crosshead speed in accordance with ISO 527-2 [1], the test conditions and the determination of characteristic values are influenced by various factors. Due to the applied stress, the various components of the material testing machine are deformed, which is also known as machine compliance and is of great importance for traverse path measurement.
The deformation of the machine crossbars and spindles as well as the drive slip (see: drives for materials testing machines), the bending of the crosshead and the traverse are included in the measurement signal as ΔLF, whereby the absolute errors are relatively small here. A larger proportion is contributed by the deformation of the deformation body of the force measuring cell (see: electro-mechanical force transducer and piezoelectric force transducer) ΔLK and, in particular, the slip in the clamping jaws ΔLE.
The quality and operating principle of the clamping jaws significantly determine the measurement result in the deformation channel and thus significantly influence the elastic values, such as modulus of elasticity or strain limits.
Influence of test specimen clamping
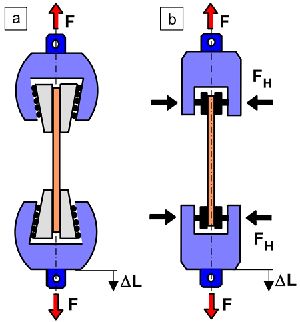
The importance of the quality of the specimen clamping becomes clear when comparing the wedge clamp and the parallel clamping device (Fig. 1). Due to the rollers of the wedge clamping device, the holding function is only achieved with increasing test load, which creates an additional path that enters the measurement signal and can cause strong start-up behaviour. In contrast, the parallel clamp only causes minimal misalignment, which is further reduced when pneumatically or hydraulically pressing clamps are used. However, the result of the test is also influenced by the type of clamp inserts fine or coarse file cut, hard rubber.
| Fig. 1: | Comparison of wedge clamp a) and parallel clamp b) |
The path measurement signal ΔLM therefore consists of the sum of the individual deformation components of the test device ΔLM = ΔLP + ΔLF + ΔLK + ΔLE and thus essentially determines the compliance of the test system. Any configuration change made by the user of the testing machine (electro-mechanical force transducer, extension rods, clamping jaws or jaw inserts) changes the value of the compliance K.
Determination of machine compliance
Due to configuration dependency, machine compliance is not usually specified by the manufacturer of the universal testing machine. If it is, the compliance in mm/kN is usually only the reciprocal of the stiffness of the load frame without additional equipment and often corresponds only to a calculated value. Since, in the case of traverse path measurement, the compliance depends on the additional equipment used, some of which is developed in-house, many testing machine manufacturers have integrated software modules into the testing software that allow the specific compliance and a corresponding correction curve to be determined. This means that optimum displacement measurement and positioning accuracy can be guaranteed via the crosshead transducer even without the use of special strain gauges or displacement transducers (see: Tensile test path measurement technology). However, it should be emphasised at this point that even the best correction curves cannot replace high-precision strain transducers that measure the deformation directly on the test specimen.
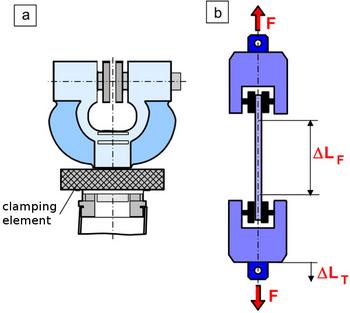
| Fig. 2: | Tensioning the test clamp (a) and determining the compliance curve (b) |
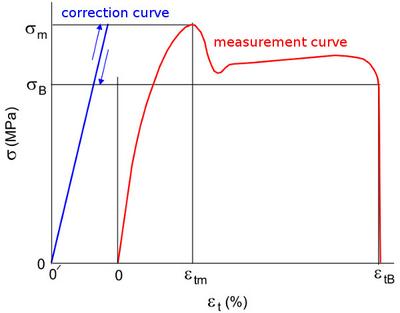
To determine the yield strength Ct in the tensile test, a test specimen with high tensile stiffness Et · A0 and minimal deformation under the test force to be used should be selected. The individual elements in the load path of the universal testing machine (linkage, clamps) should be braced under a load of approx. 90 % of the nominal load of the force measuring device (Fig. 2a). After the test specimen, e.g. made of steel, has been aligned and clamped, the tensile test is performed at a low test speed up to the nominal load of the force measuring device and then unloaded again while recording the data of the traverse path and the sensor path (Fig. 2b). The corresponding correction curve ΔLT(F) can be calculated from the loading and unloading curve by regression. Subtracting the deformation ΔLF of the test specimen then produces the correction curve that can be used for the compliance correction online in the tensile test or offline in post-processing using Excel® or Origin®. Depending on the test load, the self-deformation component is then subtracted from the measurement signal of the traverse path (Fig. 3). This significantly improves the accuracy and control behaviour, even in controlled tests.
| Fig. 3: | Application of the correction curve in the tensile test with traverse path measurement |
See also
References
| [1] | ISO 527-2 (2025-06): Plastics – Determination of Tensile Properties – Part 2: Test Conditions for Moulding and Extrusion Plastics |
Additional literature
- Bierögel, C., Grellmann, W.: Quasi-Static Tensile Test. In: Grellmann, W., Seidler, S.: Mechanical and Thermomechanical Properties of Polymers. Landolt-Börnstein, Volume VIII/6A3, Springer, Berlin (2014) pp. 76–143, (ISBN 978-3-642-55165-9; see AMK-Library under A 16)


