Specimen Compliance
| A service provided by |
|---|

|
| Polymer Service GmbH Merseburg |
| Tel.: +49 3461 30889-50 E-Mail: info@psm-merseburg.de Web: https://www.psm-merseburg.de |
| Our further education offers: https://www.psm-merseburg.de/weiterbildung |
| PSM on Wikipedia: https://de.wikipedia.org/wiki/Polymer Service Merseburg |
A-Bild-Technik
General
In material or polymer testing, the term ‘compliance’ refers to two fundamental factors that influence the determination of characteristic values. These are the so-called machine compliance as a property of a material testing machine and the stiffness of the test specimen, also referred to as specimen stiffness.
Depending on the type of material test (tensile, compression or bend test) and the absolute load level, the universal testing machine must have sufficient resistance to the unavoidable deformation of the load frame and the force measuring cell (see: electro-mechanical force transducer and piezoelectric force transducer). The tensile or compressive compliance of the testing machine with identical force transducers can be assumed to be almost the same, disregarding the clamping and extension elements. In the bending test, the influence of machine compliance is almost negligible regardless of the direction of traverse, as the forces in this test are significantly lower than in the compression or tensile test. A special case occurs when torsion tests (see: dynamic-mechanical analysis (DMA) – torsional stress) are performed, as a different type of load and deflectibility of the special materials testing machine is then present.
Regardless of the type of test, the test specimen resists the imposed deformation, which is referred to as specimen compliance. The stiffness of the machine and the specimen must be in a balanced relationship to avoid influences on the determination of material values and the control of the testing machines (see: tensile test control).
Machine stiffness
In materials testing, machine compliance or compliance C describes the self-deformation of the closed load frame of universal testing machines with two or four frame columns [1, 2] or the expansion of the load frame, e.g. of hardness testing machines [3, 4] or testing machines with a central drive spindle.
If a universal testing machine is used to perform tensile tests, compression tests (see also: compression test arrangement) and bending tests, then in addition to the deformation of the test specimen, a deformation of the testing machine occurs, which depends significantly on the stiffness of the design, the materials used, the force transducer used and the connection and coupling elements. The different deformation components of a testing machine consist of the self-deformation of the testing machine, which is not infinitely rigid. These are the bending of the crosshead and the traverse, as well as the extension of the load-bearing columns and the drive spindle (see: drives materials testing machines), the absolute value of which is, however, comparatively low. Depending on the nominal capacity of the force measuring device, deformations of the elastic deformation body are also included in the overall measurement signal. Since experience has shown that the connecting rods always have some tolerance, additional deformations occur, which depend in particular on the number of connecting elements and their design. However, the greatest influence is exerted by the clamping elements, whereby significant differences occur here depending on the design of the clamping device. In the case of tensile tests, wedge clamps exhibit the greatest misalignments and parallel clamps with retensioning exhibit the smallest deformations. In compression and bending tests, the influence of the support elements is significantly lower. In principle, machine compliance without specific test accessories is orders of magnitude higher than in actual material or plastic tests.
Specimen stiffness
The stiffness of a material is usually understood to be the elasticity or shear modulus for the respective type of stress in the linear-elastic stress range. For tensile testing, this is the modulus of elasticity Et, for compression testing Ec and for bending testing the flexural modulus Ef is used, while for torsion or shear testing the shear modulus G is used. For larger deformations, the modulus of elasticity is no longer used; instead, the increase in, for example, the stress–strain curve dσ/dε (see: tensile test) is often used to describe the stiffness at a given deformation.
The stiffness of a component in relation to a specific load case is determined by its dimensions (e.g. wall thickness or outer diameter) and its design (e.g. geometric design, open or closed profiles or ribbing). Due to different geometric parameters, the stiffness of a component or its resistance to deformation under different stress states will only match in exceptional cases, which is why complex loads (e.g. tension, bending and torsion) represent a challenge even without oscillating or impact loads.
The specimen stiffness S in materials testing is usually the product of the stiffness of the material and a special geometric variable. Due to the requirements of materials testing and the test specimen shape optimised for the tests, different specimen stiffnesses are used.
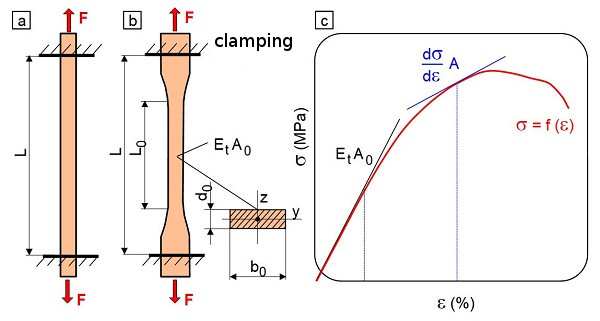
| Fig. 1: | Schematic explanation of specimen compliance in tensile testing |
In tensile tests, prismatic [5] or multipurpose test specimens of type 1A or 1B are sometimes used in plastics testing [6], the latter having shoulders on both sides for better clamping (Fig. 1). In the prismatic test specimen, the specimen stiffness St is constant within the clamping length L and is calculated according to Eq. (1) for a linear-elastic deformation. This equation also applies to the shoulder test specimen, but only in the plane-parallel part of the test specimen (Fig. 1a and b).
| (1) |
If the elongation in the tensile test exceeds the linear-viscoelastic range, initial microdamage occurs, the stress–strain curve curves and the specimen cross-section decreases in accordance with the Poisson's ratio of the respective material.
For this reason, Eq. (2) must be used to describe the current stiffness of the specimen, which is only valid for the momentary strain of the test specimen (Fig. 1c).
| (2) |
The specimen compliance in the tensile test Ct is calculated as the reciprocal of the specimen stiffness St according to Eq. (3) and is expressed in the unit 1/N. The specimen compliance decreases with increasing test piece cross-section and/or increasing modulus of elasticity Et.
| (3) |
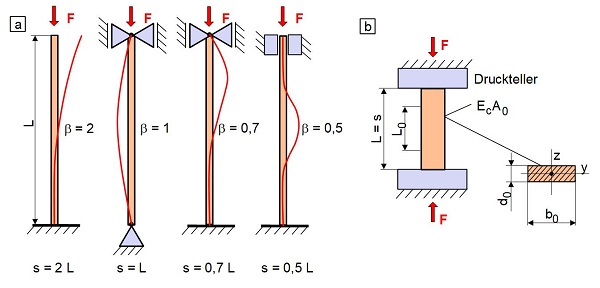
The specimen stiffness in the compression test is calculated in the same way as for the tensile test, but different stress cases arise depending on the length of the test specimen, its cross-section and the storage conditions. In very long, slender test specimens, a special failure case occurs, which is also known as EULER buckling (Fig. 2a) and represents an instability problem [7]. Depending on the storage conditions, geometry and modulus of elasticity of the test specimen, lateral buckling (bending buckling) may occur as a result of compressive stress at a critical load. In the case of torsion or bending with torsion, however, drill buckling or bending drill buckling (tipping) can lead to failure. In the elastic deformation range, the critical buckling load or compressive stress Fk is calculated according to Eq. (4) and the buckling stress σk is obtained according to Eq. (5).
| (4) |
| (5) |
In Eq. (4), Ec is the modulus of elasticity under compressive stress, Iy is the minimum axial moment of inertia, and s is the buckling length, which is the product of the buckling length coefficient β and the test piece length L (s = β L). The value λ is referred to as the slenderness ratio and is calculated according to Eq. (6), where iy is the so-called minimum radius of inertia according to Eq. (7).
| (6) |
| (7) |
| Fig. 2: | Buckling behaviour and specimen deflection in compression test |
The support conditions in the compression test (Fig. 2b) correspond to the second elastic buckling case in Fig. 2a, whereby s = L applies. To prevent buckling of the test specimens in the compression test, the slenderness ratio λ should be between 6 and 10, which is why the length L of a prismatic test specimen is calculated according to Eq. (8) [8].
| (8) |
For the prismatic test specimen, the specimen stiffness Sc is constant within the clamping length L and is calculated according to Eq. (9) for a linear-elastic deformation.
| (9) |
If the compression in the compression test exceeds the linear-viscoelastic range, microdamage occurs and the stress-strain curve becomes increasingly non-linear. Eq. (10), which is valid for the momentary compression of the test specimen, must then be used to describe the current stiffness of the specimen (see Fig. 1c).
| (10) |
Analogous to the tensile test, the specimen compliance Cc in the compression test is also calculated as the reciprocal of the specimen stiffness Sc according to Eq. (11) and is expressed in the unit 1/N.
| (11) |
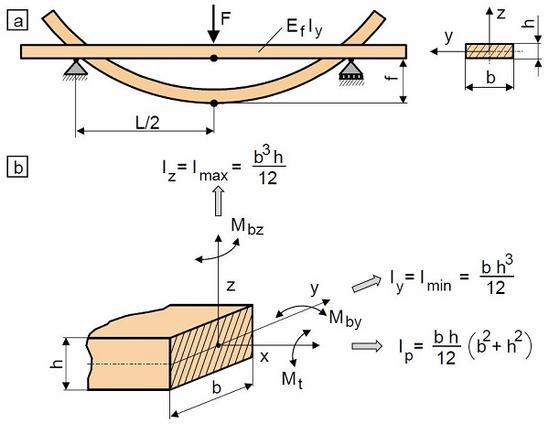
| Fig. 3: | Specimen compliance in bending and torsion tests |
In the bending test, the geometric parameter describing stiffness is the axial moment of inertia, regardless of whether three-point or four-point bending (see: bend test) is used. However, it is important whether the bending is around the y-axis or z-axis, as is common in impact tests. In these cases, the minimum or maximum axial moment of inertia Iy or Iz must be used (Fig. 3a). In the three-point bending test on plastics [9], bending is usually performed around the y-axis of the prismatic test specimen, so that the specimen stiffness is calculated according to Eq. (12).
| (12) |
In the case of a non-linear bending stress–peripheral fibre strain curve (see: bend loading), Eq. (13) is used to describe the current stiffness of the specimen (see Fig. 1c).
| (13) |
Analogous to the tensile test, the specimen compliance Cf in the bending test is also calculated as the reciprocal value of the specimen stiffness Sf according to Eq. (14) and is expressed in the unit 1/N mm2.
| (14) |
In the torsion test, the stiffness of a prismatic test specimen is calculated as the product of the shear modulus G and the polar area moment of inertia Ip (Fig. 3b) according to Eq. (15).
| (15) |
The specimen compliance Cto in the torsion test is also defined as the reciprocal value of the specimen stiffness Sto according to Eq. (16) and has the unit 1/N mm2.
| (16) |
The specimen's compliance in the respective test requires the absence of notches and notch stresses. In the case of geometrically complex test specimens, such as CT-specimens, the complex stress conditions make it extremely difficult to specify compliance values, so that numerical solution variants are generally used here.
See also
- Stiffness
- Machine compliance
- Compression test compliance
- Bend test compliance
- Tensile test compliance
- Material testing machine
References
| [1] | Heimbrodt, P.: Einfluss der Prüfmaschine auf die Kennwerte des Zugversuches. Bergakademie Freiberg, Master-Thesis (1976) |
| [2] | Instron Bluehill: Referenzhandbuch – Software für Berechnungen Rev. 1.1 (2006) |
| [3] | Reimann, E.: Bestimmung mechanischer Werkstoffkennwerte, Ergebnisse des instrumentierten Eindringversuchs im Makrobereich. Materialprüfung 42 (2000) 10, pp. 411–415 |
| [4] | Zügner, S.: Untersuchungen zum elastisch-plastischen Verhalten von Kristalloberflächen mittels Kraft-Eindringtiefen-Verfahren. Dissertation, Bayerische Julius-Maximilians-Universität Würzburg (2002) |
| [5] | ISO 527-5 (2021-11): Plastics – Determination of Tensile Properties – Part 5: Test Conditions for Unidirectional Fibre-reinforced Plastic Composites |
| [6] | ISO 527-2 (2025-06): Plastics – Determination of Tensile Properties – Part 2: Test Conditions for Moulding and Extrusion Plastics |
| [7] | Szabo, I.: Einführung in die Technische Mechanik. Springer, Berlin (1984), 8th Edition, (ISBN 3-540-13293-7; see AMK-Library under T 15) |
| [8] | Bierögel, C.: Quasi-static Test Methods. In: Grellmann, W.,Seidler, S. (Eds.): Polymer Testing. Carl Hanser, Munich (2022) 3rd Edition, pp. 101–143, (ISBN 978-1-56990-806-8; E-Book: ISBN 978-1-56990-807-5; see AMK-Library under A 22) |
| [9] | ISO 178 (2019-04): Plastics – Determination of Flexural Properties |


