CT-Specimen
| A service provided by |
|---|

|
| Polymer Service GmbH Merseburg |
| Tel.: +49 3461 30889-50 E-Mail: info@psm-merseburg.de Web: https://www.psm-merseburg.de |
| Our further education offers: https://www.psm-merseburg.de/weiterbildung |
| PSM on Wikipedia: https://de.wikipedia.org/wiki/Polymer Service Merseburg |
CT-specimen or written in full Compact tension (CT) specimen
The Anglo-Saxon abbreviation CT stands for ‘Compact Tension’ and the CT-test specimen is referred to in German as a compact tensile test specimen.
Requirements for test specimen geometry
When experimentally determining fracture mechanical values (see: fracture mechanical testing), the following basic conditions must be observed:
- Under the respective test conditions, the test specimen dimensions must be significantly larger than the extent of the plastic zone at the crack tip.
- The force, notch expansion (see: crack opening) and load-load application point displacement must be continuously measurable.
- To calculate the stress intensity factor K at the moment of unstable crack propagation, the stress on the test specimen and the critical crack length must be precisely determinable.
- For the corresponding test specimen geometry, the determining equation, i.e. the relationship between stress and crack length, must be known.
In order to fulfill these requirements, a series of specifications were established based on ASTM standard E 399 [1] and incorporated into the existing standards.
Test specimen shape
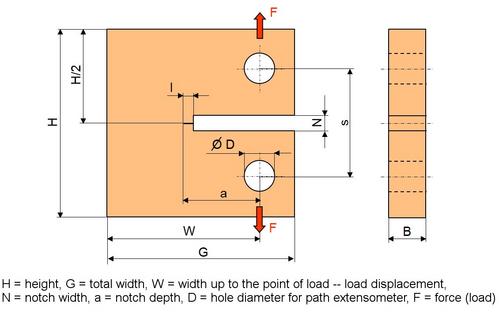
| Fig.: | Schematic illustration of the CT-specimen |
Dimension (according [1, 2]):
W = 2 B, special shape: W = B to 4 B
s = 0.55
H = 1.2 W
a = (0.35–0.55) W
D = 0.25 W
G = 1.25 W
Typical dimensions for plastics [3. 4]:
Example 1: Designation: 48 mm x 50 mm-specimen
W = 40 mm, B = 10 mm, H = 48 mm, G = 50 mm, D = 10 mm, L = 12 mm, a = 18 mm, s = 22 mm, N = 2 mm
Example 2: Designation: 96 mm x 100 mm-specimen
W = 80 mm, B = 3...10 mm, H = 96 mm, G = 100 mm, D = 20 mm, L = 36 mm, a = 38 mm, s = 44 mm, l = 2 mm
Determination equation [1]
Designation according thickness B:
CT 10, CT 15, CT 20, CT 30
Geometry criterion for metals:
Geometry criterion for plastics:
It is valid: Re = y = Yield stress (yield point)
The geometry constant β depends on the material (see also: geometry criterion, fracture toughness).
A comprehensive summary of suitable test specimens for fracture mechanics investigations on plastics and composite materials is included in fracture mechanics test specimens.
See also
- Specimen for fracture mechanics tests
- Compact tension specimen
- Geometry function
- Laser double-scanner
- Hybrid methods, examples
- Laser multi-scanner
- Toughness temperature dependence
References
| [1] | ASTM E 399 (2024): Standard Test Method for Linear-Elastic Plane-Strain Fracture Toughness of Metallic Materials |
| [2] | Blumenauer, H., Pusch, G.: Technische Bruchmechanik. Deutscher Verlag für Grundstoffindustrie, Leipzig Stuttgart (1993) 3rd Edition, (ISBN 3-342-00659-5; see AMK-Library under E 29-3) |
| [3] | Grellmann, W., Seidler, S. (Eds.): Deformation and Fracture Behaviour of Polymers. Springer, Berlin Heidelberg (2001) (ISBN 978-3-540-41247-6; e-Book: ISBN 978-3-662-04556-5; see AMK-Library under A 7) |
| [4] | Grellmann, W., Seidler, S. (Eds.): Polymer Testing. Carl Hanser, Munich (2022) 3rd Edition, pp. 233/234 (ISBN 978-1-56990-806-8; E-Book: ISBN 978-1-56990-807-5; see AMK-Library under A 22) |


