Thermography
| A service provided by |
|---|

|
| Polymer Service GmbH Merseburg |
| Tel.: +49 3461 30889-50 E-Mail: info@psm-merseburg.de Web: https://www.psm-merseburg.de |
| Our further education offers: https://www.psm-merseburg.de/weiterbildung |
| PSM on Wikipedia: https://de.wikipedia.org/wiki/Polymer Service Merseburg |
Thermography
Thermography
Thermography is a non-destructive testing method used in materials and component testing. It is based on thermal radiation, or more precisely, on the measurement of the intensity of electromagnetic waves in the infrared range. Typical applications can be found in the construction industry, aircraft manufacturing and machine monitoring. This measurement method is used for quality control. In plastics diagnostics, thermography is used in conjunction with experimental methods of fracture mechanics to quantify the onset of damage, for example by coupling in-situ fracture mechanics experiments with non-destructive methods. A hybrid method used at Polymer Service GmbH Merseburg is the coupling of acoustic emission and thermography with tensile testing on a statically stressed CT-specimen or multi-purpose test specimen.
General information
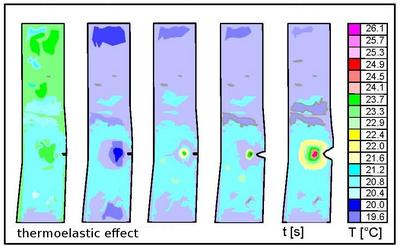
Depending on the excitation, this test method is divided into passive and active thermography. In passive thermography, the test object is also the heat source. Active thermography uses an external heat source to heat up the test object, which then radiates the absorbed heat in all directions. The infrared radiation emitted by the test object is recorded by the measuring device, the thermal imaging camera. The detectors in the camera respond to the wavelength range of the infrared spectrum. The intensity values are then displayed on a screen in greyscale or false colour representation. This is illustrated by a thermal image in Figure 1 [1]. Here, a notched PA 6 multi-purpose test specimen was subjected to tensile stress in a tensile test. After calibration, temperatures can be assigned to the individual image pixels. A colour scale is provided on the right-hand side of Figure 1 for this purpose.
| Fig. 1: | Thermoelastic effect under short-term tensile stress of glass fibre reinforced PA 6 [1] |
In the case of the example shown in Figure 1, statements can be made about the temperature distribution on the surface of the test specimen under a specific load regime. This allows conclusions to be drawn about the internal friction, which can be determined precisely using dynamic-mechanical analysis (DMA).
Physical fundamentals
Thermal imaging cameras detect electromagnetic radiation in the infrared range. This range covers wavelengths from 780 nm to 1 mm. The cameras have a field of detectors (photocells) that are sensitive to these wavelengths.
When viewing various objects in an air-conditioned room (see also: standard atmospheres) through a thermal camera, the thermal imaging camera still detects heat sources with different radiation amplitudes. The reason for this is that the objects are made of different materials and have surface properties that can vary greatly.
Reflection, transmission and absorption of thermal radiation
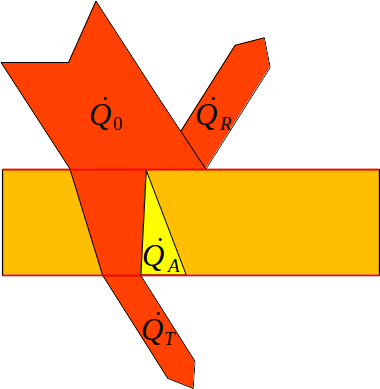
Heat radiation is described by the heat flow emanating from the heat sources. When a heat flow (heat ray) hits an object, the laws of geometric optics apply in principle (Figure 2).
| Fig. 2: | Schematic representation of heat radiation on a plate |
When a heat hits a body, part of it is reflected (), part is transmitted () and part is absorbed by the body (). This results in (see Figure 2)
| (1) |
The proportions or individual radiation coefficients on the right-hand side of Eq. (1) are obtained by dividing both sides by the heat flux incident on the body :
| (2) |
However, it should be noted that the heat flows on the right-hand side of Eq. (1) generally depend on the wavelength – and on the material – and thus also the coefficients in Eq. (2).
Emission of thermal radiation
The thermal radiation absorbed from the environment increases the internal energy of the body. However, it also releases this energy back into the environment. This is the content of KIRCHOFF's law of radiation: the absorbed heat radiation is equal to the emitted heat radiation, which is expressed in Eq. (3) by the absorption coefficient (degree of absorption) α and the emission coefficient (degree of emission) ε:
| (3) |
This is also the reason why thermal imaging cameras display objects in a room with different grey or colour values, because each body has a specific emission coefficient depending on its internal energy, material and surface properties.
Principle of thermography
According to STEFAN-BOLTZMANN's law, the heat flow from a body with an area A is proportional to the fourth power of the temperature:
| (4) |
Here, σ is the Stefan-Boltzmann radiation constant (), ε is the emission coefficient, A is the emitting surface of the body, and TK is its temperature (in K). At the same time, this body absorbs a heat flux from its surroundings, which represents the sum of all heat fluxes from nearby bodies:
| (5) |
Due to Eq. (3),(4) and (5) can be combined, taking Eq. (3) into account. This means that the heat flow emitted by a body that can be detected by a thermal imaging camera is:
| (6) |
It is equal to the radiated power emitted, for example, by a test specimen subjected to periodic mechanical stress (see Fig. 1). The corresponding stress–strain diagram (see also: Tensile test) exhibits hysteresis, with the area enclosed by the two curves representing the heat losses generated by internal friction in the test specimen. In plastics, internal friction is described by the imaginary part of the complex modulus of elasticity: . The imaginary part is approximately , where represents the viscoelastic loss factor (see Dynamic-mechanical analysis (DMA) – General principles) [3]. The loss work performed by the internal friction is therefore , where is the strain (the double designation of emissivity and strain has been retained here due to its use in the literature, but formatted differently). This results in the heat output generated with as the angular frequency at which the test specimen is periodically loaded:
| (7) |
However, the heat output in Eq. (7) is nothing other than the heat flow in Eq. (6) that reaches the thermal imaging camera.
Application in materials testing
Passive thermography
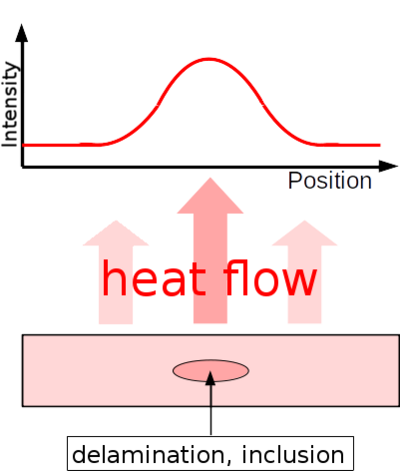
This form of thermographic measurement is used when the object being examined has its own heat source or acts as one. This is the case, for example, when an injection-moulded test piece leaves the mould and cools down. With the help of geometric data, the thermal imaging camera can observe the different local cooling functions and immediately detect irregularities in comparison to a reference object. An example is shown schematically in Fig. 3 opposite.
The heated test specimen emits infrared waves into the environment, causing it to cool down. Due to the different heat conduction properties of delaminations and inclusions, higher intensities of infrared radiation occur at these points.
The quality of joining processes such as ultrasonic or friction stir welding can also be monitored with a thermal imaging camera [4, 5].
| Fig. 3: | How passive thermography works |
Active thermography
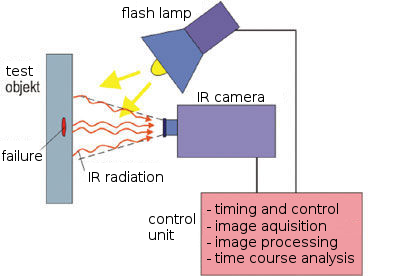
Active thermography uses an external heat source, which often operates in pulse mode. This allows a stationary image of the test object to be captured, thereby significantly improving the resolution [6]. Figure 4 shows an example of the measurement setup for pulse thermography [7]. The flash lamp generates a short heat pulse, which first heats up the surface of the test object, after which the heat penetrates the entire test object in accordance with the heat conductivity of the material. At sufficiently smooth interfaces (e.g. on the rear wall), the infrared radiation is reflected and thus returns to the surface of the test specimen, where the radiation re-emerges and is registered by the infrared camera. This allows the cooling curve for each pixel to be recorded and further examined using Fourier transformation (see also: frequency analysis).
| Fig. 4: | Schematic measurement setup for pulse thermography [7] |
As an extension of this method, a flash lamp with an outgoing flash sequence is used and set to a fixed frequency of successive flashes of light of suitable intensity, ensuring that the infrared camera, clocked accordingly, can produce high-contrast, high-resolution images in the optimal working range. This extended method is known as lock-in thermography [7].
As a result, not only the intensity (heat flow pattern) but also the phase pattern is evaluated by Fourier transformation. An example from aviation is shown in Figure 5.
| Fig. 5: | Thermographic testing of the carbon fibre-reinforced vertical stabilizer of an aircraft |
Due to the particularly poor heat conduction at defects, which indicate insufficient bonding, the defective areas can be located in comparison with the design drawings (mapping method) [8]. A special application of this test method is thermal tomography, which enables depth profiling through frequency-dependent range [9]. This powerful lock-in thermography method allows large-scale structures in aircraft construction to be inspected in just a few minutes and has been used in the aircraft industry for many years.
See also
- Temperature conductivity
- Transmission light
- Frequency analysis
- Dynamic-mechanical analysis – General principles
References
| [1] | Bierögel, C.: Hybrid Methods of Polymer Diagnostics. In: Grellmann, W., Seidler, S. (Eds.): Polymer Testing. Carl Hanser, Munich (2022), 3rd Edition, pp. 499–501 (ISBN 978-1-56990-806-8; e-Book ISBN 978-1-56990-807-5; see AMK-Library under A 22) |
| [2] | Kuchling, H.: Taschenbuch der Physik. 21st revised Edition, Carl Hanser, Munich (2014), ISBN: 978-3-446-44218-4 |
| [3] | Solodov, I. et al.: Highly-efficient and Noncontact Vibro-thermography via Local Defect Resonance. Quantitative InfraRed Thermography Journal, 12,1 (2015) pp. 98–111 |
| [4] | Aderhold, J.: Passive Online-Thermographie. Fraunhofer-Allianz Vision. https://www.vision.fraunhofer.de/de/technologien-anwendungen/technologien/waermefluss-thermographie/passiv-thermographie.html (access on: 13.06.2025) |
| [5] | Kryukov, I. u. a.: Passive Thermografie als zerstörungsfreies online-Prüfverfahren im Rührreibschweißprozess. Thermographie-Kolloquium, DGZfP e.V. (2015) |
| [6] | Sultan, R. A. u. a.: Delamination Detection by Thermography. International Journal of Engineering Research and Applications 3, 1 (2013); Download as PDF |
| [7] | Busse, G.: Zerstörungsfreie Prüfung mit dynamischem Wärmetransport. In: Grellmann, W., Seidler, S. (Eds.): Kunststoffprüfung. Carl Hanser, Munich (2025) 4th Edition, pp. 492–503 (ISBN 978-3-446-44718-9; e-Book ISBN 978-3-446-48105-3; see AMK-Library under A 23) |
| [8] | Wu, D.; Salerno A., Malter U., Aoki R.: Kochendörfer, R.; Kächele, P. K.; Woithe, K.; Pfister, K.; Busse, G.: Inspection of Aircraft Structural Components using Lockin- thermography. In: Balageas, D.; Busse, G.; Carlomagno, G. M. (Eds.): Quantitative In-fraRed Thermography. QIRT 96, Stuttgart, Edizione ETS, Pisa (1997) 251–256 |
| [9] | Wu, D., Karpen, W., Busse, G.: Measurement of Fibre Orientation with Thermal Waves. Res. Nondestr. Eval. 11 (1999) 179–197 |


