Tensile Test Influences
| A service provided by |
|---|

|
| Polymer Service GmbH Merseburg |
| Tel.: +49 3461 30889-50 E-Mail: info@psm-merseburg.de Web: https://www.psm-merseburg.de |
| Our further education offers: https://www.psm-merseburg.de/weiterbildung |
| PSM on Wikipedia: https://de.wikipedia.org/wiki/Polymer Service Merseburg |
Tensile test influences
Influencing factors
In conventional tensile testing of plastics, there are numerous influencing factors that can affect the deformation behaviour and the absolute value of the material values. These factors are related to the testing technology and conditions as well as the geometry and internal state of the test specimens. These influences also occur when the basic conditions for reproducible characteristic value determination are met, such as comparable chemical and physical structure (see: microscopic structure), identical geometric conditions and identical testing methodology [1]. The theoretical requirements of the tensile test include impact-free load application at a constant crosshead speed, the creation of a uniaxial load and stress state in the test cross-section, a homogeneous and isotropic internal state in the test specimen, and no occurrence of geometric imperfections, such as notches, as well as no influences from the testing technology. Since these conditions apply to prismatic test specimens and an ideally rigid testing machine, the shoulders of the test specimens represent an imperfection and the testing technique influences the measurement result in the tensile test due to its compliance. These influencing factors can be avoided or minimised by using controlled tensile tests, which, however, are not standardised for plastics, unlike the testing of metallic materials.
Influence of specimen shape on strain rate
In conventional tensile testing, the actual nominal strain rate dεt/dt across the entire test specimen volume can be calculated from the set crosshead speed vT (Eq. 1).
| (1) |
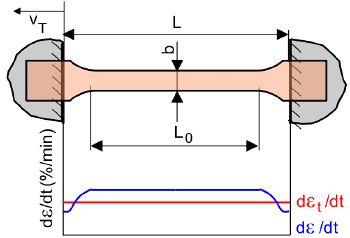
If the normative strain rate dε/dt in the plane-parallel test specimen section is controlled by using extensometers with an L0 of 75 mm, it can be seen that the set nominal and normative strain rates are different. The causes can be found in the shoulders of the test specimens and the effects of machine compliance, as there are different and variable cross-sections (Fig. 1) on the one hand, and deformations of the universal testing machine on the other.
| Fig. 1: | Nominal and normative strain rate of a test specimen in a tensile test |
It can be seen that the normative test speed in the plane-parallel section is theoretically constant, but greater than the nominal strain rate (see Eq. 2).
| (2) |
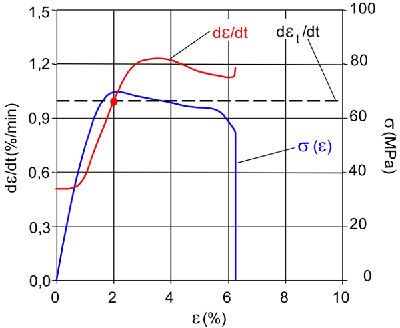
The mechanical strain depends on the applied load F and the modulus of elasticity Et of the material, but also on the cross-sectional area A0 of the test specimen, which is why the strain rate is significantly lower in the shoulder area. For standardised, constantly repeated tests, this deviation is negligible, but for scientific investigations, this difference can distort the characteristic values to be determined. Significant differences can be seen in practical comparisons on plastic test specimens with a nominal strain rate of 1 %/min. While the nominal strain rate does not change due to the constant crosshead speed, the normative strain rate shows a dependence on the strain and only reaches the required value at one point in time (red dot in Fig. 2).
| Fig. 2: | Nominal and normative strain rate of a PA 6 test specimen with 20 % GF in a conventional tensile test with constant crosshead speed |
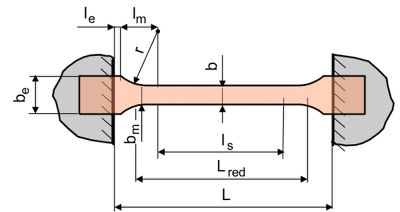
This behaviour is due to the heterogeneity and anisotropy of the internal state resulting from differing orientations and residual stresses originating from the manufacturing process of the test specimen. To minimise the influence of the shoulders on the strain rate distribution, the geometry of the test specimen must therefore be corrected over a reduced length [2, 3]. The geometric data of the test specimen (Fig. 3) is used to calculate the average thickness bm in the shoulder area using the auxiliary variable a (Eqs. 3 and 4). Knowing the different lengths in the test specimen (Eq. 5), the corrected or reduced length of the test specimen can then be determined (Eq. 6). Eq. (7) is then used to determine the required test speed and set it as the crosshead speed on the universal testing machine.
| (3) |
| (4) |
| (5) |
| (6) |
| (7) |
| Fig. 3: | Determination of the reduced length of the test specimen for correction of the test speed |
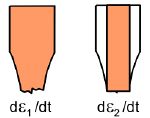
An experimental determination of a correction factor is obtained by removing the shoulders of the test specimen, resulting in a prismatic test specimen made of the identical material (Fig. 4).
| Fig. 4: | Determination of the corrected crosshead speed |
The normative strain rate dε/dt is determined on at least 5 prismatic test specimens and shoulder test specimens at an identical crosshead speed corresponding to the nominal strain rate dεt/dt, using extensometers with identical L0, and the respective mean value is calculated. The correction factor k is obtained from the quotient of the two strain rates (Eq. 8), which can then be used to calculate the corrected crosshead speed (Eq. 9).
| (8) |
| (9) |
Influence of compliance on strain and strain rate
When performing conventional tensile tests with constant crosshead speed in accordance with ISO 527-1 [4], the determination of characteristic values is influenced by unavoidable influencing factors. This is particularly evident in the determination of the modulus of elasticity Et according to Eq. (10). Here, it is assumed that only the pure specimen elongation ΔLP is included in the dimensionless strain. However, due to the external load, the different components of the universal testing machine are also deformed, which is also known as machine compliance.
| (10) |
Here, the deformation of the machine columns and the spindle, the bending of the crosshead and the traverse are included in the measurement signal as ΔLF if the traverse path is used as the measured variable. The absolute errors are relatively small here. A larger proportion is contributed by the deformation of the force transducer ΔLK and, in particular, the slip in the clamping jaws ΔLE. The measurement signal ΔLM therefore consists of the sum of the individual deformation components ΔLM = ΔLP + ΔLF + ΔLK + ΔLE and essentially determines the compliance of the test system. Any change in configuration (force transducer (see: electro-mechanical force transducer and piezoelectric force transducer), extension rods, clamping jaws or jaw inserts, see: tensile test compliance) changes the compliance value. It is clear from this that the greater the value of the elongation ΔL, the smaller the modulus of elasticity becomes. To avoid these measurement effects, the modulus of elasticity should be measured using strain extensometers or clip-on gauges, as these influencing factors then act outside the measuring length and are not recorded.
If the use of crosshead path measurement is unavoidable, e.g. for tests in a temperature-controlled chamber, the compliance for the test configuration used should be known or determined in order to correct the measured strain. Since the compliance K also affects the test speed, in the case of crosshead path measurement, with knowledge of the modulus M and the clamping length L, a correction must also be made to the crosshead speed (Eq. 11), which takes into account the proportion of self-deformation of the test system.
| (11) |
See also
Referecnces
| [1] | Bierögel, C.: Tensile Test on Polymers. In: Grellmann, W., Seidler, S. (Eds.): Polymer Testing. Carl Hanser, Munich (2022) 3rd Edition, pp. 106–123 (ISBN 978-1-56990-806-8; E-Book: ISBN 978-1-56990-807-5; see AMK-Library under A 22) |
| [2] | DIN 53455 (1981-08): Testing of Plastics – Tensile Test (withdrawn) |
| [3] | DIN 53457 (1987-10): Testing of Plastics – Determination of Elastic Modulus by Tensile, Compression and Bend Testing (withdrawn) |
| [4] | ISO 527-1 (2019-07): Plastics – Determination of Tensile Properties – Part 1: General Principles |


![{\displaystyle b_{m}={\frac {l_{m}}{{\frac {a}{\sqrt {a^{2}-1}}}arctan{\frac {(a+1)tan\left[{\frac {1}{2}}arcsin{\frac {l_{m}}{r}}\right]}{\sqrt {a^{2}-1}}}-{\frac {1}{2}}arcsin{\frac {l_{m}}{r}}}}}](https://wikimedia.org/api/rest_v1/media/math/render/svg/56a80f8d7d215d1a7166869e4a023f8395d6cadd)

![{\displaystyle L_{red}=b\left[{\frac {l_{s}}{b}}+{\frac {2l_{m}}{b_{m}}}+{\frac {2l_{e}}{b_{e}}}\right]}](https://wikimedia.org/api/rest_v1/media/math/render/svg/859081e9caa0dfc6703ebbb753399e282f683576)


