Instrumented Hardness Testing – Method & Material Parameters
| A service provided by |
|---|

|
| Polymer Service GmbH Merseburg |
| Tel.: +49 3461 30889-50 E-Mail: info@psm-merseburg.de Web: https://www.psm-merseburg.de |
| Our further education offers: https://www.psm-merseburg.de/weiterbildung |
| PSM on Wikipedia: https://de.wikipedia.org/wiki/Polymer Service Merseburg |
Instrumented Hardness Testing – Method & Material Parameter
Fundamentals of the measurement method
Since conventional hardness testing (see hardness) usually only determines a defined parameter with regard to its characteristic value and no information is available on the load history, instrumentation of the test procedure is required to expand the information possibilities of hardness measurement on plastics.
The force required to penetrate the indenter into the test specimen and the resulting indentation depth are recorded and registered over the entire indentation process [1]. By evaluating the load and unloading curves obtained, conclusions can be obtained about the viscoelastic-plastic behaviour of plastics. The test can be carried out conventionally with a constant test speed (vT = constant) or load-controlled (dF/dt = constant) and indentation depth-controlled (dh/dt = constant), but also with a constant indentation strain rate (dh/dt)/h = constant.
Four-sided pyramids according to Vickers or Knoop, three-sided pyramids according to Berkovich or so-called cube corners, conical tips (cones) or specially rounded indenters, such as spheres, can be used as indenters, whereby defined geometry corrections are required in each case.
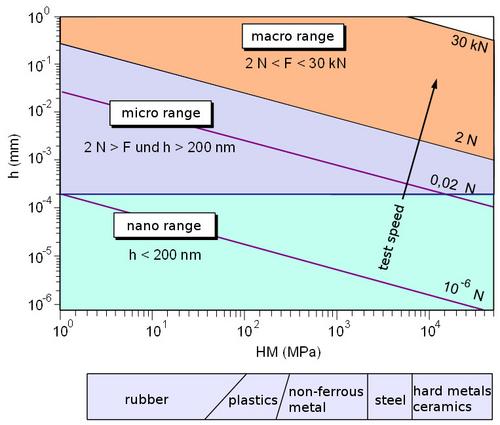
The advantage of instrumented hardness testing, in addition to the ability to automate the process, is in particular the comparability of all materials within a hardness scale, which means that the measurement process can be used in the macro, micro and nano range. Figure 1 shows a graduation of the load ranges and the relationship between the MARTENS hardness MH (formerly universal hardness) and the indentation depth h for various material.
| Fig. 1: | Definition of test load ranges in instrumented hardness testing [2] |
The instrumented indentation test can be used to determine various hardness values, the elastic indentation modulus EIT, hardening exponents n and viscoelastic as well as long-term properties of plastics, e.g. using the stepped isothermal method (SIM) [3].
In addition, the fracture toughness of brittle materials and the influence of residual stresses in the solid material or thin layers or the elastic behaviour (spring constant) of miniaturised components can be determined [4]. The detection of orientations is also possible [5]. The extension of the hardness test into the range of the smallest test forces and indentation depths (h < 200 nm), the so-called nano-hardness range, also enables experimental access to structural elements and their boundary surfaces with the aim of establishing quantitative morphology−hardness correlations.
Measurement technology
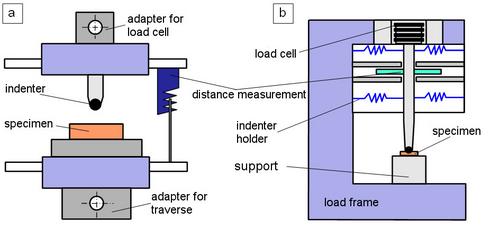
The basic structure of an instrumented hardness testing device is shown schematically in Figure 2, where additional devices for universal testing machines (Fig. 2a) or so-called stand-alone measuring systems (Fig. 2b) are used.
| Fig. 2: | Instrumented hardness measuring device (a) additional device for installation in a material testing machine and (b) external testing device (stand-alone) |
For measurements in the micro and macro hardness range, it is possible to install an additional device in material testing machines with high stiffness, whereby the traverse drive is used to generate the necessary indentation depth. The load−indentation depth diagram is then recorded and analysed using special software. Different test types (position, penetration depth and load controlled) can then be realised via the control of the testing machine, whereby holding times can also be built into the block control. Commercially available measuring systems designed as table-top devices (e.g. Fischerscope® Microhardness HV100C or ZWICK Macrohardness ZHU 2.5 or 0.5) also allow these types of control, but are not usually designed for longer test times. Special applications with additional equipment also allow the determination of temperature-dependent hardness and long-term characteristic values [6]. For metrological reasons, large devices, so-called nano-indenters, have been developed for the nano range, which are comparable to the micro hardness testing systems in their schematic design, but for which there are considerably higher requirements for the resolution of the load and indentation depth measurement.
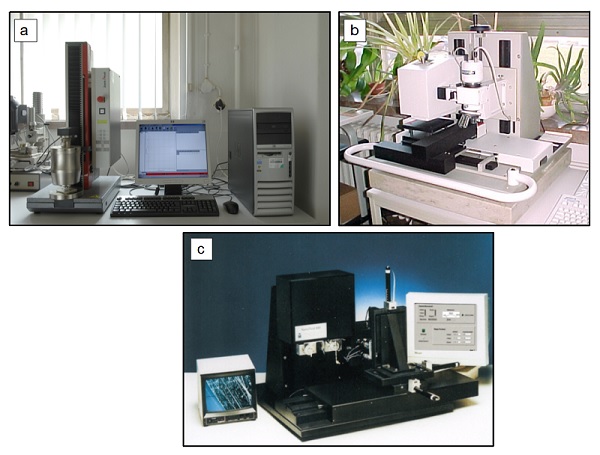
The following functional dependencies can be measured with the instrumented hardness measuring devices of the various load ranges shown in Fig. 3:
- the load F as a function of the penetration depth h during the loading and unloading cycle,
- the load F and the penetration depth h as a function of time t to quantify the relaxation (RIT) or creep behaviour (CIT) at different holding times and possibly different temperatures T, and
- the elastic recovery during the unloading phase.
| Fig. 3: | Instrumented hardness testing systems: (a) Registering macro hardness ZHU 2.5 from Zwick, Ulm (b) Registering micro hardness Fischerscope H100 XYp, from Fischer, Sindelfingen and (c) Nano hardness tester from company Micro Materials, Wrexham, U.K. |
Determination of material parameters in instrumented hardness testing
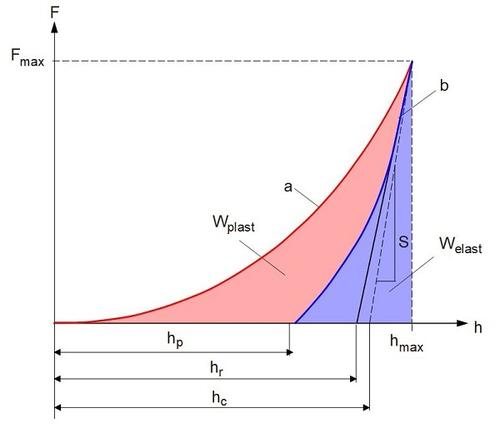
Various approaches exist for evaluating load−indentation depth curves with the aim of precisely describing the material behaviour and determining characteristic values [7−9]. In principle, it is possible to separate the plastic and elastic components of the total deformation during the hardness measurement. The maximum load Fmax and the corresponding indentation depth hmax can be taken as measured parameters from the load curve, the indentation depth hr and the indentation modulus EIT, by applying a tangent to the unloading curve, and the respective energy components from the complete load−indentation depth curve (Fig. 4). The area between the indentation function and the horizontal axis h is the total deformation energy Wtotal.
| Fig. 4: | Load−indentation depth curve (a: loading curve, b: unloading curve) |
As a result of the plastic deformation, the unloading curve does not run through the origin, so that a differential area, the plastic energy Wplast, occurs between the indentation and unloading functions. The elastic energy Welast results from the difference between the total and plastic energy.
The MARTENS hardness HM is determined at a specified test load F and contains the elastic and plastic components of the deformation. It is defined for the Vickers and Berkovich indenter and is calculated according to Eq. (1).
| (1) |
| mit: | F | – | load in N |
| h | – | indentation depth in mm |
The plastic hardness Hplast and the indentation hardness HIT are determined using the maximum load Fmax and applying tangents to the unloading curve (see Fig. 4) according to Eqs. (2) and (3) and represent a measure of the resistance to permanent deformation or damage.
| (2) |
| (3) |
| with: | Fmax | – | maximum test load in N |
| hr | – | intersection of the tangent to the unloading curve at point Fmax with the indentation depth axis in mm | |
| AP | – | projected contact area between the indenter and the test specimen, determined from the force−indentation depth curve taking into account the indenter correction in mm2 |
During the transition to small penetration depths, the contact area and thus also the contact stiffness dF/dh change continuously. For this reason, a correction is necessary, which is made by introducing the so-called projected contact area AP. The so-called indentation hardness is the quotient of the maximum acting test load Fmax and the projected contact area AP between the indenter and the test specimen. The projected contact area AP is a function of the contact depth hc (see Eq. (4)) and requires knowledge of the indenter surface function.
| (4) |
| with: | hc | – | Contact depth of the indenter with the test specimen in mm |
| ε | – | Constant, depending on the geometry of the indenter used (Vickers and Berkovich: ε = 0,75) |
For indentation depths h > 6 µm, the projected area AP is given to a first approximation by the ideal shape of the indenter. For an ideal Vickers indenter, equation (5) applies.
| (5) |
For indentation depths h < 6 µm, the surface function of the indenter cannot be assumed to correspond to its ideal shape, as all tip-shaped indenters have different deviations at the tip. The determination of the exact indenter geometry is necessary for small indentation depths, but also useful for all larger indentation depths.
The elastic indentation modulus EIT is determined from the slope of the tangent used to calculate the indentation hardness according to Eqs. (6) and (7).
| (6) |
| (7) |
| with: | μs | – | Poisson's ratio of the specimen |
| μi | – | Poisson`s ratio of the indenter (for diamond 0.07) | |
| Er | – | reduced modulus of indentation contact | |
| Ei | – | modulus of indenter (for diamond 1,14 · 106 N mm-2) |
Due to the different types of stress and determination methods, there is no agreement with the modulus of elasticity Et from the tensile test. An additional influence on the measurement result is the occurrence of bulging and sinking of the material in the environment of the indentation.
The mechanical work Wtotal expended during the indentation process is only partially consumed as plastic deformation work Wplast. The remainder is released again during the unloading process as the work of elastic re-deformation Welast. The ratio ηIT according to Eq. (8) contains material information for characterising the deformation behaviour. Accordingly, the plastic component Wplast/Wtotal is calculated from 100 % − ηIT.
| (8) |
See also
References
| [1] | Fröhlich, F., Grau, P., Grellmann, W.: Performance and Analysis of Recording Micro Hardness Tests. Phys. Status Solidi a-Appl. Res. (a) 42 (1977) 79−89; https://doi.org/10.1002/pssa.2210420106 |
| [2] | Grellmann, W.: Hardness Test Methods. In: Grellmann, W., Seidler, S. (Hrsg.):Polymer Testing. Carl Hanser Munich (2022) 3rd Edition, pp. 178–198 (ISBN 978-1-56990-806-8; E-Book 978-1-56990-807-5; ePub ISBN:978-156990-808-2; see AMK-Library under A 22) |
| [3] | Krolopp, T., Schöne, J., Arndt, S., Lach, R., Langer, B., Grellmann, W.: Registrierendes Makroeindringverfahren und Stepped Isothermal Methode – Zeitraffende Bewertung des lokalen Retardationsverhaltens thermoplastischer Kunststoffe. In: Borsutzki, M., Moninger, G.: Fortschritte in der Werkstoffprüfung für Forschung und Praxis – Werkstoffeinsatz, Qualitätssicherung und Schadensanalyse. Tagungsband Werkstoffprüfung, 2015, Verlag Stahleisen GmbH, Düsseldorf, pp. 241–246 (ISBN 978-3-514-00816-9; see AMK-Library under M 36) |
| [4] | Lach, R., Grellmann, W.: Die Eindruckbruchmechanik – Möglichkeiten zur Bewertung der Zähigkeit von Nanokompositen. In: Borsutzki, M., Geisler, S.: Fortschritte in der Werkstoffprüfung für Forschung und Praxis. Tagungsband Werkstoffprüfung, 2006, Verlag Stahleisen GmbH, Düsseldorf, S. 291–296 (ISBN 978-3-514-00734-5; siehe AMK-Library under M 13) |
| [5] | Baltá-Calleja, F. J., Fakirov, S.: Microhardness of Polymers. Cambridge University Press (2000) (ISBN 978-0-521-04182-9) |
| [6] | Bierögel, C., Schöne, J., Lach, R., Grellmann, W.: Temperaturabhängige instrumentierte Makrohärte – Methode zur Charakterisierung des Kriech- und Relaxationsverhaltens von Kunststoffen. In: Pohl, M.: Konstruktion, Werkstoffentwicklung und Schadensanalyse, Tagung „Werkstoffprüfung“ 2010, 2.–3. December 2010 Neu-Ulm, Tagungsband pp. 143−148, (ISBN 978-3-514-00778-9) |
| [7] | May, M., Fröhlich, F., Grau, P., Grellmann, W.: Anwendung der Methode der registrierenden Mikrohärteprüfung für die Ermittlung von mechanischen Materialkennwerten an Polymerwerkstoffen. Plaste Kautschuk 30 (1983) 149 – 153 |
| [8] | Koch, T.: Morphologie und Mikrohärte von Polypropylen-Werkstoffen. Dissertation, Technische Universität Wien, (2003) (see AMK-Library under C 30) |
| [9] | ISO/DIS 14577 (2024-08): Metallic Materials − Instrumented Indentation Test for Hardness and Materials Parameters − Part 1: Test Method (Draft) |


