Hardness
| A service provided by |
|---|

|
| Polymer Service GmbH Merseburg |
| Tel.: +49 3461 30889-50 E-Mail: info@psm-merseburg.de Web: https://www.psm-merseburg.de |
| Our further education offers: https://www.psm-merseburg.de/weiterbildung |
| PSM on Wikipedia: https://de.wikipedia.org/wiki/Polymer Service Merseburg |
Hardness
General principles
Definition
Hardness is the mechanical resistance that a body opposes to the mechanical indentation of another, generally harder, but in some circumstances equally hard body. Thus, a hard body resists the indentation of a foreign body more than a soft one, from which it can be directly derived that hardness is also a measure of the wear behavior of materials. Hardness testing methods are, by their very nature, comparative methods in which the hardness of two different bodies is determined in comparison to each other, whereby the hardness of the penetrating body, i.e., the indenter, is known. On this basis, two fundamentally different groups of hardness testing methods can be identified:
Indentation method: There is no relative movement between the indenter and the surface of the test specimen.
Scratch method: There is relative movement between the indenter and the surface of the test specimen.
The above definition and classification principle for hardness testing methods was formulated in a similar way by Martens [1] in 1898. In it, he describes the MOHS hardness scale as the hardness measurement method widely used at that time.
References
| [1] | Martens, A.: Handbuch der Materialienkunde für den Maschinenbau. Erster Theil. Materialprüfungswesen, Probirmaschinen und Messinstrumente. Julius Springer, Berlin (1898), Kapitel "Härteprüfung", pp. 238–244 |
Types of regulation
Regardless of the area of application (nano, micro, or macro hardness), there are three different types of control used in recording hardness measurements.
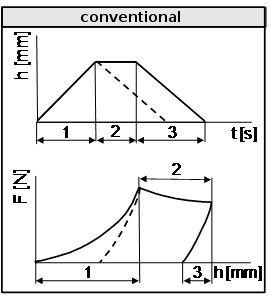
Conventional test execution normally involves a loading process up to a specified indentation depth or test load, followed immediately by the unloading process. If the indentation depth h is selected as the load parameter, this corresponds to the dashed unloading curve in Fig. 1 below.

|
|
| Fig. 1: | Conventional recording hardness measurement with and without stress relaxation |

|
|
| Fig. 2: | Time curve of indentation depth and test load during stress relaxation |
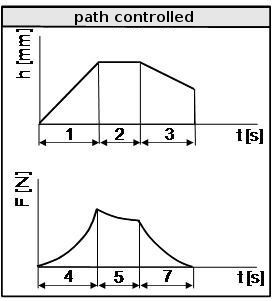
If a holding phase with constant path is inserted between loading and unloading, stress relaxation occurs (see: relaxation plastics), which manifests itself in a decrease in the test load, causes the temporal behaviour shown in Fig. 2, and corresponds to path control in terms of control technology.
Since in this case only the path feed is stopped or the position is held after the linear path ramp, this type of control is the easiest test to perform.
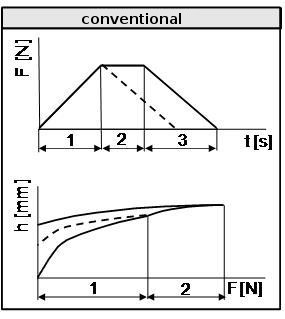
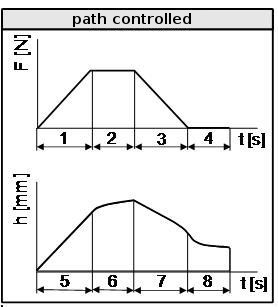
If, in contrast, the test load F is selected as the load parameter, i.e., a constant increase in load per unit of time (load ramp) is applied and the indentation depth generated is recorded, the behaviour shown in Fig. 3 results. If the load is relieved without delay after reaching the specified maximum load, the dashed curve in Fig. 3 is obtained. If the load is regulated to a constant value in time interval 2, the indentation depth increases, i.e., creep occurs, which is documented in the time dependencies of load and indentation depth according to Fig. 4.

|
|
| Fig. 3: | Conventional recording hardness measurement with and without creep |

|
|
| Fig. 4: | Time curve of indentation depth and test load during creep |
Hardness revaluation
From the point of view of comparability, it is sometimes desirable or necessary to convert the hardness values determined using a particular method to a different scale, i.e., to reevaluate them. This is usually the case when a hardness tester for the specific method is not available, or when impressions cannot be made on the test specimen after the specific method has been applied, for example, due to space constraints. In addition, it is sometimes necessary to infer the tensile strength from a hardness value, e.g., if no tensile test specimens can be taken from the component.
The need for hardness conversion also arises when selecting materials and designing components using characteristic values from available databases (see: Campus® database) without performing tests on the material. Due to the viscoelastic deformation behaviour of plastics, two hardness values determined by different methods can be converted into each other under the following conditions:
- Both hardness values must be determined either under test load or after unloading.
- The same indentation depth–load functions should apply to the indenters under the given geometric dimensions.
- The loading times must be approximately the same.
Instead of identical indentation depth–load functions, similar indentation depth–area functions may also be sufficient for conversion purposes. On this basis, empirical conversion to different hardness scales is possible.
Empirical correlations between ball indentation hardness HB and α-Rockwell hardness as well as SHORE A and SHORE D are known from the literature.
The following relationship exists between ball indentation hardness and α-Rockwell hardness (see: graph for ball indentation hardness):
SHORE A and SHORE D are related to each other as follows (see: SHORE hardness for a graphical representation):
While there are no further conversion options for plastics due to the absence of systematic investigations, there are standard-compliant conversion tables for metallic materials. This conversion proves to be very popular for steel and cast steel, and these relationships can also be successfully applied to hardened and cold-formed Cu and Al alloys as well as matrix materials. However, there are significant deviations for cold-worked or high-alloy steels.
Nevertheless, such empirical conversions should always be considered within specific material groups in order to take into account reservations regarding generalized application.
References
| [2] | Fett, T.: Zusammenhang zwischen der Rockwell-α-Härte nach ASTM D 785 und der Kugeleindruckhärte nach DIN 53456 für Kunststoffe. Materialprüfung 14 (1972) 151–153 |
| [3] | Weiler, W. W.: Härteprüfung an Metallen und Kunststoffen. Ehningen: Expert Verlag Renningen (1990) (ISBN 978-3-8169-0552-3) |
| [4] | Herrmann, K., Kompatscher, H., Polzin, T., Ullner, C., Wehrstedt, A.: Härteprüfung an Metallen und Kunststoffen. Expert Verlag, Renningen (2007) (ISBN 978-3-8169-2550-7; see AMK-Library under C 31) |
| [5] | Herrmann, K.: Härteprüfung an Metallen und Kunststoffen. Grundlagen und Überblicke zu modernen Verfahren. Unter Mitarbeit von fünf Mitautoren (Polzin, T., Kompatscher, M., Mennicke, R., Ullner, C., Wehrstedt, A.) 2nd revised Edition (2014) (ISBN 978-3-8169-3181-2) |
| [6] | Tobisch, K.: Über den Zusammenhang zwischen Shore A und Shore D Härte. Kautsch. Gummi Kunstst. 34 (1981) 347–349 |
| [7] | Blumenauer, H.: Werkstoffprüfung. Deutscher Verlag für Grundstoffindustrie, Leipzig Stuttgart (1994) 6th Edition, (ISBN 3-342-00547-5; see AMK-Library under M 3) |
| [8] | ASTM D 785 (2023): Standard Test Method for Rockwell Hardness of Plastics and Electrical Insulating Materials |
Conventional hardness testing methods for plastics and elastomers
The following conventional hardness testing methods are known in the context of polymer testing:
- Barcol hardness
- BUCHHOLZ hardness
- IRHD hardness
- KNOOP hardness
- Ball indentation hardness
- ROCKWELL hardness
- SHORE hardness
- Vickers hardness
Which hardness testing method can or should be used depends, among other things, on the characteristics of the material to be tested. Significant differences between the testing methods mentioned exist, for example, in the shape and size of the indenters.
Special testing methods
Special testing methods include, for example, compression hardness testing (Stauchhärte), scratch hardness testing, UCI hardness testing, and scratch resistance testing.
Instrumented hardness testing
If the measured variables of load and indentation depth are recorded continuously, i.e., the entire indentation process is recorded, this is referred to in polymer testing and diagnostics as instrumented or recording hardness testing.
The fundamentals of the measurement methodology, the material parameters, and the special features of the experimental implementation of instrumented hardness testing for relaxation and creep, as well as the temperature control system developed by Polymer Service GmbH Merseburg in collaboration with ZwickRoell GmbH & Co. KG, Ulm, are presented and explained in the WIKI-lexicon “ Polymer Testing & Diagnostics”:
- Instrumented hardness testing – Method & Material parameter
- Instrumented hardness testing – Creep
- Instrumented hardness measurement – Relaxation
- Instrumented hardness measurement with tempering
- Instrumented hardness measurement – Indentation Depth measurement with modified contact foot
References
| [9] | Fröhlich, F., Grau, P., Grellmann, W.: Performance and Analysis of Recording Microhardness Tests. Phys. stat. sol. (a) 42 (1977) 79–89, DOI: https://doi.org/10.1002/pssa.2210420106 |
| [10] | Grellmann, W.]: Ermittlung der Härte von Gläsern und Keramiken. Dissertation, Martin-Luther-Universität Halle-Wittenberg (1978) (Content as pdf) |
| [11] | May, M., Fröhlich, F., Grau, P., Grellmann, W.: Anwendung der Methode der registrierenden Mikrohärteprüfung für die Ermittlung von mechanischen Materialkennwerten an Polymerwerkstoffen. Plaste und Kautschuk 30 (1983) No. 3, pp. 149–153 (Download as pdf) |
Weblink
- Wikipedia – The Free Encyclopedia: Martens, Adolf


