Notching
| A service provided by |
|---|

|
| Polymer Service GmbH Merseburg |
| Tel.: +49 3461 30889-50 E-Mail: info@psm-merseburg.de Web: https://www.psm-merseburg.de |
| Our further education offers: https://www.psm-merseburg.de/weiterbildung |
| PSM on Wikipedia: https://de.wikipedia.org/wiki/Polymer Service Merseburg |
Notching or Notch insertion
General information
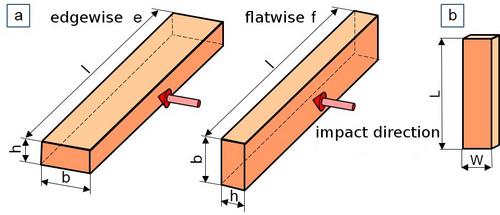
To characterise the toughness of plastics, impact and notch impact tests with different types of stress are used depending on the dominant material behaviour [1]. For brittle materials or for testing at very low temperatures, e.g. to determine the brittle-tough transition, impact tests are usually used, in which unnotched test specimens with different geometries are used. In the impact bending test, prismatic flat test specimens (80 x 10 x 4 mm3) are used [2], which are made from the multipurpose test specimen type 1A by removing the shoulders [3] (Fig. 1a). Variations arise when layer-like laminates are tested.
| Fig. 1: | Test specimens for the impact test (a) according to Charpy and (b) according to Dynstat |
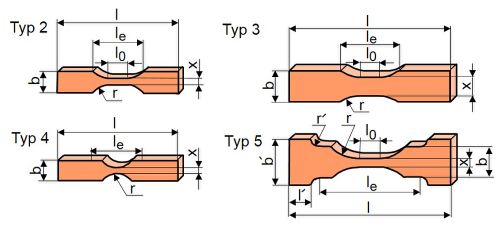
Depending on the direction of support and laminate structure, a distinction is also made between vertical (n) and plane-parallel (p) blow directions. For testing according to IZOD, the test specimen shapes are used as for the flatwise or edgewise impact test according to CHARPY (Fig. 1a) [4]. Here, it is also possible to test laminates in the perpendicular and plane-parallel directions. The Dynstat test for brittle plastics also uses prismatic flat test specimens, but with dimensions of 15 x 10 x 1.2–4.5 mm3 (Figure 1b) [5], which means that test specimens from components can also be examined due to their short length. In the tensile impact test (see: Figure 2), four different test specimens are used depending on the material being tested [6].
| Fig. 2: | Test specimen for the impact test |
Notched Charpy impact test and notched tensile impact test
For tough plastics that do not break or only break partially in conventional impact tests, notched impact tests are used, whereby different notch shapes are used depending on the type of stress.
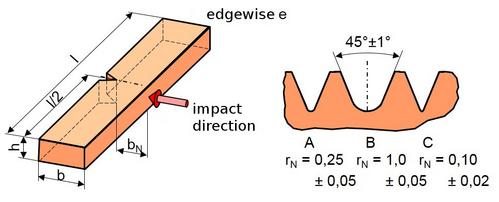
In conventional notched impact tests according to ISO 179-1 [2] or ISO 180 [4], notched test specimens with dimensions of 80 x 10 x 4 mm3 are used, which are usually also made from multipurpose test specimens [3]. In the Charpy impact test, there are three types of notches that differ in notch radius, but all have the same notch depth of 2 mm and the same notch angle of 45°, regardless of the direction of impact (edgewise or flatwise) (Figure 3). Notch shape B with a notch radius of 1 mm is intended for brittle plastics, while types A and C should be used for more ductile materials.
| Fig. 3: | Notch shapes for the Charpy impact test (narrow side) according to CHARPY [2] |
In the notch impact test according to IZOD [4], only two notch geometries are used for brittle (A) and tough (B) plastics (Figure 3), as the support conditions (see support distance) differ significantly from the arrangement according to CHARPY and the characteristic values determined are not comparable.
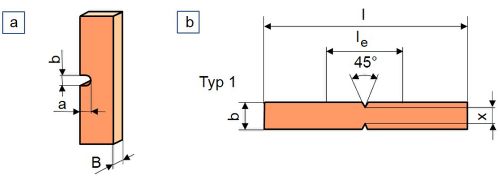
The notches for the CHARPY or IZOD test are usually made by machine milling or planing, sometimes also by sawing, in the centre of one side of the test specimen. In contrast to CHARPY and IZOD, the Dynstat test does not use a V-notch, but a U-notch on the flat side of the test specimen. This is made with a milling cutter or a special saw blade, whereby the cutting speed must be adapted to the respective plastic material, just as for CHARPY or IZOD test specimens. The notch width here is 0.8 mm and the notch depth is 1/3 of the width B (Figure 4a) [5]. In the tensile impact test according to ISO 8256 [6], the type 1 test specimen with notches on both sides is used. The notch depth of the V-notches is 2 mm in each case and the notch angle is specified as 45° in analogy to the notched impact test. In order to avoid branching of the crack and thus falsified energy values, care must be taken to ensure that the opposite notches are precisely aligned.
| Fig. 4: | Notch shape (a) of the notch impact test (narrow side) according to Dynstat [5] and (b) of the notched tensile-impact test |
Instrumented Charpy Impact test and instrumented tensile impact test
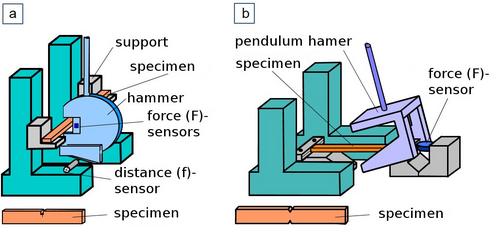
For highly tough plastics, e.g. those used in automotive engineering, which do not fail in conventional notch impact tests or only deliver inadequate results, instrumented Charpy impact tests are used, in which the impact load–deflection diagram is recorded online. This requires the instrumentation of the pendulum impact device used with at least force sensors or additionally with displacement sensors (Figs. 5a and b).
| Fig. 5: | Instrumented pendulum impact tester (a) for the notch impact test and (b) for the notch tensile test |
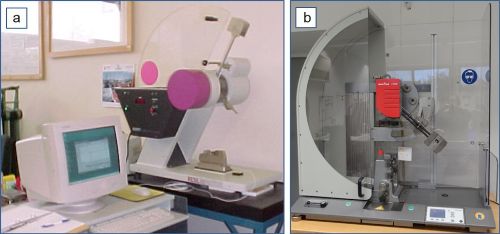
Instrumented impact tests are only standardised for bending stress, but only in accordance with CHARPY [7], and for impact stress in instrumented free-falling dart test [8, 9]. Regardless of this, a pendulum impact device Resil jun. with 25 J working capacity from INSTRON/CEAST is available for the instrumented tensile-impact and CHARPY impact test, which is equipped with a suitable piezoelectric force measurement and a pendulum height adjustment (Figure 6a). For the instrumented notch impact bending test, Polymer Service GmbH Merseburg has a unique fracture mechanics workstation based on the 25 J pendulum impact device HIT 25P from ZwickRoell GmbH & Co. KG, Ulm, and is equipped with force and displacement sensors, a pendulum height adjustment with locking device and a stop block device, as well as the WinICIT-software [10, 11]
| Fig. 6: | nstrumented pendulum impact testers (a) Resil jun. for the notch impact test and (b) HIT 25P for the notch impact test |
Since the instrumented Charpy impact tests in accordance with ISO 179-2 [7] usually do not produce evaluable results for plastics due to the drop height used and a structure-related evaluation of the toughness is not possible, the fracture mechanics toughness evaluation of the impact tests is absolutely necessary for tough and highly tough plastics [12]. This involves using much sharper notch radii to generate a high stress concentration (0.15 to 0.3 µm) in both the notch impact bending and tensile tests, but with reduced impact speeds in the range of 1.0 to 1.5 m/s [13, 14].
Equipment systems for notch insertition
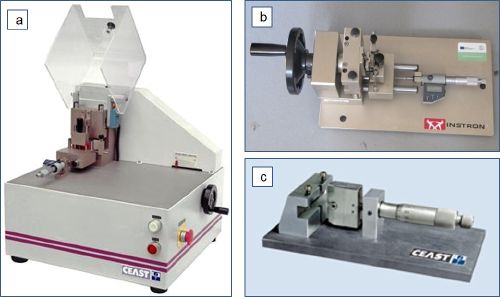
In this case, industrial metal blades and specific notching devices as shown in Figure 7 are used for the notching.
| Fig. 7: | Notching devices from INSTRON/CEAST (a) Notchvis machine system, (b) manual Notchvis and (c) razor blade notching device for tensile impact and bending tests |
The NOTCHVIS notching device from CEAST can be used to make narrow notches. It was originally designed for the machine production of V and U notches in the notch radius range of 0.05 mm, 0.1 mm, 0.25 mm and 1 mm, but with appropriate additional equipment can also use sharper metal blades for manual planing (Figure 7b) or pressing (Figure 7c).
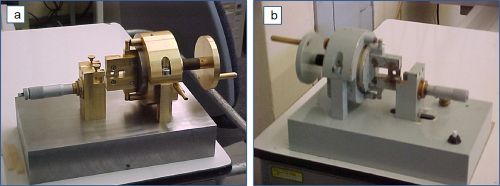
A special notch device was developed at the Technische Hochschule “Carl Schorlemmer” Leuna-Merseburg (abbreviated:THLM) back in 1980 for making sharp notches in plastics. It is now available in a modified form from Polymer Service GmbH Merseburg (Fig. 8).
| Fig. 8: | Industrial blade notching devices from Polymer Service GmbH Merseburg, (a) pneumatic/manual notching device (b) manual notching device for plastics |
The notch depth was mostly 2 mm, regardless of the notch radius. However, if crack resistance curves (R) curves are to be generated, then greater notch depths are usually required, e.g. for an a/W ratio of 0.5, then a = 5 mm. If these penetration depths cannot be achieved with the metal blade due to the material behaviour, a preliminary notch can be made by milling, sawing or planing. In the case of brittle materials, unstable crack propagation can already occur during the notching process, which is why the pneumatic notching device (Figure 8a) cannot be used and the notch must be made carefully with manual feed (Figure 8b).
Since the notch radius has a significant influence on the determined level of toughness (see: Notch sensitivity), the geometry in the notch base should be checked regularly with a microscope for notch angle and radius. If the notch geometry is incorrect due to tool wear, the results of the toughness characterisation can be significantly distorted by multiple cracks or crack branching in the notch ground and a subsequent increase in energy consumption during the impact test.
Jungbluth pointed out in [15] that constant notch conditions must be maintained in order to achieve reproducible measurement results. The following procedure was suggested:
- Only metal blades with a symmetrical cutting geometry should be used for notch preparation to ensure straight penetration into the test specimen. The blades were selected after measurement under a light microscope.
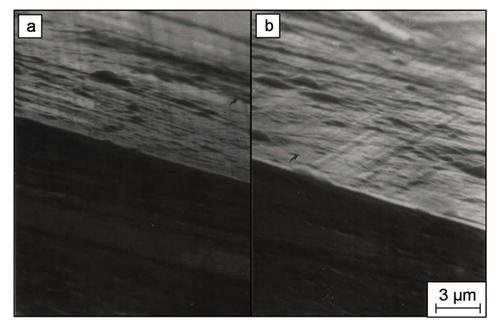
- To avoid the influence of blade wear on the reproducibility of measurement results, the metal blade should be replaced after 165 notch indentations. With the aid of scanning electron microscope images (Fig. 9), it was possible to prove that multiple reuse of metal blades did not lead to detectable damage.
| Fig. 9: | Scanning electron microscope image of a metal blade tip after a) single use and b) 150 uses (view) |
See also
References
| [1] | Grellmann, W.: Impact Loading. In: Grellmann, W., Seidler, S. (Eds.): Polymer Testing. Carl Hanser Munich (2022), 3rd Edition, pp. 143–156 (ISBN 978-1-56990-806-8; E-Book ISBN 978-1-56990-807-5) (see AMK-Library under A 18) |
| [2] | ISO/DIS 179-1 (2025-05): Plastics – Determination of Charpy Impact Properties – Part 1: Non-instrumented Impact Test (Draft) |
| [3] | ISO 3167 (2014-08): Plastics – Multipurpose Test Specimen |
| [4] | ISO 180 (2023-06): Plastics – Determination of Izod Impact Strength |
| [5] | DIN 53435 (2024-10): Testing of Plastics – Bending Test and Impact Test on Dynstat Test Specimen |
| [6] | ISO 8256 (2023-11): Plastics – Determination of Tensile-impact Strength |
| [7] | ISO 179-2 (2020-05): Plastics – Determination of Charpy Impact Properties – Part 2: Instrumented Impact Test |
| [8] | ISO 6603-2 (2023-11): Plastics – Determination of Puncture Impact Behaviour of Rigid Plastics – Part 2: Instrumented Impact Testing |
| [9] | ISO 7765-2 (2025-05): Plastic Film and Sheeting – Determination of Impact Resistance by the Free-falling Dart Method – Part 2: Instrumented Puncture Test |
| [10] | Bierögel, C., Grellmann, W., Oluschinski, A.: Entwicklung eines Bruchmechanikarbeitsplatzes auf Basis des Pendelschlagwerks HIT 50P. (2009), (unpublished report) |
| [11] | Oluschinski, A.: WIN-IKBV-Mess- und Auswerteprogramm für den instrumentierten Kerbschlagbiegeversuch. Polymer Service GmbH Merseburg (2007) |
| [12] | Grellmann, W.: Fracture Toughness Measurements in Engineering Plastics. In: Grellmann, W., Seidler, S. (Eds.): Polymer Testing. Carl Hanser Munich (2022), 3rd Edition, pp. 247–303 (ISBN 978-3-446-44350-1) (see AMK-Library under A 18) |
| [13] | MPK-Procedure MPK-ICIT (2016-08): Testing of Plastics – Instrumented Charpy Impact Test (ICIT): Procedure for Determining the Crack Resistance Behaviour Using the Instrumented Impact Test |
| [14] | MPK-Procedure MPK-ITIT (2014-07): Testing of Plastics Instrumented Tensile-impact Test (ITIT): Procedure for Determining the Crack Resistance Behaviour Using the Instrumented Tensile-impact Test |
| [15] | Jungbluth, H.: Untersuchungen zum Verformungs- und Bruchverhalten von PVCC-Werkstoffen. TH "Carl Shorlemmer" Leuna-Merseburg (1987) (see AMK-Library under B 1-1) pp. 34/35 (Bibliografische Kurzfassung/Inhaltsverzeichnis/Inhaltsverzeichnis) |

