Ultrasonic Wall Thickness Measurement: Difference between revisions
Oluschinski (talk | contribs) Created page with "{{Language_sel|LANG=ger|ARTIKEL=Ultraschall-Wanddickenmessung}} {{PSM_Infobox}} <span style="font-size:1.2em;font-weight:bold;">Ultrasonic wall thickness measurement</span> __FORCETOC__ ==Technical requirements== The most important practical applications of ultrasonic testing technology are the non-destructive characterisation of materials for defect detection, Ultrasonic Weld Insp..." |
Oluschinski (talk | contribs) |
||
| Line 41: | Line 41: | ||
Even when using the immersion technique, evaluation problems arise in wall thickness measurement with highly scattering composite materials, as the actual back wall echo is difficult to separate from the signal noise [5]. It can be seen that without the use of delay distances, a highly noisy back wall signal ('''Fig. 2 a''') occurs. With a delay line ('''Fig. 2b'''), there is a significant improvement in the signal-to-noise ratio, which can be further improved by using the FreqScan evaluation method developed by [https://de.wikipedia.org/wiki/Polymer_Service_Merseburg Polymer Service GmbH Merseburg] [6]. | Even when using the immersion technique, evaluation problems arise in wall thickness measurement with highly scattering composite materials, as the actual back wall echo is difficult to separate from the signal noise [5]. It can be seen that without the use of delay distances, a highly noisy back wall signal ('''Fig. 2 a''') occurs. With a delay line ('''Fig. 2b'''), there is a significant improvement in the signal-to-noise ratio, which can be further improved by using the FreqScan evaluation method developed by [https://de.wikipedia.org/wiki/Polymer_Service_Merseburg Polymer Service GmbH Merseburg] [6]. | ||
[[File:US_Wall_Thickness- | [[File:US_Wall_Thickness-2.jpg]] | ||
{| | {| | ||
|- valign="top" | |- valign="top" | ||
Revision as of 09:28, 8 December 2025
| A service provided by |
|---|

|
| Polymer Service GmbH Merseburg |
| Tel.: +49 3461 30889-50 E-Mail: info@psm-merseburg.de Web: https://www.psm-merseburg.de |
| Our further education offers: https://www.psm-merseburg.de/weiterbildung |
| PSM on Wikipedia: https://de.wikipedia.org/wiki/Polymer Service Merseburg |
Ultrasonic wall thickness measurement
Technical requirements
The most important practical applications of ultrasonic testing technology are the non-destructive characterisation of materials for defect detection, weld seam testing and the measurement of the thickness or wall thickness of components [1], some of which require special testing technology for the testing application.
Ultrasonic wall thickness measurement is an established and industrially used testing method, which has been greatly simplified and improved in terms of measurement technology, particularly through digital technology, but still requires solid knowledge and practical experience on the part of the tester [1, 2].
For test objects that are not accessible from both sides, such as pipes or containers, which may also contain production media, wall thickness measurement is only possible using non-destructive polymer testing methods, whereby ultrasonic wall thickness measurement has become established here, regardless of the material. The pulse-echo technique with normal or SE transducers is particularly relevant from a technical point of view, although ultrasonic transmission measurement technique is also applicable, but is preferred in laboratory operations and is used for air-ultrasound.
Physical fundamentals
The test method for determining the wall thickness d is based on determining the sound running time t from the test head to the wall and back again, but requires knowledge of the longitudinal wave velocity cL of the material to be tested at a specified test temperature (Eq. 1).
| (1) |
After converting Eq. (1), the sound velocity can then be determined from the known thickness of a test object, whereby calibration on identical material is required in both cases.
Experimental methods and evaluation procedures
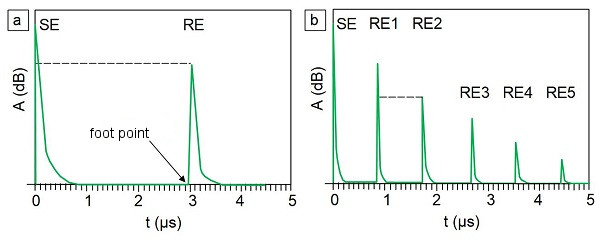
The classic testing technique for wall thickness measurement uses either ultrasonic pulse excitation with a defined pulse repetition frequency or quasi-stationary excitation of ultrasound using A-scan display or the λ/2 thickness resonance frequency fR0 to determine thickness characteristics. While the resonance method is used in particular for very thin components, analogue and now digital A-scan technique was previously the preferred method for industrial applications [1]. Simple wall thickness measurement using the single echo method is used especially for highly damping or scattering materials (Fig. 1a), as no multiple echoes are registered here. The runtime t of the ultrasound between the transmitted and reflected wall echoes is evaluated on the monitor display, whereby influences from adjustment, reading inaccuracy and echo height scaling can distort the measurement result.
| Fig. 1: | Ultrasonic wall thickness measurement using the pulse-echo technique as (a) single echo method (EMM) and (b) multiple echo method (MEM) |
In addition, there is the system dead time and, in the case of small thicknesses, overlaps between the high-voltage pulse of the transmitter and the first rear wall echo, which means that no foot point can be determined for the transmitted echo. If multiple reflections occur between the probe and the rear wall in homogeneous and isotropic materials, the multiple echo method (Figure 1b) can be used. In this case, the wall thickness is determined over several echoes, whereby the multiplication of the running path length must also be taken into account. One of the back wall echoes can then also be used as the starting point for the measurement. However, this preferred method can only be used when multiple echoes occur (homogeneous metallic materials) and is generally not usable in cases of high attenuation or strong scattering. For very thin walls and to suppress the transmission pulse, delay lines can also be used, which improve the close-range resolution and also allow applications on curved geometries (pipes or containers) [1–3]. In both cases, the measurement becomes much more complicated if there are corners and edges in the immediate vicinity of the measuring position [3, 4] and if there is severe erosive or corrosive damage to the rear wall. If SE transducers are used for wall thickness measurement to increase the local resolution, a correction of the reverse path length is necessary, as the ultrasound is transmitted into the test object at an angle corresponding to the roof angle. When using the immersion bath technique or delay line bodies, the respective interface echo (e.g. between the delay line and the test object surface) can also be included in the evaluation.
FreqScan evaluation method
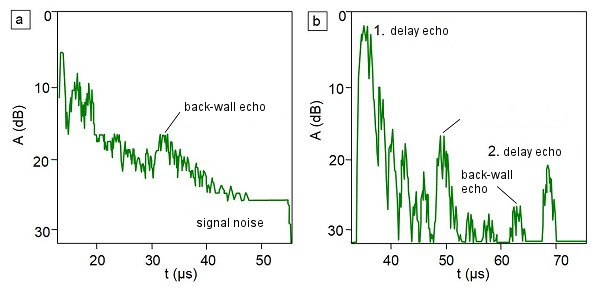
Even when using the immersion technique, evaluation problems arise in wall thickness measurement with highly scattering composite materials, as the actual back wall echo is difficult to separate from the signal noise [5]. It can be seen that without the use of delay distances, a highly noisy back wall signal (Fig. 2 a) occurs. With a delay line (Fig. 2b), there is a significant improvement in the signal-to-noise ratio, which can be further improved by using the FreqScan evaluation method developed by Polymer Service GmbH Merseburg [6].
| Fig. 2: | Ultrasonic wall thickness measurement using the pulse-echo ultrasonic technique on GFRP (d = 34.4 mm) in direct coupling as (a) without delay and (b) with delay [5] |
Equipment technology for ultrasonic wall thickness measurement
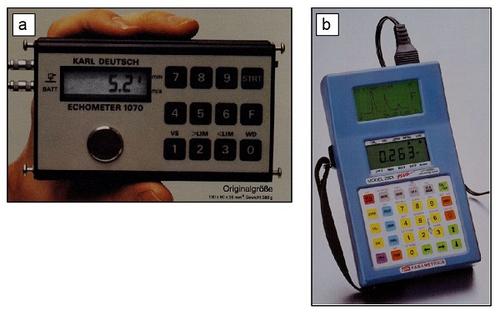
Compared to analogue measuring systems with A-scan technique, modern digital wall thickness devices are small and handy, and the wall thickness can be read directly from the integrated monitor. These devices (Fig. 3a) simplify calibration, can be switched from thickness to sound velocity measurement and, in the case of SE sensors, include correction of the path error, taking into account the respective roof angle. However, devices that include a digital display of the A-scan in addition to the alphanumeric display (Fig. 3b) are preferable, as they allow the tester to check the correctness of the measurement. Regardless of these advantages, the influences of coupling agent thickness, corrosion on the rear wall, fluctuating contact pressure or the test temperature must of course also be taken into account, whereby modern ultrasonic sensors often already have integrated temperature sensors [7].
| Fig. 3: | Digital ultrasonic wall thickness gauges (a) from Karl Deutsch Prüf- und Messgeräte Bau GmbH und Co KG, Wuppertal and (b) from Olympus IMS |
Application examples
Ultrasonic wall thickness measurement is used in the chemical industry to check wall thickness erosion, especially in pipelines, containers and tanks, as well as in shipbuilding for servicing purposes. This allows, for example, surface or selective corrosion (pitting), cavitation (voids) or erosion to be detected, differentiated and quantitatively specified.
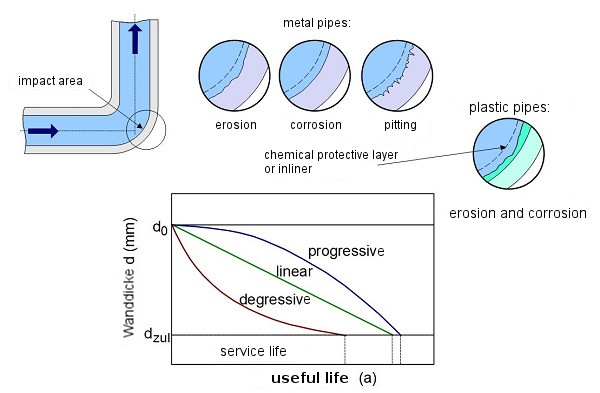
| Fig. 4: | Wall thickness measurement on metal and plastic pipes and use of the results for service life prediction |
In pipelines used in the chemical industry or in nuclear power plants, which form a significant part of the infrastructure, increased material wear is recorded, regardless of the material used, particularly in the impact area (Fig. 4) at pipe curvatures or bends and in the vicinity of welded joints (flow turbulence) when abrasive or erosive media are transported. In the case of metallic pipes, erosion or corrosive effects often occur here, while in the case of plastic pipes or containers, damage to the inliner occurs, which leads to exposure of the reinforcing fibre and a reduction in the initial wall thickness d0 (see Fig. 4). With prescribed cyclical inspection (3 to 6 months) of the residual wall thickness, these pipe sections can be replaced prophylactically if the permissible residual wall thickness dzul is known, thereby avoiding any consequential damage. If these measuring positions are difficult to access due to design conditions and/or thermal insulation, these ultrasonic transducers can also be installed in a stationary manner, analogous to the acoustic emission sensor technology used in nuclear power plants, and the wall thickness is determined permanently or cyclically at an identical position [8].
A special form of thickness measurement is the determination of the layer thicknesses of paint coatings or plastic insulation on metallic base materials using ultrasound, which, however, requires a special measurement and evaluation methodology [3].
See also
References
| [1] | Matthies, K. u. a.: Dickenmessung mit Ultraschall. DVS-Verlag GmbH, Berlin, 2nd Edition (1998), (ISBN 3-87155-940-7; see AMK-Library under M 44) |
| [2] | Deutsch, V., Platte, M., Vogt, M.: Ultraschallprüfung – Grundlagen und industrielle Anwendungen. Springer, Berlin (2012), (ISBN 978-3-642-63864-0; see AMK-Library under M 45) |
| [3] | Gevatter, H.-J., Grünhaupt, U. (Eds.): Handbuch der Mess- und Automatisierungstechnik in der Produktion. Springer, Berlin, 2nd Edition (2006), (ISBN 978-3-540-21207-2) |
| [4] | DIN EN 14127 (2011-04): Non-destructive Testing – Ultrasonic Thickness Measurement (withdrawn; replaced by DIN EN ISO 16809 (2025-09) |
| [5] | Sirch, C., Oluschinski, A., Bierögel, C., Grellmann, W.: Ultraschallprüfung von Kunststoffbauteilen. 12. Tagung „Problemseminar Deformation und Bruchverhalten von Kunststoffen“, Merseburg, June 24–26, 2009, Proceedings CD-ROM |
| [6] | Sirch, C., Oluschinski, A., Bierögel, C., Rufke, B., zur Horst-Meyer, S., Grellmann, W.: Ultraschall-Messungen an Grenzflächen in GfK-Thermoplast-Verbunden. 11. Tagung „Problemseminar Deformation und Bruchverhalten von Kunststoffen“, Merseburg, June 20–22, 2007, Proceedigs CD-ROM (ISBN 978-3-86010-918-2) pp. 429−430 |
| [7] | zur Horst-Meyer, S.: SONOWALL – Wanddickenmessungen mit Ultraschall. DGZfP-Jahrestagung „Zerstörungsfreie Werkstoffprüfung“ (2010), Erfurt, P54 Download als pdf |
| [8] | Mück, A., Imhof, D.: Dauerüberwachung der Wanddicke von Rohrleitungen mit Ultraschall. DGZfP-Jahrestagung „Zerstörungsfreie Werkstoffprüfung“ (2015), Salzburg, Österreich, A1 |


