Ultrasonic Transmission Technique
| A service provided by |
|---|

|
| Polymer Service GmbH Merseburg |
| Tel.: +49 3461 30889-50 E-Mail: info@psm-merseburg.de Web: https://www.psm-merseburg.de |
| Our further education offers: https://www.psm-merseburg.de/weiterbildung |
| PSM on Wikipedia: https://de.wikipedia.org/wiki/Polymer Service Merseburg |
Ultrasonic transmission technique
Requirements for ultrasonic transmission technique
Non-destructive ultrasonic testing technology is divided into two main classic testing methods, known as transmission and reflection methods or pulse-echo technology [1]. Regardless of whether the ultrasound is transmitted into the material via direct coupling, immersion technology or air-ultrasound, and regardless of the type of ultrasonic probe (standard, angle or S/E sensor) used, the transmission method or intensity method generally requires two sensors of the same design with identical properties. In addition, it must be ensured that the same coupling medium, thickness d, is used and that the acoustic axes of the opposing standard sensors are ideally aligned with each other. The transmission method can be performed using standard, angle and S/E sensors and offers the advantage that in the case of materials with high sound attenuation, only the simple sound path between the transmitter and receiver needs to be covered.
Options for coupling
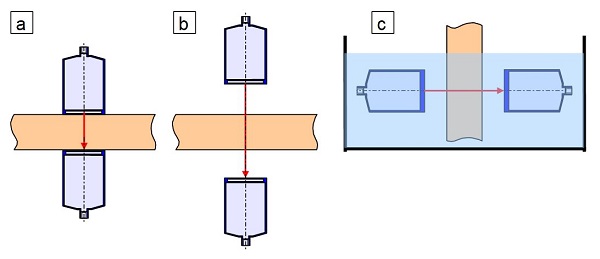
The transmission method with standard sensors generally also uses pulsed ultrasound with a specified pulse repetition frequency. Ultrasonic direct coupling can be achieved using special oils or greases, air-ultrasound or the immersion bath technique using [[[Squirter Technique|water coupling]] (Fig. 1). Due to the fact that the test object must be accessible from both sides for this test method to be used, the procedure is mainly used in laboratories in practice.
| Fig. 1: | Schematic presentation of the ultrasonic transmission technique with standard sensors (a) for direct coupling, (b) using air-ultrasound, and (c) using the immersion bath technique |
Schematic representation of miscouplings
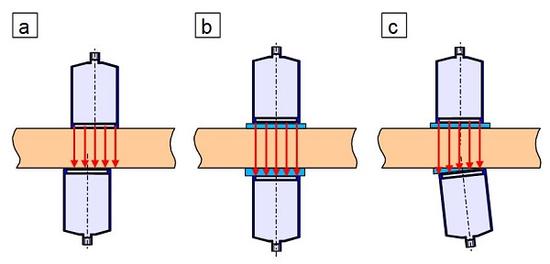
In all three cases, the acoustic axis of the sensors must be perfectly aligned and must not be tilted, as this would reduce the intensity of the received ultrasound. Misalignment of the sensors and coupling errors due to varying coupling layer thicknesses can sometimes cause significant errors (Fig. 2). Transmission testing does not provide any information about the type and depth of existing discontinuities, only about the extent of defects perpendicular to the incident ultrasound [1, 2], whereby different positions of the defects (delaminations or doublings) can also result in different conclusions. Compared to an ideal sensor position, the defects shown in Fig. 2 all cause a reduction in intensity at the receiver sensor.
| Fig. 2: | Schematic representation of miscoupling in the transmission method with standard sensors (a) incorrect acoustic axis, (b) differing coupling layer thickness, and (c) tilting of the sensor |
Detection of material defects
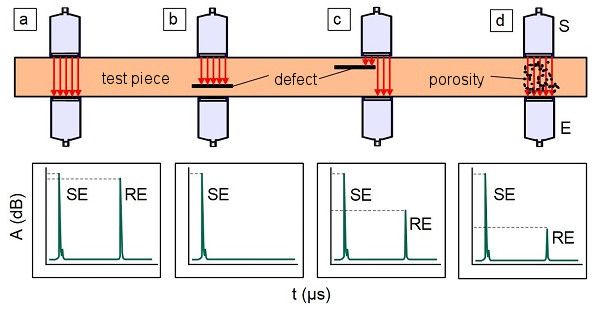
A defect-free and homogeneous test piece according to Fig. 3a produces a reduction in intensity from I0 to I in accordance with the attenuation of the material being examined. The evaluation of the runtime t allows the wall thickness of the test object in question to be determined if the speed cL of the longitudinal wave is known. If there are flat defects in the direction of sound propagation, these can shield the received signal completely (Fig. 3b) or partially (Fig. 3c), depending on their size and position. The porosities in Fig. 3d cause a strong reduction in intensity due to scattering effects.
| Fig. 3: | Schematic presentation of A-scans in the transmission method with standard sensors with (a) ideal transmission, (b) total coverage of the back-wall echo (RE), (c) partial coverage of the backwall echo, and (d) intensity reduction due to porosity |
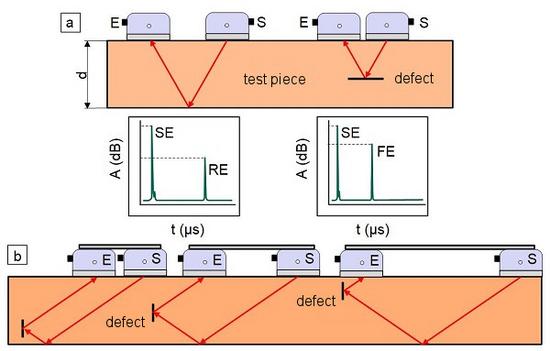
The transmission method can also be performed with angle beam sensors and can be used to detect planar defects, such as doublings in sheet metal or delaminations in laminates. This requires angle sensors with suitable incidence angles for the respective material type, in which transverse waves (see: refraction sound waves and ultrasonic waves reflection) are used for non-destructive testing. Since the sound emission is transmitted at a defined angle, the sound path to the receiver is longer than with perpendicular transmission using a standard sensor (Fig. 4). In Fig. 4a, it can be seen that in the case of no defects, the backwall is displayed by the receiver signal. With an identical angle of incidence, the distance between the two sensors must be reduced in order to detect the horizontal defect, which is achieved using the so-called tandem technique (see Fig. 4b). Due to the shorter sound path in the case of a horizontal defect, the intensity of the defect echo (FE) is higher than that of the backwall echo (RE). Figure 4b shows that the defect depth of the vertical discontinuity influences the head distance of the tandem and that this must be varied during the measurement.
| Fig. 4: | Schematic representation of A-scans in the ultrasonic testing method with angle sensors for (a) test objects with and without horizontal defects and (b) test objects with vertical defects of varying depths using the tandem technique |
Due to the specific design, the S/E sensors are also operated in transmission mode. The usable depth or thickness range of the test object or the suspected defect location is determined by the roof angle of the test sensor pair and results from the superposition of the sound fields of the two transducers, the sound velocity of the test medium and the focusing of the sound beams. With this type of sensors, a so-called detour error always occurs, which is caused by the sound field properties and the roof angle and can be taken into account by making adjustments [2].
See also
- Ultrasonic–Elastic parameters
- Ultrasonic birefringence
- Ultraschall modulation
- Ultrasonic phased array sensors
- Ultrasonic composite sensors
References
| [1] | Deutsch, V., Platte, M., Vogt, M.: Ultraschallprüfung – Grundlagen und industrielle Anwendungen. Springer, Berlin (2012), (ISBN 978-3-642-63864-0; see AMK-Library under M 45) |
| [2] | Matthies, K.: Dickenmessung mit Ultraschall. DVS Media GmbH, Berlin, 2nd Edition, (1998), (ISBN 3-87155-940-7; see AMK-Library under M 44) |


