Air-Ultrasound: Difference between revisions
Oluschinski (talk | contribs) Created page with "{{Language_sel|LANG=ger|ARTIKEL=Luftultraschall}} {{PSM_Infobox}} <span style="font-size:1.2em;font-weight:bold;">Air-ultrasound</span> __FORCETOC__ ==Introduction== Air-ultrasound is an ultrasonic testing method in which air is used as the coupling medium. The ultrasonic sensors are not in contact with the test material. This testing method is suitable for non-contact, Non-destructive Polymer Testing | non-destructiv..." |
Oluschinski (talk | contribs) No edit summary |
||
| Line 75: | Line 75: | ||
In the practical application of airborne ultrasound, defectoscopy, which uses volume or C-scans to detect component defects, is predominant. '''Figure 6''' below shows the volume image (a) and the C-image (b) of a PE 100 pipe segment with weld line measured from the concave side. The volume image represents a "transmission image" and the C-image a flat layer of the material, which is based on the evaluation of a time interval. These two ultrasound images can be used to detect relative changes in the geometry and internal structures when testing with air coupling. | In the practical application of airborne ultrasound, defectoscopy, which uses volume or C-scans to detect component defects, is predominant. '''Figure 6''' below shows the volume image (a) and the C-image (b) of a PE 100 pipe segment with weld line measured from the concave side. The volume image represents a "transmission image" and the C-image a flat layer of the material, which is based on the evaluation of a time interval. These two ultrasound images can be used to detect relative changes in the geometry and internal structures when testing with air coupling. | ||
[[file: | [[file:Air-Ultrasound_6.jpg|400px]] | ||
{| | {| | ||
|- valign="top" | |- valign="top" | ||
Latest revision as of 14:17, 28 November 2025
| A service provided by |
|---|

|
| Polymer Service GmbH Merseburg |
| Tel.: +49 3461 30889-50 E-Mail: info@psm-merseburg.de Web: https://www.psm-merseburg.de |
| Our further education offers: https://www.psm-merseburg.de/weiterbildung |
| PSM on Wikipedia: https://de.wikipedia.org/wiki/Polymer Service Merseburg |
Air-ultrasound
Introduction
Air-ultrasound is an ultrasonic testing method in which air is used as the coupling medium. The ultrasonic sensors are not in contact with the test material.
This testing method is suitable for non-contact, non-destructive testing of thin-walled components made of materials with a thermoplastic or thermoset matrix, such as fibre-reinforced plastics (CFRP, GFRP) and hybrid materials or metallic materials.
From a materials engineering perspective, coupling the ultrasonic sensors via air has the advantage that the material to be tested is not exposed to any media stress. The medial load can lead to an impairment of the mechanical characteristic value level, which plays a particularly important role in inline inspection in the production process [1]. On the other hand, coupling via air is a disadvantage for the determination of acoustic parameters, as the loss of sound energy via the medium air imposes high demands on the measurement technology [2, 3].
Measuring method
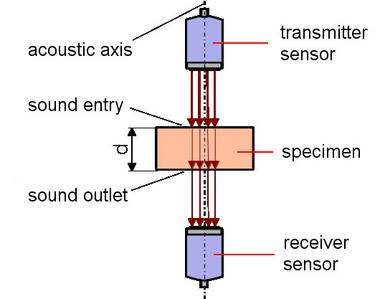
Usually, the high sound attenuation of the air for the volume testing of a test specimen requires the arrangement of two ultrasonic sensors on both sides of the test specimen, whereby the sensors are aligned to each other on the acoustic axis (through-sounding arrangement, Fig. 1).
| Fig. 1: | Sound transmission arrangement |
This means that sound waves only pass through the thickness of the test specimen once, and the total sound attenuation is halved compared to the pulse-echo ultrasound technique.
The sensors should have a certain distance to the test specimen that corresponds to their near field. This achieves focussing and significantly improves the imaging of the ultrasonic signals, especially in defectoscopy of surfaces. Newer methods also allow one-sided access to the component using the pulse-echo ultrasound method [5].
Exitation
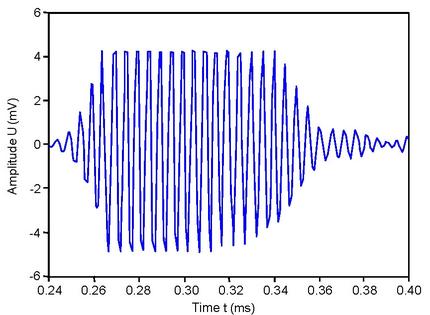
In contrast to ultrasonic direct coupling, air coupling is not excited with Dirac pulses, but with a sequence of Burst pulses. These represent square-wave oscillations that are transmitted to the piezo material of the ultrasonic sensor. The piezo material changes these vibrations due to its electrical contacting, its elastic properties and its geometry. Figure 2 shows a representation of these vibrations for a piston vibrometer.
| Fig. 2: | Reaction of an air ultrasound transducer to a burst signal |
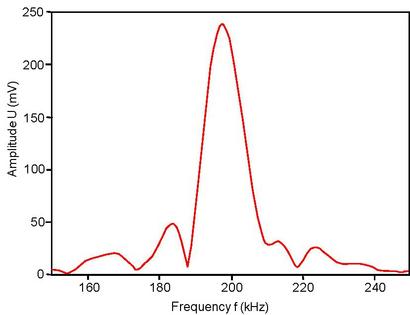
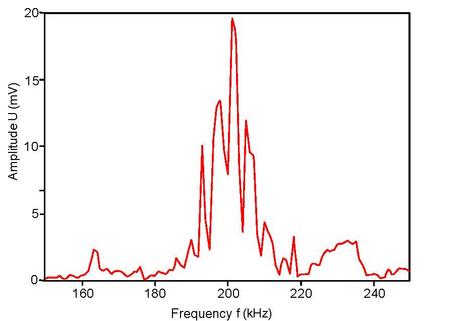
In order to ensure a sufficiently high sound intensity, low measurement frequencies of a few 100 kHz are used for excitation. The air ultrasonic transducers have a corresponding natural frequency close to the measurement frequency and are therefore driven in the resonance range. Figure 3 shows the frequency spectrum of the burst signal from Fig. 2. The resonance frequency at 200 kHz and the relatively narrow width of the frequency band can be recognised. This is intended in favour of maximum sound pressure and makes it possible to carry out defectoscopic examinations on panels and films using sensors with piston transducers.
| Fig. 3: | Fourier transform of the burst signal from Fig. 2 |
Measurement Example
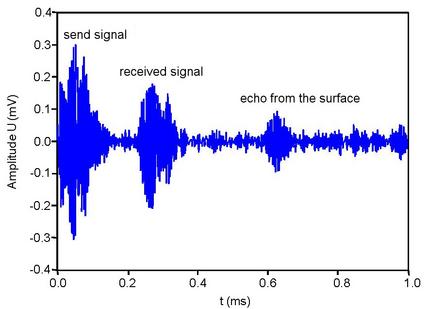
A measurement on a PE pipe segment is shown as an example. The corresponding HF signal is shown in Fig. 4. The presentation of an HF signal of the airborne ultrasonic devices usually also contains the transient sound signal, which serves as a trigger for signal recording and measurement. This allows the ultrasound velocities and sound attenuation to be determined with a reference measurement without a test specimen.
| Fig. 4: | HF signal from an airborne ultrasound measurement on a PE 100 pipe segment |
Figure 4 shows the HF image of the airborne ultrasound measurement (through-transmission arrangement) on the PE 100 pipe segment. It is characterised by the sender's transmitted signal, the received signal at the receiver and the first echo signal at the receiver, which was caused by the double reflection of the burst signal at the rear wall and the surface of the test specimen. This allows the speed of sound to be determined if the wall thickness of the test specimen is known.
| Fig. 5: | Fourier transform of the HF signal from Fig. 4 |
The Fourier spectrum of the HF signal (Fig. 4) shows the same main maximum as that of the burst signal, but with a stronger structure due to the acoustic properties of the test specimen. Due to the low-pass effect of the test specimen, there is also a frequency shift and phase shifts caused by inhomogeneities.
Practical application
The aim of this non-destructive material testing method is to determine material properties such as density and modulus of elasticity, but in particular to detect defects and inhomogeneities.
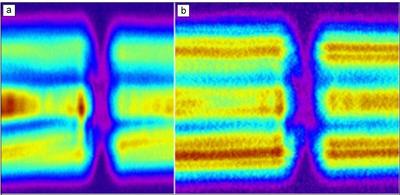
In the practical application of airborne ultrasound, defectoscopy, which uses volume or C-scans to detect component defects, is predominant. Figure 6 below shows the volume image (a) and the C-image (b) of a PE 100 pipe segment with weld line measured from the concave side. The volume image represents a "transmission image" and the C-image a flat layer of the material, which is based on the evaluation of a time interval. These two ultrasound images can be used to detect relative changes in the geometry and internal structures when testing with air coupling.
| Fig. 6: | Volume image (a) and C-image (b) from a flat scan of the PE 100 pipe segment with weld line |
See also
- Ultrasonic direct coupling
- Pulse-echo ultrasonic technique
- Ultrasonic immersion bath technique
- Ultrasonic runtime measurement
- Ultrasonic weld inspection
References
| [1] | Stößel, R.; Krohn, N.: Jahrestagung 2001, Berichtsband 75-CD, DGZfP e.V. (2001) |
| [2] | Huber, A.: Zerstörungsfreie Prüfung für zukünftige Boostergehäuse mittels luftgekoppeltem Ultraschall. 3. Augsburger Produktionstechnik-Kolloquium, Deutsches Zentrum für Luft- und Raumfahrt e.V. (DLR), Zentrum für Leichtbauproduktionstechnologie (ZLP), Augsburg (2015) https://www.dlr.de/de/medien/publikationen/sonstige-publikationen/2015/zerstoerungsfreie-pruefung-fuer-zukuenftige-boostergehaeuse-mittels-luftgekoppeltem-ultraschall_1854/@@download/file (access: 28.04.2025) |
| [3] | Krautkrämer, J.; Krautkrämer, H.: Werkstoffprüfung mit Ultraschall. Springer (2013) p. 296 |
| [4] | Grellmann, W., Seidler, S. (Eds.): Polymer Testing. 3rd Edition, Carl Hanser Munich (2022) p. 456ff; (ISBN: 978-1-56990-806-8; e-book ISBN 978-1-56990-807-5; see AMK-Library under A 22) |
| [5] | Hillger, W.; Ilse, D.; Bühling, L.: Unterschiedliche Verfahren zum einseitigen Zugang bei der Ultraschallprüfung mit Ankopplung über Luft. DACH Jahrestagung 2015, DGZfP e. V. (2015) |
