DCB-Specimen
| A service provided by |
|---|

|
| Polymer Service GmbH Merseburg |
| Tel.: +49 3461 30889-50 E-Mail: info@psm-merseburg.de Web: https://www.psm-merseburg.de |
| Our further education offers: https://www.psm-merseburg.de/weiterbildung |
| PSM on Wikipedia: https://de.wikipedia.org/wiki/Polymer Service Merseburg |
DCB-specimen
Test specimen shapes
Blumenauer [1, 2] requires that the size of the plastic zone (see also: effective crack length) must be small compared to the crack length and the test specimen dimensions.
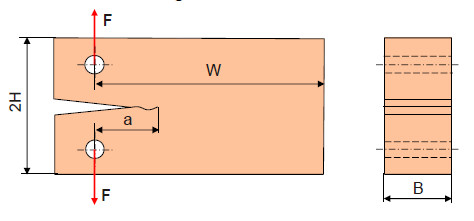
Test procedure F = const.
|
|
| Fig. 1: | Scheme of the DCB-specimen at constant loading |
Determination equation [1, 2]
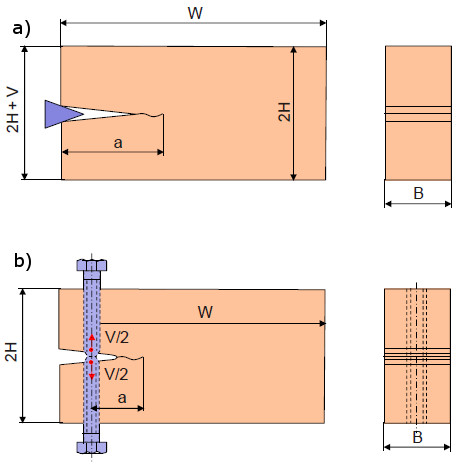
Test procedure v = const.
|
|
| Fig. 2: | Scheme of DCB-specimen at constant deformation; realized with a wedge (a) and with screws (b) |
Determination equation [1, 2]
with
| KI | crack toughness | |
| E | elastic modulus |
Other specimen shape: TDCB (Tapered-double-cantilever beam)-specimen
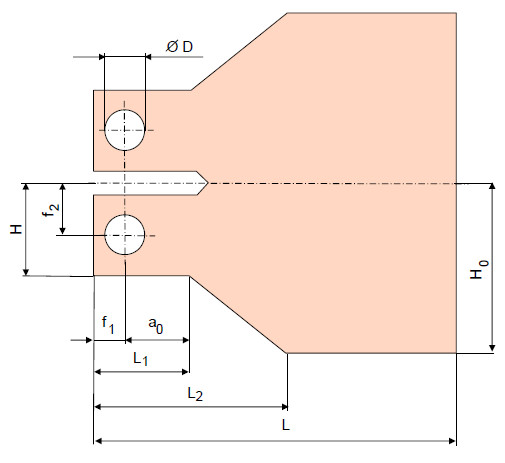
Different specimen shapes of the same basic type are described in the literature. Blumenauer gives such a specimen type in [1]:
|
|
| Fig. 3: | Scheme of a TDCB-specimen [1] |
Determination equation
Load due to tensile force F:
Load due to crack opening V:
for 0.8 < (a/H) < 2.4
Another form of TDCB-specimen is listed under test specimen for fracture mechanics tests.
Determination of fracture mechanical values under the influence of media for the evaluation of stress corrosion cracking
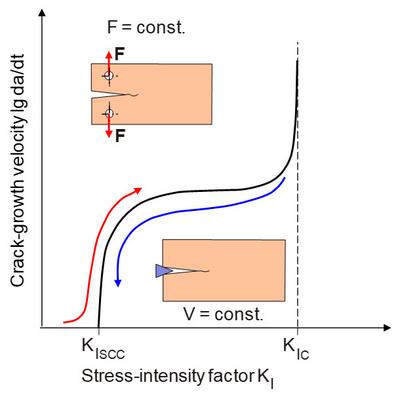
The principle procedure for carrying out the test is shown in Figure 4. The loading on the DCB-specimen can be applied either by a constant load (F = const.) or by a constant deformation (v = const.) using wedges or bolts. In the case of F = const., the KI value that triggers the start of stable crack propagation is determined over several differently loaded test specimens, whereby the corresponding values of F and a are to be used in the determination equation for KI. At v = const. the KI value decreases with increasing crack extension in the corrosive medium and causes the crack to stop. The KIscc value to be calculated belongs to this crack length a and the present notch displacement v according to the corresponding determination equation. Further detailed information on the dimensions of the test specimen and the test procedure can be found in [3]. In analogy to linear elastic fracture mechanics (LEFM), the requirements for the geometry of the test specimens must also be controlled when determining fracture mechanical values under the influence of media for the evaluation of stress corrosion cracking in the plane strain state.
Geometry criterion for metals:
Geometry criterion for polymers:
the following applies: Re = σy = yield stress (yield point)
The geometry constant β is material-dependent (see also geometry size criterion, fracture toughness).
| Fig. 4: | Crack-growth velocity in dependence on stress-intensity factor and kind of experimental condition at constant loading or deformation |
Further detailed information on the test methods mentioned with regard to test specimen dimensions and the test procedure can be found in [3] and [4].
Determination of fracture mechanical values on DCB-specimens for fibre composites
The DCB-specimen was originally developed for fracture mechanics tests on bonded joints, but was then transferred to unidirectional (UD) laminates [5].
Standards
- ASTM D 5528/D5528M (2021): Standard Test Method for Mode I Interlaminar Fracture of Unidirectional Fiber-Reinforced Polymer Matrix Composites
- ISO 15024 (2023-02): Fibre-Reinforced Plastic Composites – Determination of Mode I Interlaminar Fracture Toughness, GIc, for Unidirectionally Reinforced Materials
- ISO 25217 (2009-05): Adhesives – Determination of the Mode I Adhesive Fracture Energy of Structural Adhesives Joints using Double Cantilever Beam and Tapered Cantilever Beam Specimens
Specimen
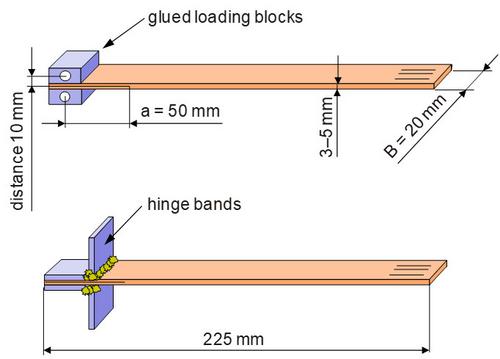
| Fig. 5: | DCB-Specimen with blocks (top) and hinges (bottom) for force initiation |
L = 225 mm
B = 20 mm
a = 50 mm
Test method
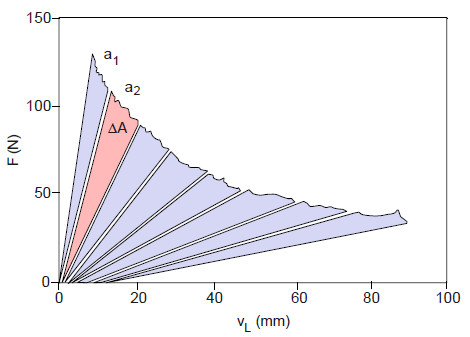
To obtain a defined initial crack, a 50 mm long foil is inserted. Characteristic for this test method is a stable crack propagation, i.e. the crack progress can be controlled during the test. Either aluminium blocks or hinges are used for force initiation. The DCB-specimen is continuously loaded in a universal testing machine – the crack opening is recorded at intervals of approx. 10 mm and the crack length after unloading. There are several established methods for evaluation, of which the area method will be presented here (see Fig. 6). Other methods are described by Hodgkinson in [6]. The critical energy release rate GIc is determined with the help of the load-unload curve according to Fig. 6 using the following equation:
| Fig. 6: | Determination of GIc in the DCB test with the area evaluation method |
Test system for performing DCB tests
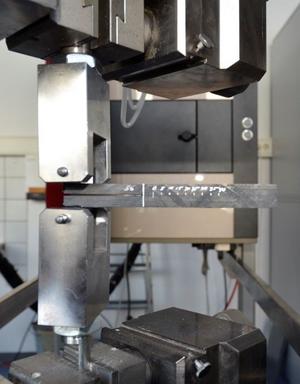
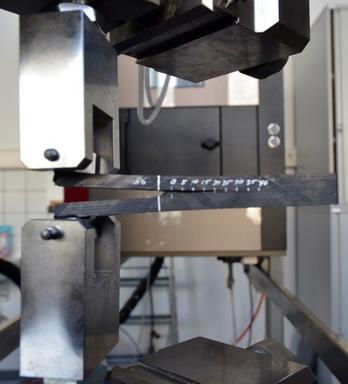
The test set-up shown in Fig. 7 was implemented at Polymer Service GmbH Merseburg to carry out fracture mechanics tests under Mode I loading on DCB-specimens. The left partial image shows the installation of a DCB-specimen in a universal testing machine Z 050 from ZwickRoell GmbH & Co. KG in the unloaded state. The right partial image shows a loaded condition with crack propagation.
|
| ||
| |||
Determination of fracture mechanical values on DCB-specimens for bonded joints
In work by Schlimmer and co-workers [7], the DCB-specimen is used for fracture mechanics evaluation of bonded joints.
See also
- Specimen for fracture mechanics tests
- TDCB-specimen
- Geometry criterion
- Fracture mechanics
- Energy release rate
References
| [1] | Blumenauer, H., Pusch, G.: Technische Bruchmechanik. Deutscher Verlag für Grundstoffindustrie, Leipzig Stuttgart (1987) 2nd Edition, pp. 127–129 and p. 140 (ISBN 3-342-00096-1; see AMK-Library under E 29-2) |
| [2] | Blumenauer, H., Pusch, G.: Technische Bruchmechanik. Deutscher Verlag für Grundstoffindustrie, Leipzig Stuttgart (1993) 3rd Edition, pp. 122–124 (ISBN 3-342-00659-5; see AMK-Library under E 29-3) |
| [3] | Heady, R. B.: Evaluation of Sulfide Corrosion Cracking Resistance in Low Alloy Steels. Corrosion 33 (1977) 3, pp. 98–107 |
| [4] | Dietzel, W, Schwalbe, K.-H.: GKSS-Bericht 87/E/46 |
| [5] | Altstädt, V.: Testing of composite materials. In: Grellmann, W., Seidler, S. (Hrsg.): Polymer Testing. Carl Hanser Munich (2022) 3rd Edition, pp. 547–548 (ISBN 978-1-56990-806-8; e-book: ISBN 978-1-56690-807-5); see AMK-Library under A 23) |
| [6] | Hodgkinson, J. M. (Ed.): Mechanical Testing of Advanced Fibre Composites. Woodhead Publishing, Cambridge (2000) |
| [7] | Großkurth, L., Schlimmer, M.: Bruchmechanische Untersuchungen von Dickschichtklebungen. In: Grellmann, W.: Herausforderungen neuer Werkstoffe an die Forschung und Werkstoffprüfung. Deutscher Verband für Materialforschung und -prüfung. Tagungsband 2005, pp. 377–382 (ISSN 1861-8154; see AMK-Library under A 8) |


![{\displaystyle K_{I}={\frac {E\cdot V\cdot H\left[3H\left(a+0.6H\right)^{2}+H^{3}\right]^{1/2}}{4\left[\left(a+0.6H\right)^{3}+H^{2}a\right]}}}](https://wikimedia.org/api/rest_v1/media/math/render/svg/65436afd47694dc5b181abe61932791867f4c2a5)


