Ultrasonic Direct Coupling
| A service provided by |
|---|

|
| Polymer Service GmbH Merseburg |
| Tel.: +49 3461 30889-50 E-Mail: info@psm-merseburg.de Web: https://www.psm-merseburg.de |
| Our further education offers: https://www.psm-merseburg.de/weiterbildung |
| PSM on Wikipedia: https://de.wikipedia.org/wiki/Polymer Service Merseburg |
Ultrasonic direct coupling
Ultrasonic transducer and testing methods
The application of ultrasonic transducers with direct coupling method on the surface of test object by using different transducer types (normal beam probe, angle-beam probe, angle transmitter-receiver probe or phased array probe) and on the used testing method (through-transmission method or pulse-echo method) is the oldest ultrasonic testing equipment.
While direct contact with the test material is avoided with the air-coupled ultrasonic technique, the immersion bath technique or the squirter technique and thus the surface structure has a comparatively small influence, these influencing factors must be taken into account with the direct contact method in order to obtain evaluable ultrasonic results.
Fundamentals of ultrasonic-contact technique
When ultrasonic waves emitted by a normal or an angled probe strike a surface of a test object perpendicularly or obliquely, the input of ultrasonic energy is significantly affected by the impedance ratio of the system between the surfaces of the probes and the surfaces of the test object. The geometric properties of the surfaces (roughness, corrosion and tool marks) have a great influence on the emitted ultrasonic energy. Part of the ultrasound emitted by the piezo transducer is reflected into the probe, but its intensity is damped by a special damping material applied to the piezo.
Depending on the properties of the probe (medium 1) and the test object (medium 2), a part of the wave penetrates in the testing sample and another part is reflected in the direction of the probe itself. This property depends on the contact between the transducer and the testing sample, too. This is described by the reflection factor (R) and the transmission factor (T or D). Using a normal beam probe, the equations (1) and (2) describe the transmission and reflection behaviour [1].
| (1) |
| (2) |
with:
characteristic acoustic impedance W1 = ρ1 cL1 of medium 1
characteristic acoustic impedance W2 = ρ2 cL2 of medium 2
density ρ1/2 of medium 1 or 2
velocity of the longitudinal wave’s cL1/2 of medium 1 or 2
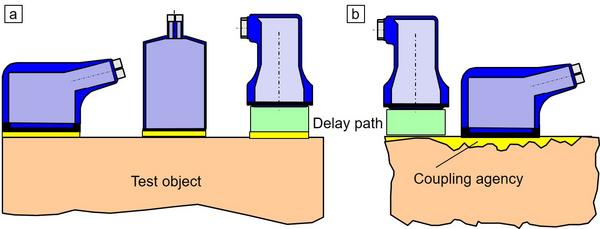
By identical media, i. e. W1 = W2, is R = 0 and T = 1, sound transmission is not impeded, whereas when reflecting from acoustically soft material, a phase inversion happens and the reflection factor is negative. An important precondition for unhindered sound transmission into the medium 2 or the test specimen, which is why coupling media such as water, oil, grease or coupling gel are used, especially when the quality of the specimen surface is low, as thin air gaps hinder sound transmission (Fig. 1).
| Fig. 1: | Direct coupling of (a) angle probe, trans-receiver probe and normal probe at high surface quality and (b) normal and angle probe at low surface quality |
Types of coupling media and effect of coupling layer
In ultrasound contact technique, coupling media are used independently of the type of probes. The viscosity of the coupling media is an important influencing factor, as longitudinal or transverse waves require different impedance matching. Since small air gaps of 10 nm cause a complete reflection of the ultrasonic waves into the transducers, the coupling layer is of great importance regardless of the type of probe and test material. While water, oil, low viscosity grease, glycerine or a special coupling gel are preferably used for longitudinal waves, pastes, graphite, high viscosity grease, gypsum or hydrogel are used for transverse waves.
The thickness of the coupling layer is defined significantly by the quality of the testing surface, whereby the coupling thickness (matching layer) has to be unequal of (2 n+1) λ/4, otherwise a maximum of reflection exists.
If a delay-line in the form of a wedge is used, analogue coupling media are used, which cannot be taken by higher temperatures of the test object due to a possible thermal instability of these media. The thermal influence on the properties of the sample, the coupling medium and the probe with the delay-line must generally be taken into account in defectoscopy as well as in thickness measurement. [1, 2].
See also
- Ultrasonic immersion bath technique
- Pulse-echo ultrasonic technique
- Ultrasonic runtime measurement
- Ultrasonic weld inspection
- Ultrasonic wall thickness measurement
References
| [1] | Deutsch, V., Platte, M., Vogt, M.: Ultrasonic Testing. Fundamentals and Industrial Applications. Springer Berlin (1997), (ISBN 978-3-540-62072-9; see AMK-Library under M 45) |
| [2] | Matthies, K.: Thickness Measurement with Ultrasound. DVS-Media Berlin (1998). ISBN 978-3-87155-941-9 (see AMK-Library under M 44) |


