D-Scan Technique
| A service provided by |
|---|

|
| Polymer Service GmbH Merseburg |
| Tel.: +49 3461 30889-50 E-Mail: info@psm-merseburg.de Web: https://www.psm-merseburg.de |
| Our further education offers: https://www.psm-merseburg.de/weiterbildung |
| PSM on Wikipedia: https://de.wikipedia.org/wiki/Polymer Service Merseburg |
D-scan technique
General information
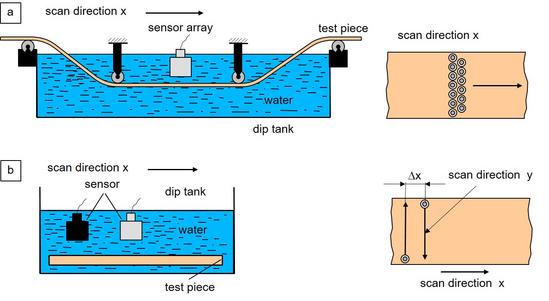
The D-scan is an ultrasound testing and evaluation method for two-dimensional imaging of the acoustic properties of the surfaces of test specimens. The D-scan, which is usually generated together with the C-scan, is composed of A-scans that have been recorded using a raster of equidistant measuring points. In contrast to the C-scan, a colour or gray value is assigned to the sound runtime of the first recorded amplitude of the received signal. The recording of the amplitudes depends on whether they exceed a trigger threshold defined by the tester. This means that each A-scan is assigned a colour or gray value depending on the start of the measurement interval and the trigger threshold. In the D-scan, these image points are combined, and the colour values are graded and displayed relative to the scale of the colour palette used [1, 2]. The tests required for the D-scan can be performed using air ultrasound, the squirter technique, or in an immersion bath. If a moving test object is present, e.g., a passing plate, then a fixed sensor array can be used; otherwise, the sensor (see: ultrasonic sensors) performs a meandering scanning movement on the stationary test object (Fig. 1) [3].
| Fig. 1: | Schematic diagram of the passive (a) and active (b) scanning process on a plate to generate the D-scan |
Construction of the D-scan
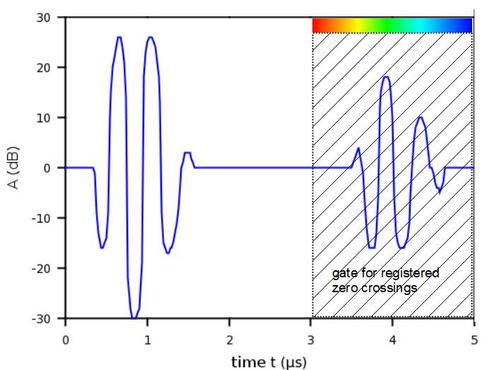
A manipulator (scanner with a defined step size) is used to scan the test piece to be examined in accordance with the previously specified raster definition. The HF-scans or A-scans are recorded at the raster points. In order to generate a D-scan from the HF-scan, a colour or gray palette is assigned to the timescale. As an example, Fig. 2 shows the measurement signal of an aluminium plate, with a possible colour palette for colour coding a limited time interval within which the zero crossings to be evaluated are recorded.
| Fig. 2: | A-scan of an ultrasonic HF-signal on an aluminium plate (d = 10 mm) |
The determined time values at the zero crossings of the recorded amplitudes are arranged in a matrix according to the scanned raster (Fig. 3a). The time values are then colour-coded using a colour palette. The extremes of the selected colour palette are assigned to the beginning and the end of the time interval, resulting in a relative assignment of the colour values to the time values of different zero crossings (Fig. 3b). These values are often smoothed, as shown in Fig. 3c.
| Fig. 3: | Example of a matrix from the time values (ultrasound runtime) of the zero crossings of triggered amplitudes from the HF-scan (a), colour-coded matrix (b), and the smoothed presentation of the colour matrix (c) |
Practical relevance of the D-scan
The D-scan is very important for testing component interfaces. Its special property compared to the C-scan is the sensitive examination of surfaces. For example, slight deviations from the component plane and, in comparison with a reference measurement, irregularities in the component geometry can be detected, and impact damage (see also: compression after impact (CAI) test) can be examined and documented.
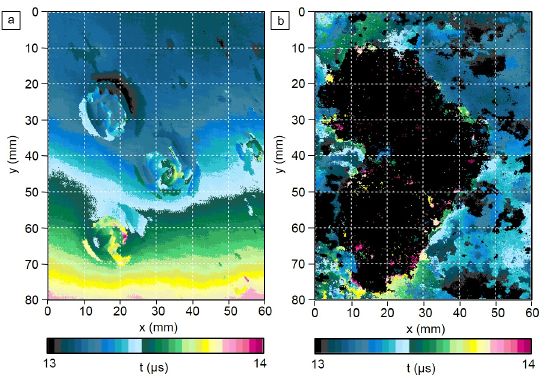
| Fig. 4: | Example of an ultrasonic examination using D-scans on a glass fibre-reinforced composites component damaged by three impacts: (a) surface and (b) back wall |
Figure 4 shows the D-scans of the surface (a) and rear wall (b) of a glass fibre-reinforced composite component. This is made possible by selecting suitable time intervals for the response signal using apertures. A comparison of these two images shows the typical impact behaviour of a glass fibre-reinforced plastic, i.e. the damage spreads conically towards the rear wall (impact trombe). The colouring in Fig. 4a shows that the test specimen is not exactly parallel to the scan plane. The impacts and pores near the surface are clearly visible. The damage area shown on the rear side in Fig. 4b is easy to detect. However, noise caused by the high signal amplification is noticeable here.
The advantage of the D-scan over the C-scan is the suppression of reflections from deeper interfaces, which makes it much easier to evaluate surfaces. The dimensions of surface defects that can still be detected depend on the measurement technique used (sensor and measurement frequency).
See also
- A-scan technique
- B-scan technique
- Imaging ultrasonic testing
- C-scan technique
- F-scan technique
- HF-scan
- Ultrasound testing
References
| [1] | Matthies, K., Gohlke, D.: Der Ultraschall-Volumenscan als Werkzeug zur Prüfung komplizierter Geometrien und komplexer Gefüge. DGZfP-Jahrestagung 2007 |
| [2] | Deutsch, V., Platte, M., Vogt, M.: Ultraschallprüfung – Grundlagen und industrielle Anwendungen. Springer, Berlin Heidelberg (1997), (ISBN 3-540-62072-9; see AMK-Library under M 45) |
| [3] | Jashari, L.: Auswahl und Charakterisierung einer spezifischen technologischen Schnittstelle und Wechselwirkung innerhalb einer CFK-Prozesskette. disserta Publishing (2015) p. 95 (ISBN 978-3-9563-6697-0; e-Book ISBN 978-3-956363-53-5) |
Weblink
- http://www.karldeutsch.de/KD_GENERAL_DL_Contents_DE_M1.html (last access 02.11.2025)


