KNOOP Hardness: Difference between revisions
Oluschinski (talk | contribs) Created page with "{{Language_sel|LANG=ger|ARTIKEL=KNOOP-Härte}} {{PSM_Infobox}} <span style="font-size:1.2em;font-weight:bold;">KNOOP hardness</span> __FORCETOC__ ==Basics== The KNOOP hardness test method was introduced into materials testing in 1939 by Knoop, Peters and Emerson. It is one of the classic conventional test methods for evaluating hardness, whereby an allocation to the small load or micro range was made from the outset and 10 N was recommended as the highes..." |
(No difference)
|
Latest revision as of 12:39, 3 December 2025
| A service provided by |
|---|

|
| Polymer Service GmbH Merseburg |
| Tel.: +49 3461 30889-50 E-Mail: info@psm-merseburg.de Web: https://www.psm-merseburg.de |
| Our further education offers: https://www.psm-merseburg.de/weiterbildung |
| PSM on Wikipedia: https://de.wikipedia.org/wiki/Polymer Service Merseburg |
KNOOP hardness
Basics
The KNOOP hardness test method was introduced into materials testing in 1939 by Knoop, Peters and Emerson. It is one of the classic conventional test methods for evaluating hardness, whereby an allocation to the small load or micro range was made from the outset and 10 N was recommended as the highest test load. An asymmetrical four-sided diamond pyramid with a diagonal ratio of 7.114 : 1 is used as the indenter. This Knoop indenter has two different tip angles of 172°30" and 130° respectively. Due to this geometry, the Knoop indenter is also advantageously used to solve application-technical problems with the help of instrumented micro hardness testing (see Instrumented hardness testing).
Definition of the KNOOP hardness
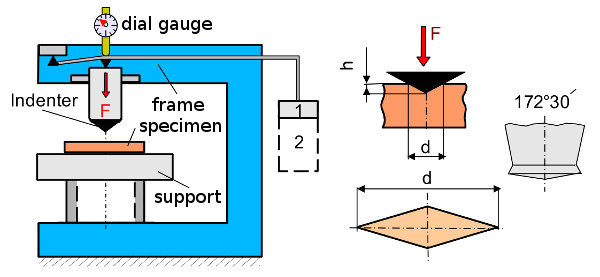
In contrast to Vickers hardness, where the indentation surface is used for calculation, KNOOP hardness (abbreviation: HK) is determined with the help of the projection surface of the indentation. HK is calculated using the large indentation diagonals:
with
| HK | KNOOP hardness in N/mm2 | |
| F | test load in N | |
| A | projected indentation surface in mm2 | |
| l | large indentation diagonal in mm |
The KNOOP hardness method is particularly suitable for the determination of characteristic values in layers close to the surface and very thin test specimens, as the indentation depth of the long diagonal to the short diagonal has a ratio of 1 : 30.514 (Fig. 1).
| Fig. 1: | Schematische Darstellung einer Knoop-Härte Prüfung |
Due to this penetration depth ratio, extreme demands are made on the evenness and roughness of the surface to be tested, resp. the geometric dimensions of the test specimen. The KNOOP hardness is suitable for the verification of residual stress and in particular also of structural and morphological anisotropy effects by considering the directional dependence of the determined HK characteristic values.
Suitability of the KNOOP hardness for the detection of orientations
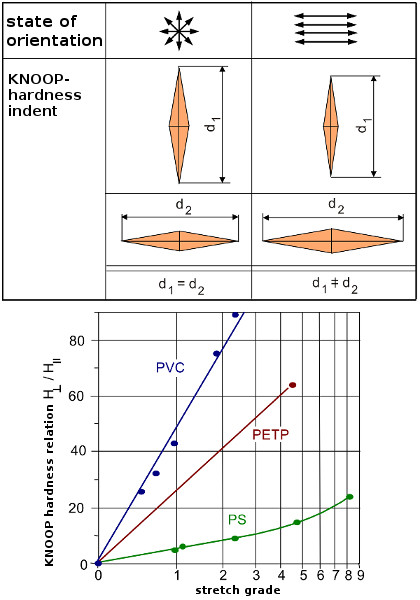
Figure 2 shows schematically the influence of the orientation on the indentation geometry.
| Fig. 2: | Schematic representation of the influence of orientations on the longitudinal and transverse diagonal of the indentation surface in KNOOP-hardness (top) and determination of the anisotropy of selected plastics (according to Weiler; bottom) |
In oriented thermoplastic materials, the stresses under the indenter are greater in the direction of orientation than perpendicular to it. After relieving the indenter, the shortening of the diagonals of the indenter is pronounced to different degrees, as the strain field is no longer symmetrical.
If the major principal axis is parallel to the orientation, the maximum strain is perpendicular to the preferred direction of the molecular chains, which leads to an enlarged indentation. Thus, higher hardness values are determined in the direction of orientation than perpendicular to it.
If the major axis is oriented perpendicular to the preferred direction of the molecular chains, the maximum strain occurs parallel to the molecular orientation, resulting in a reduced impression. The characteristic values determined with the KNOPP hardness test method prove to be extremely sensitive for detecting anisotropies in materials.
See also
References
- Knoop, F., Peters, C., Emerson, W. B.: J. Res. Nat. Bur. Stand. 23 (1939) 39
- ASTM E 384 (2022): Standard Test Method for Microindentation Hardness of Materials
- ASTM D 1474/D1474M (2013; reapproved 2023): Standard Test Method for Indentation Hardness of Organic Coatings
- VDI/VDE 2616 Blatt 2 (2014-07): Härteprüfung an Kunststoffen und Elastomeren
- Blumenauer, H. (Hrsg.): Werkstoffprüfung. Deutscher Verlag für Grundstoffindustrie, Leipzig Stuttgart (1994) 6. Auflage, (ISBN 3-342-00547-5; see AMK-Library under M 3)
- Grellmann, W., Seidler, S. (Eds.): Polymer Testing. Carl Hanser Munich (2022) 3. Edition, pp. 180/182 (ISBN 978-1-56990-806-8; see AMK-Library unter A 23)
- Weiler, W. W.: Härteprüfung an Metallen und Kunststoffen. 2. aktualisierte und erweiterte Auflage, Expert Verlag, Renningen (1990), (ISBN 978-3-8169-0552-3)


