Notch Sensitivity
| A service provided by |
|---|

|
| Polymer Service GmbH Merseburg |
| Tel.: +49 3461 30889-50 E-Mail: info@psm-merseburg.de Web: https://www.psm-merseburg.de |
| Our further education offers: https://www.psm-merseburg.de/weiterbildung |
| PSM on Wikipedia: https://de.wikipedia.org/wiki/Polymer Service Merseburg |
Notch Sensitivity
General information
The impact strength (see: Impact test), determined on unnotched test specimens, and the notched impact strength (see: Notched impact test), determined on notched test specimens of a plastic, are of particular technical relevance for the evaluation of the toughness of components (see: impact loading plastics). The requirement profile for a component, such as the mechanical stress level, the geometric design, dimensional accuracy as well as thermal and medial loads can usually be determined fairly precisely. In contrast, the property profile of the plastic in a concrete component depends on a large number of individual factors. One important property is the notch sensitivity of the plastic, which decisively influences the deformation and fracture behaviour in the event of the occurrence of design-related notches (sharp-edged cross-sectional transitions, ribs, edges, cut-outs, etc.).
Definition of notch sensitivity
Notch sensitivity describes the sensitivity of a plastic to external notches. It can be determined, for example, under impact loading with the help of the Charpy test arrangement. For this purpose, tests are carried out on both notched and unnotched test specimens. Since the test speed also has an influence on the characteristic toughness values, it should be kept constant for both methods. Since the impact velocity is dependent on the potential nominal energy of the pendulum hammer [1], this should be selected so that the unnotched test specimen can be tested in accordance with the standard [2].
To determine the CHARPY notched impact strength, the notched test specimen is positioned centrally on the support so that the notch is on the tensile side (see notch geometry). The impact is therefore on the side opposite the notch.
The CHARPY notched impact strength acN is determined from the corrected impact energy Ec, related to the smallest initial cross-section of the test specimen at the notch tip. The impact strength acU is determined on the unnotched test specimen:
and
with
| bN | residual width of the specimens under the notch | |
| b | width of the unnotched specimen | |
| h | thickness of test specimen |
If no fracture (at least partial fracture) occurs in the unnotched test specimen, no impact strength can be determined, since according to ISO 179-1 [2] the presence of a total fracture is a necessary condition for this. This is typically observed with plastics that do not have the necessary stiffness, so that they are merely bent and pulled through the abutments during impact. In this case, a fracture-promoting effect could be achieved, for example, by modifying the test parameters ( support distance, temperature).
The notch sensitivity kZ can then be calculated from the quotient of notch impact strength acN and impact strength acU:
The notch sensitivity also provides information about the effectiveness of fillers.
Influence of the notch radius on the notch impact strength
The notch impact strength is decisively influenced by the selected notch radius (see: notch geometry) and the method of notch insertion (sawing, milling, planing). In addition to the machining processes themselves, the respective machine parameters, such as feed rate or cutting speed, also have an influence on the notch impact strengths determined. The extent of the differences depends on the material, whereby the notch impact strength generally increases with increasing notch radius. In the notch radius range of 0.1 mm to 1 mm specified by the ISO test standard [2], the differences in the determined notched impact strengths are most pronounced.
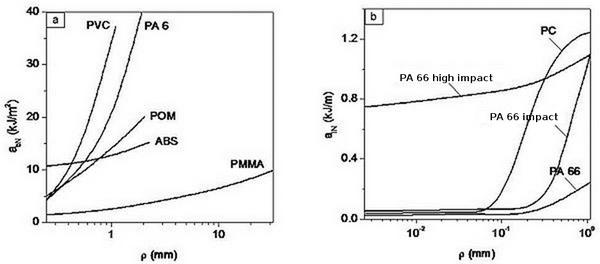
Figure 1a shows that polyvinyl chloride (abbreviation: PVC), polyamide ( abbreviation: PA; trade name: nylon) and polyoxymethylene ( abbreviation: POM) show qualitatively similar behaviour as a function of the notch radius, whereby the influence of the notch radius is most pronounced for PVC. Acrylonitrile butadiene styrene ( abbreviation: ABS) and polymethyl methacrylate (abbreviation: PMMA) show less dependence at different toughness levels. ABS proves to be the most notch-insensitive in the notch radius range considered.
The large tolerance range that ISO 179-1 allows for the defined notch radii must be viewed correspondingly critically. For the standard notch type A, a nominal radius in the notch base of 0.25 mm is specified with a tolerance of ± 0.05 mm. However, the standard itself shows that the notched impact strength of a polycarbonate ( abbreviation: PC) can drop to 10 kJ/m² for a standard-compliant 0.20 mm notch radius, while it is approx. 65 kJ/m² for 0.25 mm.
In Fig. 1b, the examined notch radius range was extended in the direction of smaller notch radii ρ up to ρ = 2.5 µm by introducing metal blade notches. For PA 66, PA 66 impact resistant and polycarbonate ( abbreviation: PC), brittle material behaviour is already present at notch radii < 0.1 mm, characterised by low IZOD notched impact strength values aIN that are independent of the notch radius. In contrast, for high-impact PA 66, only a slight influence of the notch radius in the range of 2.5 µm to 0.25 mm on the IZOD notched impact strength is found (see impact test).
Attention: Due to the different loading, CHARPY and IZOD notched impact strength are not quantitatively comparable. Accordingly, there is no generally valid formula for converting the characteristic values.
| Fig. 1: | Dependence of CHARPY notched impact strength acN on notch radius ρ for selected plastics (a) and IZOD notched impact strength aIN on ρ for PA materials (high impact PA 66, impact PA 66, PA 66) and PC (b) [3, 4] |
Qualitatively, however, there are similar tendencies depending on the notch radius. Of the materials considered here, ABS and the highly impact-resistant PA 66 prove to be notch-insensitive over the entire notch radius range. The loading temperature and the loading velocity must be taken into account as additional influencing variables.
The determination of the temperature dependence of the toughness with the aim of specifying material-specific brittle-tough transition temperatures is, as can be deduced from the figure, only meaningful by means of sharp notches.
Analogous statements can be made for the dependence of the toughness on the velocity. Thus, it becomes clear that the specification of critical notch radii is only possible from investigations of the dependence of fracture-mechanical characteristic values on the notch radius.
Influence of the notch radius on the J values of PE, PP and PB
Wilke [5] carried out fracture mechanics tests on the selected polyolefin materials polybutene ( abbreviation: PB), polyethylene ( abbreviation: PE) and polypropylene ( abbreviation: PP) to evaluate the influence of the notch sharpness on the toughness behaviour. All test specimens were available as injection-moulded multi-purpose test specimens from which prismatic test specimens with dimensions of 80 mm ×10 mm ×4 mm were prepared in accordance with ISO 3167 type A.
Afterwards, a notch was introduced on the narrow side using the NOTCHVIS notch device from Ceast. The following notch radii were selected for the tests: 0.05 mm, 0.1 mm, 0.25 mm and 1 mm. Furthermore, a set of test specimens was provided with a sharp metal blade notch for each material. The notch depth was 2 mm regardless of the notch radius, so that the test specimen width in the notch tip (ligament length) was reduced from 10 mm to 8 mm. In order to keep the load in front of the blade tip as low as possible and to largely exclude any preliminary damage to the material, a 1 mm long notch with a notch radius of 0.1 mm was inserted first before inserting a 1 mm long metal blade notch, so that the total notch depth was also 2 mm here. For the pure polyolefins, a metal blade with a blade radius of 0.15 µm was chosen for this (see also notch geometry).
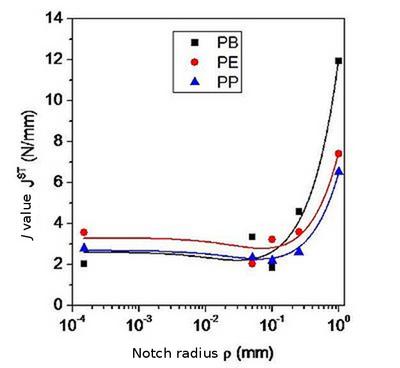
The evaluation of the load–deflection diagrams recorded in the instrumented notched Charpy impact test, e.g. the determination of the maximum load Fmax as well as the energy components Ael and Apl, was carried out according to MPK-Procedure (MPK-ICIT) [6]. The dependence of the J values JST calculated by means of the approximation formula according to Sumpter and Turner (ST) on the notch radius is shown for three polyolefin materials in Figure 2.
| Fig. 2: | J-values JST of the polyolefin materials PE, PP and PB as a function of notch radius (ST: Estimation method according to SUMPTER and TURNER) |
In the investigations, PB proves to be the most ductile (see ductility plastics) and PP the least ductile due to its significantly increased deformability; PE occupies an intermediate position. The values of the J-integral can be explained very well with the notch stress doctrine (gauge), whereby the critical values for the notch radius of 0.2 to 0.6 mm are one to two orders of magnitude higher than the values found for other plastics [7].
See also
References
| [1] | ISO 13802 (2025-08): Plastics – Verification of Pendulum Impact-Testing Machines – Charpy-, Izod- and Tensile Impact-Testing |
| [2] | ISO/DIS 179-1 (2025-05): Plastics – Determination of Charpy Impact Properties – Part 1: Non-instrumented Impact Test (Draft) |
| [3] | Flexman, E. A.: Verhalten von Polyamid 66 bei Schlagbeanspruchung. Kunststoffe 69 (1979) 172–174 |
| [4] | Vincent, P. I.: Impact Tests and Service Performance of Thermoplastics. Plastics Institute, London (1971) |
| [5] | Wilke, A.: Einfluss der Kerbschärfe auf das Zähigkeitsverhalten ausgewählter Kunststoffe und Ableitung materialspezifischer Kennwerte. Diplomarbeit Martin-Luther-Universität Halle-Wittenberg (2009) (see AMK-Library under B 3-146) |
| [6] | MPK-Procedure (MPK-ICIT) (2016-03): Testing of Plastics – Instrumented Charpy Impact Test (ICIT): Procedure for Determining the Crack Resistance Behaviour Using the Instrumented Impact Test |
| Part I: Determination of Characteristic Fracture Mechanics Parameters for Resistance Against Unstable Crack Propagation | |
| Part II: Determination of Characteristic Fracture Mechanics Parameters for Resistance Against Stable Crack Propagation | |
| [7] | Kinloch, A. J., Young, R. J.: Fracture Behaviour of Polymers. Elsevier Appl. Sci. Publ., London New York (1985) |


