Imaging Ultrasonic Testing
| A service provided by |
|---|

|
| Polymer Service GmbH Merseburg |
| Tel.: +49 3461 30889-50 E-Mail: info@psm-merseburg.de Web: https://www.psm-merseburg.de |
| Our further education offers: https://www.psm-merseburg.de/weiterbildung |
| PSM on Wikipedia: https://de.wikipedia.org/wiki/Polymer Service Merseburg |
Imaging Ultrasonic Testing
Graphical representations of ultrasound images
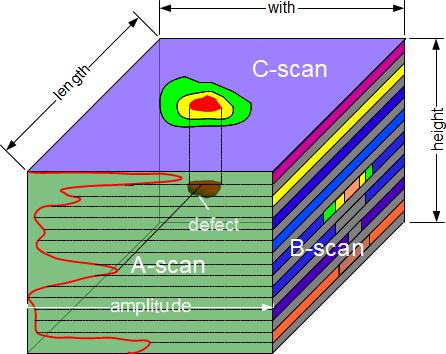
Imaging ultrasound testing basically covers all graphical representations of amplitude as a function of time or location. It ranges from simple HF-scan representation using a simple oscilloscope to A-scan and 4d-scan. The information provided by ultrasonic images varies depending on the type of representation. The A-scan (rather than the HF-scan) is particularly important due to its relatively easy-to-interpret representation. For this reason, it is not customary to classify this representation of ultrasonic signals, which has existed since the early days of ultrasound testing, as imaging ultrasound testing. In addition, for physical reasons, ultrasound testing is mostly used as a single-point test, whose signals are processed as HF- or A-scans. It was only later that line scanning (B-scan) and area scanning (C/D-scan) became technically viable. The scan is actually a raster scan, because the A-scans are composed as images in line or area form and scaled (by colour or grey scale) (Fig. 1). To ensure that the sensor is subject to as little mechanical wear as possible, the scans are performed using, for example, the squirter technique or immersion technique. The basic metrological requirement is therefore an active scanning process of the ultrasonic sensor or the ultrasonic beam in phased array technology, as well as passive scanning, in which the test piece moves under an ultrasonic test field. With this type of measurement, the HF-signals are recorded as a function of location and time and evaluated in terms of signal propagation time and/or amplitude or attenuation.
| Fig. 1: | Schematic diagram of the relationship between A-, B- and C-scans in relation to the visual representation of errors |
Types of imaging in ultrasonic testing
The actual ‘ultrasonic imaging test’ is therefore characterised by the graphical 2D or 3D representation of the ultrasonic signal. A distinction is made between
as well as several other types of representation that have been developed for special cases.
See also
References
| [1] | Deutsch, V.; Platte, M.; Vogt, M.: Ultraschallprüfung – Grundlagen und industrielle Anwendungen. Springer, Berlin Heidelberg (1997), ISBN 978-3-642-63864-0; see AMK-Library under M 45) |
| [2] | Krautkrämer, J.; Krautkrämer, H.: Werkstoffprüfung mit Ultraschall. Springer, Berlin Heidelberg (2013) (ISBN 978-3-662-10910-6) |
| [3] | Ahrholdt, M.: Ein System zur automatischen Auswertung von Ultraschall-Messdaten. Cuvillier Verlag (2005) (ISBN 978-3-8653-7581-0) |

