Bend Test – Specimen Preparation: Difference between revisions
Oluschinski (talk | contribs) Created page with "{{Language_sel|LANG=ger|ARTIKEL=Biegeversuch Prüfkörperentnahme}} {{PSM_Infobox}} <span style="font-size:1.2em;font-weight:bold;">Bend test – Specimen preparation</span> __FORCETOC__ ==Specimen shapes for bend testing== For the three-point bend test on plastics, in accordance with the relevant standards of bend testing of plastics [1–3], the test specimen with dimensions 80 mm x 10 mm x 4 mm is preferably used. This test specimen ca..." |
(No difference)
|
Revision as of 14:16, 28 November 2025
| A service provided by |
|---|

|
| Polymer Service GmbH Merseburg |
| Tel.: +49 3461 30889-50 E-Mail: info@psm-merseburg.de Web: https://www.psm-merseburg.de |
| Our further education offers: https://www.psm-merseburg.de/weiterbildung |
| PSM on Wikipedia: https://de.wikipedia.org/wiki/Polymer Service Merseburg |
Bend test – Specimen preparation
Specimen shapes for bend testing
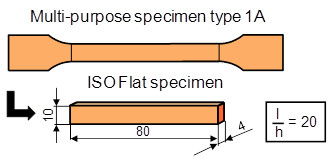
For the three-point bend test on plastics, in accordance with the relevant standards of bend testing of plastics [1–3], the test specimen with dimensions 80 mm x 10 mm x 4 mm is preferably used. This test specimen can be manufactured directly by injection moulding or from the multipurpose test specimen type 1A by cutting off the plane-parallel part (Fig. 1). The advantage of this type of specimen production is the comparability of the internal condition of the specimens with respect to residual stress and orientations.
| Fig. 1: | Preparation of specimen for the bend test from multi-purpose specimen type 1A |
Specimen shapes for bend testing
The test specimens used must not have any rounded corners or edges or sink marks due to impermissibly high volume shrinkage. The presence of cracks, burrs or scratches as well as strong tendency to demould test specimen in injection moulding can cause additional problems that falsify the measurement results. In addition, the test specimens should not exhibit any torsion and must have surfaces that are perpendicular and plane-parallel to one another. According to the mostly used standard ISO 178 [3], the nominal thickness should be in the interval of 3 to 5 mm, preferably 4 mm, and then the test specimen width should be 10 mm. In the case of deviating specimen thicknesses, the specimen width must then be adjusted accordingly [3].
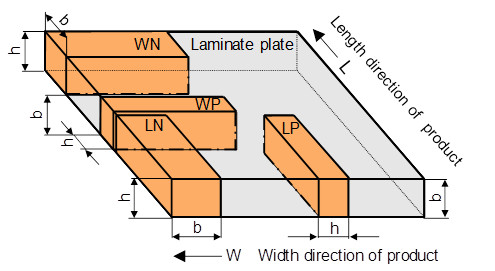
In principle, it is also possible to produce the required test specimens by sawing and milling from extruded or calendered sheets, in which case the sheet thickness influences the geometry of the test specimens. In this case, the width b must also be adapted to the nominal thickness of the sheet. As a result, widths of up to 50 mm are technically possible. If filled materials with coarse fillers with regard to geometry are to be characterized, then width and thickness must also be varied to avoid impermissibly high stress peaks. Since such specimens, which are made from plates, usually have a high degree of anisotropy, in this case specimen removal must be carried out in the two main directions (longitudinal = L and transverse = W), with the test direction (perpendicular = N and parallel = P) also being variable (Fig. 2).
| Fig. 2: | Production of specimen for bend test from anisotrope plates |
Test specimens for long fiber reinforced thermoset materials
Particular problems arise when specimens are taken from long-fibre-reinforced, layered anisotropic thermoset-based plastics (laminates). Since only normal stress components in the longitudinal direction of the test specimen are taken into account in the standard-compliant evaluation of the bending test, premature failure occurs under identical test conditions as with the short-fibre-reinforced materials. The cause is the occurrence of interlaminar shear fractures with large-area delaminations caused by the transverse force shear component. To minimize the shear stress component, the ratio of support length L to test specimen thickness h is increased from normally 16 to 20 to 25 for such materials.
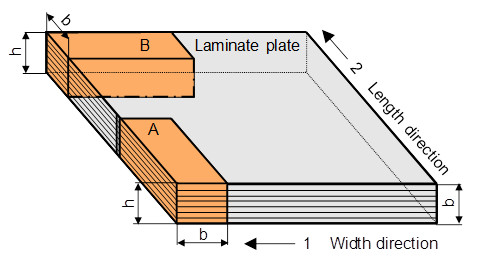
To characterize the properties in the longitudinal and transverse directions, the test specimens must also be taken in both main orientation directions (Fig. 3), with the specimen length being based on the specimen thickness and the required support span ratio. Since the position of the specimens in relation to the main orientation direction has a decisive influence on the characteristic material value level, the prismatic specimens must be prepared from the laminated sheets as shown in Figure 3. In this case, the removal direction of the specimens must be clearly marked with respect to the processing or orientation direction [4].
| Fig. 3: | Position of specimen for the bend test at anisotrope materials (laminates) |
Bending test specimen made of plastic components
When removing test specimens from plastic components, e.g. for a failure analysis, standardized test specimens with the dimensions 80 mm x 10 mm x specimen thickness in mm should also be removed, if possible. In this case, particular attention must be noted to the direction of removal with respect to the component geometry and the direction of injection, and the test specimens must be clearly marked (Fig. 4). As a rule, transversely curved test specimens, e.g. taken from pipe segments, should not be used or, if they have the same geometry, should only be evaluated from a comparative point of view, since only a point contact on the support can be realized here.
File:Biegeversuchpkentnahme4.jpg
| Fig. 4: | Removal of specimen for the bend test from plastic components |
Slight longitudinal curvatures of the test specimens are acceptable, since these can be taken into account in the calculation equations for the peripheral fibre strain and the flexural strength (Fig. 5).
File:Biegeversuchpkentnahme5.jpg
| Fig. 5: | Curved test specimen for the bend test from plastic components |
See also
- Bend test
- Bend test – Test influences
- Bend test – Shear stress
- Bend loading
- Bend test – Specimen shapes
- Bend test – Yield stress
Referencex
| [1] | Bierögel, C.: Bend Test on Polymers. In: Grellmann, W., Seidler, S. (Eds.): Polymer Testing. Carl Hanser Munich (2022) 3. Edition, 133–143 (ISBN 978-1-56990-806-8; see under AMK-Library A 22) |
| [2] | Bierögel, C., Grellmann, W.: Bend Loading. In: Grellmann, W., Sabine Seidler (Eds.): Mechanical and Thermomechanical Properties of Polymers. Landolt-Börnstein, Volume VIII/6A3, Springer Berlin (2014) 164–191, (ISBN 978-3-642-55165-9; see under AMK-Library A 16) |
| [3] | ISO 178 (2019-04): Plastics – Determination of Flexural Properties |
| [4] | ISO 14125 (1998-03): Fibre-reinforced Plastic Composites – Determination of Flexural Properties, Technical Corrigendum Cor.1:2001-07 and Amd.1:2011-02 |


