Bend Test Compliance: Difference between revisions
Oluschinski (talk | contribs) Created page with "{{Language_sel|LANG=ger|ARTIKEL=Biegeversuch Nachgiebigkeit}} {{PSM_Infobox}} <span style="font-size:1.2em;font-weight:bold;">Bend test compliance</span> __FORCETOC__ ==The machine compliance of the materials testing machine== In bending tests to characterise the deformation behaviour or elastic properties of plastics, it may not be possible to use measuring devices for direct measurement of the deflection of the test specimen..." |
(No difference)
|
Latest revision as of 14:09, 28 November 2025
| A service provided by |
|---|

|
| Polymer Service GmbH Merseburg |
| Tel.: +49 3461 30889-50 E-Mail: info@psm-merseburg.de Web: https://www.psm-merseburg.de |
| Our further education offers: https://www.psm-merseburg.de/weiterbildung |
| PSM on Wikipedia: https://de.wikipedia.org/wiki/Polymer Service Merseburg |
Bend test compliance
The machine compliance of the materials testing machine
In bending tests to characterise the deformation behaviour or elastic properties of plastics, it may not be possible to use measuring devices for direct measurement of the deflection of the test specimen (extensometers or optical sensors). This occurs when measurements are taken in a temperature chamber or when the deformation behaviour of plastics with varying glass or carbon fibre content is to be compared. When performing conventional bending tests with constant crosshead speed in accordance with ISO 178 [1], the test conditions and the determination of characteristic values are influenced by a wide variety of factors. Due to the external stress imposed, the various components of the universal testing machine are deformed, which is also known as machine compliance (see also: tensile test compliance) and has a significant influence on the crosshead path measurement. The deformation of the test machine's crossbars and spindles, as well as the slip of the drive (motor) and the bending of the crosshead and traverse, are included in the deflection measurement signal as ΔfF, whereby the absolute errors are relatively small. The largest contribution is made by the deformation of the deformation body of the force measuring cell ΔfK and, in particular, by the impression of the supports and the test stamp in the test specimen ΔfW. The quality of the supports has a significant influence on the measurement result and thus significantly influences the elastic characteristic values, such as the modulus of elasticity or strain limits. The deflection signal ΔfM therefore consists of the sum of the individual deformation components of the test equipment ΔfM = ΔfP + ΔfF + ΔfK + ΔfEW and thus essentially determines the compliance of the test system. Any configuration change made by the user of the testing machine (force transducer, extension rods, roller support and roller radius) influences the value of the compliance K.
Compliance in the three-point bending test
Due to configuration dependencies, machine compliance is not usually specified by the manufacturer of the material testing machine. If it is known, the compliance in mm/kN is usually only the reciprocal of the stiffness of the load frame (see also: machine compliance) without additional equipment. This value usually corresponds only to a calculated value, e.g. using the finite element method (FEM). Since, in the case of crosshead path measurement, the compliance depends on the additional equipment used, some of which is developed by the testing laboratory, many testing machine manufacturers have integrated software modules into the testing software that allow the compliance and a correction curve to be determined. This guarantees optimum deflection measurement and positioning accuracy via the crosshead encoder even without the use of special deflection sensors. These correction curves cannot replace high-precision strain gauges, which measure the deformation directly on the test specimen.
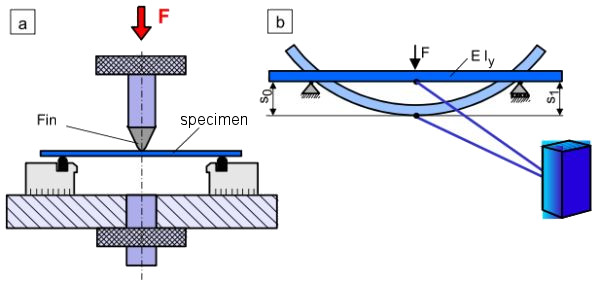
To determine the compliance Ct in the bending test, a test specimen with high bending stiffness Ef·Iy (see stiffness) and minimal self-deformation must be used with the test force to be applied. The individual elements of the load train of the universal testing machine (linkage, bending device) should be braced under a load of approx. 90 % of the nominal load FN of the force measuring cell used (Fig. 1a).
| Fig. 1: | Determination of the compliance curve in the tree-point bend test |
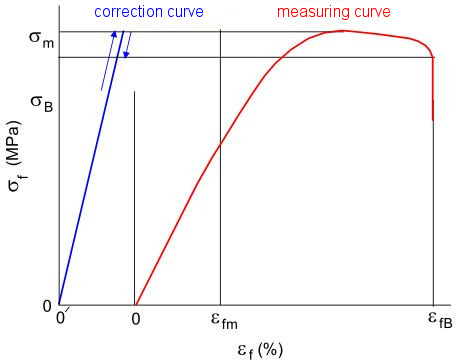
After applying the test specimen made of steel, for example, the bending test is performed at a low test speed up to the nominal load of the electro-mechanical force sensor and then unloaded again while recording the data of the traverse path s0 and the sensor path of the centre deflection s1 (Fig. 1b). The corresponding correction curve ΔfT(F) can be calculated from the loading and unloading curve by means of averaging and regression. The correction curve for the compliance correction can then be calculated by subtracting the deformation ΔfF of the test specimen. This can be used online in the bending test or offline in post-processing using Excel® or Origin®. Depending on the test load, the self-deformation portion is then subtracted from the measurement signal of the traverse path (Fig. 2).
| Fig. 2: | Application of the correction curve in the bending test with traverse path measurement |
See also
The WIKI lexicon: Polymer Testing & Diagnostics provides more detailed explanations of the following terms in this context:
- Stiffness
- Specimen compliance
- Machine compliance
- Compression test compliance
- Tensile test compliance
References
| [1] | ISO 178 (2019-04): Plastics – Determination of Flexural Properties |


