Machine Compliance: Difference between revisions
Oluschinski (talk | contribs) Created page with "{{Language_sel|LANG=ger|ARTIKEL=Maschinennachgiebigkeit}} {{PSM_Infobox}} <span style="font-size:1.2em;font-weight:bold;">Machine Compliance</span> __FORCETOC__ ==General principles== In materials testing, machine compliance refers to the deformation of the closed load framework of universal testing machines with two or four frame columns [1, 2] or expansion of the load frame, e.g. of hardness testing machines [3, 4]..." |
(No difference)
|
Latest revision as of 12:55, 3 December 2025
| A service provided by |
|---|

|
| Polymer Service GmbH Merseburg |
| Tel.: +49 3461 30889-50 E-Mail: info@psm-merseburg.de Web: https://www.psm-merseburg.de |
| Our further education offers: https://www.psm-merseburg.de/weiterbildung |
| PSM on Wikipedia: https://de.wikipedia.org/wiki/Polymer Service Merseburg |
Machine Compliance
General principles
In materials testing, machine compliance refers to the deformation of the closed load framework of universal testing machines with two or four frame columns [1, 2] or expansion of the load frame, e.g. of hardness testing machines [3, 4] or testing machines with a drive spindle.
The inherent deformation of material testing machine
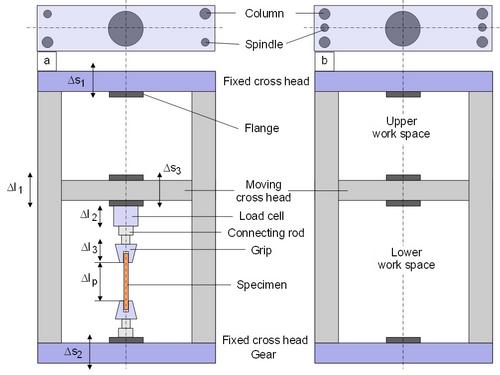
If a universal testing machine is used to perform tensile tests, compression tests (see also compression test arrangement) and bend tests, then, in addition to the deformation of the test specimen, there is also an inherent deformation of the testing machine, which depends on the stiffness of the construction, the materials used, the load cell used and the breaking load of the test specimen. The different deformation parts of a testing machine are shown schematically in Fig. 1.
| Fig. 1: | Load frame of a), 2 column machine b) 4 column universal testing machine (UTM) with equipment and deformation parts of the UTM |
The deformation components of the inherent deformation of a material testing machine
Assuming a nominal measurement (crosshead path) of the extension of the test specimen Δlp, additional path parts resulting from the inherent deformation of the non-infinitely stiff testing machine are also recorded. These are the bending components of the fixed crosshead Δs2 and the traverse (moving crosshead) Δs3 as well as the extension of the load columns and the drive spindle Δl1, the absolute amount of which, however, is small. Depending on the nominal capacity of the load cell, deformations Δl2 are also included in the overall signal.
Experience shows that the connecting rods have some play, which causes additional deformations that depend in particular on the number of connecting elements. However, the clamping elements with Δl3 exert the greatest influence, with differences occurring here depending on the design of the clamping device. In this case, wedge clamps exhibit the largest misalignments and post-tensioning parallel clamps the smallest deformations. The actually determined nominal total elongation Δlg is thus as follows in the closed force flow:
with
| , |
although there may be additional influences due to the start-up behavior of the testing machine. For each kN of test load applied, there is therefore an additional elastic and reversible path ΔlM for specimen deformation Δlp, which is characteristic for the equipment variant of the universal testing machine and is referred to as machine compliance K.
The basic principle of determining the machine compliance consists of determining the deformation of the testing machine as the difference between the crosshead path and the extension of the test specimen at the respective test force, for which different technical implementation variants exist. The manufacturers of universal testing machines usually only specify the compliance of the load framework alone, since the variety of test options and equipment variants would mean that a large number of respective compliance values would have to be specified. Experience shows that the compliance of the load framework is 2 to 3 orders of magnitude lower than that of a testing machine equipped for tensile testing. However, in conjunction with modern testing software, the user has the option of determining a correction curve for the specific test-type equipment that represents the compliance for that application and automatically corrects it when the crosshead path measurement is used. In most test equipment used to determine hardness, the expansion of the load framework is taken into account by the evaluation software via the correction of the indentation depth.
See also
References
| [1] | Heimbrodt, P.: Einfluss der Prüfmaschine auf die Kennwerte des Zugversuches. Bergakademie Freiberg, Diplomarbeit (1976) |
| [2] | Instron Bluehill: Referenzhandbuch – Software für Berechnungen Rev. 1.1 (2006), https://www.nmt.edu/academics/mtls/faculty/mccoy/docs/instron/bluehill_calculation_reference_manual_-_en.pdf |
| [3] | Reimann, E.: Bestimmung mechanischer Werkstoffkennwerte, Ergebnisse des instrumentierten Eindringversuchs im Makrobereich. Materialprüfung 42 (2000) 10, pp. 411–415, https://www.imeko.org/publications/tc5-2002/IMEKO-TC5-2002-029.pdf |
| [4] | Zügner, S.: Untersuchungen zum elastisch-plastischen Verhalten von Kristalloberflächen mittels Kraft-Eindringtiefen-Verfahren. Dissertation, Bayerische Julius-Maximilians-Universität Würzburg (2002), (see Deutsche Digitale Bibliothek) (access on 24.09.2024) |


