Compression Test Arrangement: Difference between revisions
Oluschinski (talk | contribs) Created page with "{{Language_sel|LANG=ger|ARTIKEL=Druckprüfanordnung}} {{PSM_Infobox}} <span style="font-size:1.2em;font-weight:bold;">Problems with the execution of the compression test</span> __FORCETOC__ ==Measurement requirements== A number of measurement requirements must be met in order to accurately perform the compression test to evaluate the material behaviour under uniaxial compressive loading [1]. On the one hand, the test arrangement appears to be rel..." |
(No difference)
|
Latest revision as of 07:43, 1 December 2025
| A service provided by |
|---|

|
| Polymer Service GmbH Merseburg |
| Tel.: +49 3461 30889-50 E-Mail: info@psm-merseburg.de Web: https://www.psm-merseburg.de |
| Our further education offers: https://www.psm-merseburg.de/weiterbildung |
| PSM on Wikipedia: https://de.wikipedia.org/wiki/Polymer Service Merseburg |
Problems with the execution of the compression test
Measurement requirements
A number of measurement requirements must be met in order to accurately perform the compression test to evaluate the material behaviour under uniaxial compressive loading [1]. On the one hand, the test arrangement appears to be relatively simple and straightforward; on the other hand, test practice shows that the results obtained are often subject to errors, larger standard deviations due to measurement technology can occur, and can be incorrect with regard to the absolute values [2].
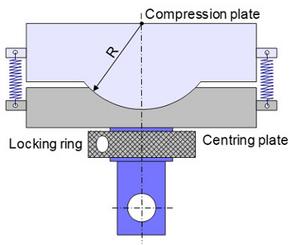
For the exact and standard-compliant execution of the compression test, the manufacturers of materials testing machines offer movable compression plates which, for example, in the Instron version are mounted on ball bearings (Fig. 1) [3].
| Fig. 1: | Compression test arrangement with dual tube ball lower plate [3] |
These movable plates can be mounted at the top or bottom and have a centreing plate that uses springs to set an exact position in the load line. Since the friction of the bearing exerts a high influence, these variants of the compression test arrangement are mostly used only for materials with a high compressive strength (metals and concrete) but sufficient ductility, since high centering forces are required. In the case of brittle or non-ductile materials, such as ceramics or high-performance composites, with very low elongations, special compression test equipment is used. Since these materials react sensitively to additional stresses ( bending, torsion or shear), special testing machines with mechanical centreing devices in x-, y- and z-direction and online display of errors in the load line are used [4]. Affected here are, for example, compression tests in the shear-loading or combined-loading method and the compression after impact (CAI) test.
In the case of thermoplastics, such compression test arrangements are not usually used, since the forces required to centre the test device are not achieved with these materials. Rigidly fixed compression plates equipped with centreing aids (concentric rings on the plates) are usually used here. In this case, the operator of the testing equipment is responsible for calibrating the exact plane-parallel alignment of the compression plates in the load line himself or this task is taken over by a certified testing facility, as otherwise stress concentrations (see fracture mechanics) can occur during compression testing which can lead to premature failure.
Another problem is the centring of the test specimen, since an off-centre position on the pressure plate or an offset of the test specimen position relative to the load line of the force measurements chain leads to the introduction of a bending moment and thus influences the measurement result.
Requirements for the specimen geometry
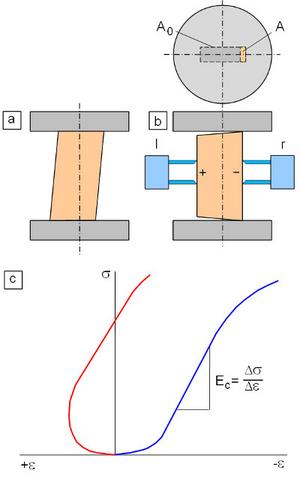
The essential problem of the compression test, however, lies in the preparation of the test specimen. If plane-parallelism but not perpendicularity (Fig. 2a) is guaranteed during specimen preparation, then a bending component occurs in addition to the compressive stress, which significantly influences the strength and deformation behaviour [2]. If both requirements are not fulfilled (Fig. 2b), then there is only partial contact of the test specimen with the pressure plate. Since the contact area A is not known, changes with increasing duration of the compression test and the stress calculation is carried out using the total area A0, the strength values will generally be too low. This effect naturally also has effects on the calculation of the modulus of elasticity, as the position of the clip-on extensometer has a significant influence.
| Fig. 2: | Influence of incorrect specimen geometry on compression test |
In the right-hand position of the test specimen (Fig. 2b), a strong start-up behaviour occurs, followed by increasing compression (Fig. 2c). However, the modulus calculation provides incorrect material values, as the stress is not calculated correctly due to the faulty surface. If the transducer is attached to the left side of the test specimen, then a tensile strain is measured due to the bending stress. This leads to either no modulus value being calculated or nonsensical values being output.
Friction and specimen positioning
Another problem is the friction between the front surface of the specimen and the compression plates in connection with the Hertzian pressure at the position of the force initiation. This leads to an impeded transverse strain in the contact area, which has only a minor effect on brittle test specimens, but causes a central bulge in ductile materials.
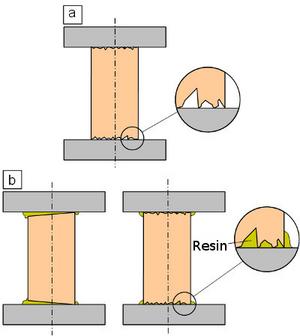
| Fig. 3: | Influence of surface roughness on compression test |
To reduce friction, fats or oils can be applied to the end faces, but this must always be noted in the protocol. These actions do not help if the roughness of the end faces is too great (Fig. 3a) and the contact surface is undefined. In this case, a pronounced start-up behaviour occurs and the measured E-moduli result in too low values. Although this effect decreases with increasing compression in ductile materials, it makes the evaluation considerably more difficult.
This problem can be avoided with the aid of a cold-curing resin (embedding agent) with a short pot life by applying it to the front sides of the test specimens and positioning it between the pressure plates. A small preload is then applied, displacing the excess resin. After the pot life has elapsed, the test can then be carried out (Fig. 3b). This delays the execution of the test somewhat and must also be noted in the protocol, but the results of the compression test are significantly improved.
See also
- Bend test
- Bend test – Influences
- Bend test – Test Influences
- Compression Test
- Compression after Impact Test
References
| [1] | Bierögel, C.: Compression Test on Polymers. In: Grellmann, W., Seidler, S. (Eds.): Polymer Testing. Carl Hanser Verlag, Munich (2022) 3. Edition, p. 125–133 (ISBN 978-1-56990-806-8; e-book: ISBN 978-1-56690-807-5) |
| [2] | Voronko, Y.: Mechanische Eigenschaften von Kunststoffen im Biege- und Druckversuch. Studienarbeit, Martin-Luther-Universität Halle-Wittenberg (2009) (see AMK-Library under B 3-152) |
Weblinks
| [3] | Compression Platens. Instron/Darmstadt: https://www.instron.de/wa/solutions/compression-Testing-Sperical-Seated-Platens.aspx |
| [4] | Compression Platens. Zwick/Roell GmbH & Co. KG/Ulm: https://www.zwickroell.com/de/branchen/werkstoffpruefung-materialpruefung/druckversuch/ |


