Notch Geometry
| A service provided by |
|---|

|
| Polymer Service GmbH Merseburg |
| Tel.: +49 3461 30889-50 E-Mail: info@psm-merseburg.de Web: https://www.psm-merseburg.de |
| Our further education offers: https://www.psm-merseburg.de/weiterbildung |
| PSM on Wikipedia: https://de.wikipedia.org/wiki/Polymer Service Merseburg |
Notch geometry
Notch forms for the Charpy notched impact test
In the conventional notched impact test according to ISO 179-1 [1] or ISO 180 [2], notched test specimens with the dimension 80 x 10 x 4 mm3 are used, which are usually made of multipurpose test specimens [3].
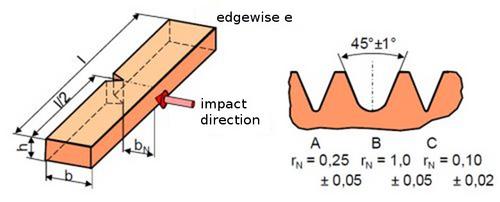
In the Charpy notched impact test, there are 3 types of notches that differ in the notch radius, but all have the same notch depth of 2 mm and the identical notch angle of 45 °, regardless of the impact direction (edgewise or flatwise) (Fig. 1). Notch form type B with a notch radius of 1 mm is intended for brittle plastics, while types A and C should be used for tougher materials.
| Fig. 1: | Notch shapes of the notched impact test (edgewise) according to Charpy [1] |
Notch forms for the notched impact test according to Izod
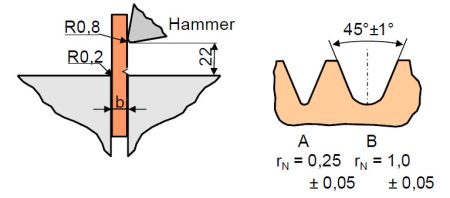
In the notched impact test according to Izod (see impact test), only two notch geometries are used for brittle (A) and tough (B) plastics, as the support conditions here differ significantly from the arrangement according to Charpy and the characteristic material values determined are not comparable (Fig. 2).
| Fig. 2: | Notch shapes of the notched impact test (flatwise) according to Izod [2] |
The geometry in the notch base
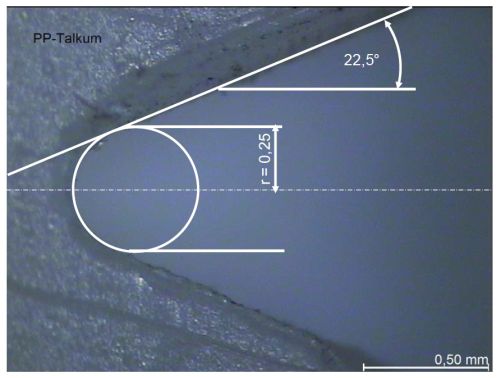
The notches are usually introduced into the centre of the test specimens by milling or planing, sometimes also by sawing. Since the notch radius has a considerable influence on the determined toughness level (see: Notch sensitivity), the geometry in the notch base should be checked regularly with a microscope with regard to notch angle and radius (Fig. 3). If the notch geometry is not correct due to tool wear, the results for characterising the toughness can be considerably falsified by multiple cracks or crack branching and subsequent increase in energy consumption during impact.
| Fig. 3: | Microscopic check of the notch geometry for PP talc, notch type A |
See also
References
| [1] | ISO/DIS 179-1 (2025-05): Plastics – Determination of Charpy Impact Properties – Part 1: Non-instrumented Impact Test (Draft) |
| [2] | ISO 180 (2023-06): Plastics – Determination of Izod Impact Strength |
| [3] | ISO 3167 (2014-08): Plastics – Multipurpose Test Specimen |


