B-Scan Technique
| A service provided by |
|---|

|
| Polymer Service GmbH Merseburg |
| Tel.: +49 3461 30889-50 E-Mail: info@psm-merseburg.de Web: https://www.psm-merseburg.de |
| Our further education offers: https://www.psm-merseburg.de/weiterbildung |
| PSM on Wikipedia: https://de.wikipedia.org/wiki/Polymer Service Merseburg |
B-scan technique
General information
The B-scan is an ultrasound procedure for displaying a cross-sectional image of a test object. It is composed of A-scans that have been recorded on a line at equidistant measuring points. The individual A-scan planes are arranged parallel to each other, and each amplitude is assigned a colour or gray value. This results in a two-dimensional cross-sectional image of the tested object [1].
Construction of the B-scan
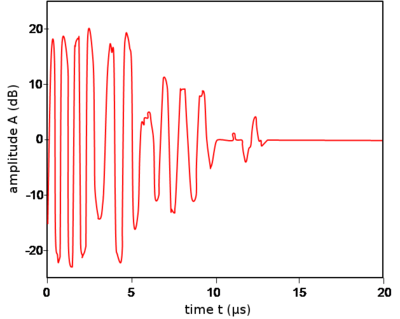
The oscilloscope or measurement card in the PC first determines electrical voltage values that directly reflect the oscillation behaviour of the (piezoelectric) test head oscillator. An example of the shape of such a signal is shown in Fig. 1 below. Here, the voltage amplitude is not given in volts, but in decibels (dB). The reason for this is the improved graphical representation of the amplitude values, since the response signals for measurements (see: measure) on plastics at the receiving test head are usually voltage values in the order of µV, while those of the incident signal are in the range of 100 V to 400 V. In addition, the logarithmic representation of the signal (Eq. 1) helps in its interpretation. This representation is called an HF-scan (image).
| (1) |
| Fig. 1: | HF scan of an ultrasonic signal on a glass fibre-reinforced plastic (GFRP) test specimen (d = 15 mm) |
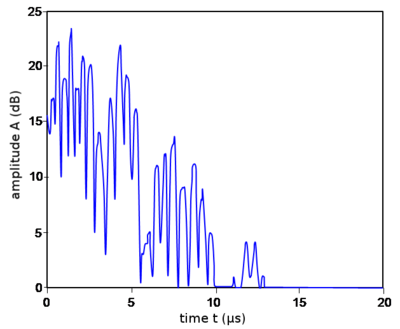
In order to generate a B-scan from the HF-scan, the HF-scans, which were recorded at equal intervals on a scan line, must be converted into A-scans. To do this, the absolute values of the amplitude values over time are recorded according to Eq. (2): This results in the following Fig. 2.
| (2) |
| Fig. 2: | A-scan of the HF presentation from Fig. 1 |
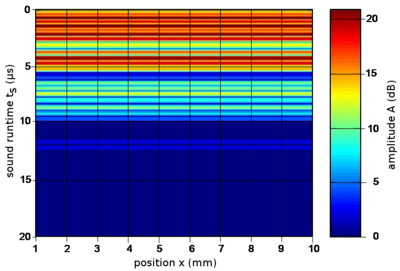
In the next step, the A-scans are rotated in space so that the A-scans are perpendicular in the x-y plane, i.e., the amplitude is upright in the z direction.
The time scale (from Fig. 2) is directed downward. The A-scans are then arranged in sequence according to their position on the scan line. The result of this graphical procedure is shown in Fig. 3. The x-axis indicates the position of the transducer (ultrasonic sensors) on the scan line and thus the individual A-scans. The colour legend defines the amplitude values of the individual colours in the B-scan [2, 3] to simplify the assignment of the respective A-scans.
| Fig. 3: | Arrangement of identical A-scans from Fig. 2 |
Practical relevance of the B-scan
In practice, B-scans are generated to perform defectoscopic examinations. The B-scan represents a cross-section of the test specimen being examined. The quality of this signal representation depends on the reflection coefficients at the interfaces (see also: phase boundary surface) where the sound is transmitted. B-scan representation is also possible for materials that greatly attenuate sound, such as plastics [4, 5].
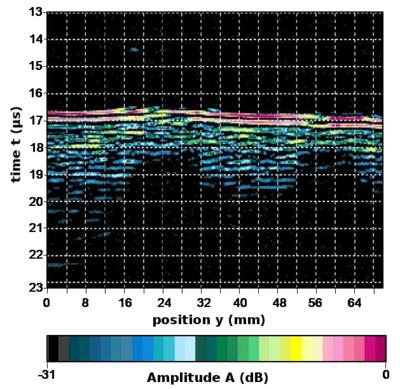
An example can be seen in Fig. 4. There, a glass fibre-reinforced vinyl ester resin panel was impact damaged by a drop bolt testing system.
The scan line was placed over two of the impacts. The back wall signal of the plate can be seen in Fig. 4 at the bottom left at 22.3 µs. Both impacts on the surface are visible (interruptions in the amplitude lines). Furthermore, the typical conical damage characteristic can be detected, which has a smaller extent near the impact than at a greater distance.
| Fig. 4: | Cross-sectional image (B-scan) of a damaged glass fibre-reinforced vinyl ester resin |
Other types of B-scan generation
The group transducer generates the B-scan without moving the ultrasonic sensor. Individual transducers are arranged equidistantly in a line array. A constant time offset simulates the movement of the ultrasonic sensor described above (see: ultrasonic phased array sensors). This allows the B-scan to be generated in the same way.
Sonography is a method that has been used in medicine for diagnostic purposes for some time. This also involves group transducers, whose scans are arranged in a fan shape, in contrast to those used in materials testing. The B-scan or sector scan is created in a similar way.
See also
- A-scan technique
- Imaging ultrasonic testing
- C-scan technique
- D-scan technique
- F-scan technique
- HF-scan
- Ultrasound testing
References
| [1] | Deutsch, V., Platte, M., Vogt, M.: Ultraschallprüfung – Grundlagen und industrielle Anwendungen. Springer, Berlin Heidelberg (1997), (ISBN 3-540-62072-9; see AMK-Library under M 45) |
| [2] | http://www.ultraschallmuseum.de/download/Tafeln-7-11Korr-Febr2007-Internet.pdf (access on 2.11.2025) |
| [3] | Krautkrämer, J., Krautkrämer, H.: Werkstoffprüfung mit Ultraschall. Springer, Berlin Heidelberg (1986) (ISBN 978-3-662-10909-0) |
| [4] | Schlengermann, U., Schulz, S.: Darstellung und Auswertung von Ultraschall-Prüfergebnissen durch B-Bilder. In: ZfP in Anwendung, Entwicklung und Forschung. DGZfP-Jahrestagung 2002, DGZfP (2002) |
| [5] | Ahrholdt, M.: Ein System zur automatischen Auswertung von Ultraschall-Messdaten. Cuvillier Publishing (2005) (ISBN 978-3-8653-7581-0) |

![{\displaystyle A=20\cdot lg{\frac {U_{2}}{U_{1}}}\ \left[dB\right]}](https://wikimedia.org/api/rest_v1/media/math/render/svg/3d19f0bc1e03960c51d05427a058c3ccfd7b5798)


