Pulse-Echo Ultrasonic Technique: Difference between revisions
Oluschinski (talk | contribs) Created page with "{{Language_sel|LANG=ger|ARTIKEL=Ultraschall-Impuls-Echo-Technik}} {{PSM_Infobox}} <span style="font-size:1.2em;font-weight:bold;">Pulse-echo ultrasonic technique</span> __FORCETOC__ ==Advantages and capabilities== The non-destructive ultrasonic testing technique is separated in two important classical test methods, which are called reflection (pulse-echo) technique and trough-transmission technique [1]. Independent of Ultrasonic Direct Coupling | ultrasonic direct..." |
(No difference)
|
Latest revision as of 14:13, 3 December 2025
| A service provided by |
|---|

|
| Polymer Service GmbH Merseburg |
| Tel.: +49 3461 30889-50 E-Mail: info@psm-merseburg.de Web: https://www.psm-merseburg.de |
| Our further education offers: https://www.psm-merseburg.de/weiterbildung |
| PSM on Wikipedia: https://de.wikipedia.org/wiki/Polymer Service Merseburg |
Pulse-echo ultrasonic technique
Advantages and capabilities
The non-destructive ultrasonic testing technique is separated in two important classical test methods, which are called reflection (pulse-echo) technique and trough-transmission technique [1].
Independent of ultrasonic direct coupling, immersion bath technique or air coupling, a beam of sound directed into the test material is used and which transducer types (normal or angle-beam probe) are used, only one transducer is required for the pulse-echo technique. Although twice the sound path is required here compared to the transmission technique and thus the pulse-echo technique has disadvantages for sound-absorbing or sound-scattering test materials, the following advantages of this test technique are available [1]:
- by means of run-time differences (delay times) the flaw depth is determinable,
- the coupling quality because of only one probe is not critical,
- the testing object has to be only accessible unilaterally,
- the detection sensitivity for little discontinuities is significant higher and
- the practice pertinence and the handling of probe is importantly better.
Realisation of pulse-echo method
The pulse-echo method with normal-beam probes normally uses also pulsed ultrasonic waves with a certain pulse repetition frequency. The coupling can be realised by oils or greases, by air-coupling technique or by the immersion bath technique (Figure 1). Because of the unilateral access, this method is used by industry for wall thickness measurement and the flaw detection [1−4].
| Fig. 1: | Schematic drawings of the pulse-echo technique with normal-beam probes (a) at direct coupling as well as (b) non-contact coupling by air and (c) by water ( immersion bath technique) |
In all three cases, the acoustic axis of the transducer must be plane-parallel to the surface of the test object and must not have any tilt, otherwise the intensity of the received ultrasound will be reduced. Direct coupling can be realised with different coupling media, depending on the quality of the surfaces and the required impedance matching (Figure 1a). This measurement method is often used for thickness measurement, mostly using the delay-block to suppress the initial impulse.
Pulse-echo technique with normal-beam probes
The normal beam probes with air-coupled ultrasound in the pulse-echo method work in the low frequency range and – due to their wavelength – have only a minimal resolution (Figure 1b) in contrast to the immersion bath technique (Figure 1c), where a high resolution is possible by measuring frequencies above 100 MHz.
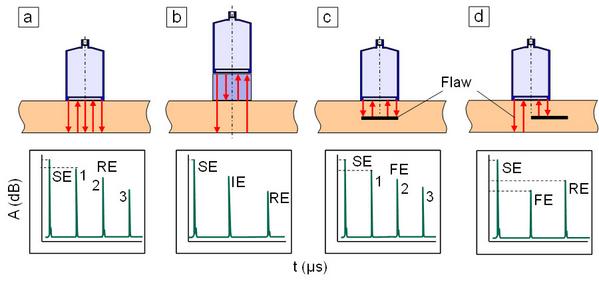
| Fig. 2: | Schematic drawings for using pulse-echo method with normal-beam probes (a) for thickness gauging without delay block, (b) with delay block, (c) multiple echo series measuring flaws and (d) measuring at a flaw edge with flaw echo and back wall echo |
The applications shown in Figure 2 serves for thickness gauging and the detection of those flaws, which have a plane or two-dimensional dimension in the sound field. Depending on attenuation and scattering in the testing object by adjustment of the time axis makes possible multiple echoes for thickness gauging if the ultrasonic velocity of longitudinal waves is known (Figure 2a). Using a delay block (Figure 2b) the initial echo can be supressed and for thickness measurement the runtime of ultrasound enter the interface echo (IE) and the back wall echo (RE). If flaws exist, which in their dimension are oriented across to the incident sound field, depending on its size a complete masking (Figure 2c) or a partial masking of the back wall echo happens (Figure 2d). Thus, the dimension and the size of the flaw respectively as well as – by the runtime of ultrasound – the flaw depth can be measured.
Pulse-echo technique with angle-beam probes
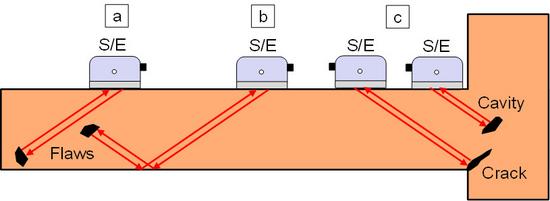
The pulse-echo method can be used – under certain conditions – not only for the weld testing but also for the test of discontinuities at exposed positions (Figure 3).
| Fig. 3: | Schematic drawing presenting the test with angel-beam probes in pulse-echo technique at (a) testing objects with and (b) without direct sounding, (c) testing objects with corner crack and cavity or inclusion |
Depending on the angel of incidence and the correct node a reflection flaws can be direct or indirect sounded over the back wall, if the flaws position in the sound field of transversal waves is allowed (Figure 3a and b). The corner cracks and cavities at volume accumulations are not detectable with normal-beam probes but with angel-beam probes (Figure 3c).
See also
- Ultrasonic direct coupling
- Ultrasonic weld inspection
- Ultrasonic runtime measurement
- Ultrasonic immersion bath technique
References
| [1] | Deutsch, V., Platte, M., Vogt, M.: Ultrasonic Testing. Fundamentals and Industrial Applications. Springer Verlag, Berlin (1997), (ISBN 3-540-62072-9; see AMK-Library under M 45) |
| [2] | Matthies, K.: Thickness Measurement with Ultrasound. DVS-Media Verlag GmbH, Berlin (1998), (ISBN 978-3-87155-941-9) see AMK-Library under M 44) |
| [3] | Chaplin, R.: Industrial Ultrasonic Inspection: Levels 1 and 2. Friesenpress Company, Toronto (2017), (ISBN 978-1460295670) |
| [4] | Loughlin, C.: Sensors for Industrial Inspection. Springer Verlag, Berlin (1992), (ISBN 978-0792320463) |


