C-Scan Technique: Difference between revisions
Oluschinski (talk | contribs) Created page with "{{Language_sel|LANG=ger|ARTIKEL=C-Bild-Technik}} {{PSM_Infobox}} <span style="font-size:1.2em;font-weight:bold;">C-scan technique</span> __FORCETOC__ ==General information== The C-scan is an ultrasonic testing and evaluation method for two-dimensional imaging of the acoustic properties of a test specimen volume. It is composed of A-scans that have been recorded using a grid of equidistant measuring points. A colour or gray v..." |
(No difference)
|
Latest revision as of 08:26, 1 December 2025
| A service provided by |
|---|

|
| Polymer Service GmbH Merseburg |
| Tel.: +49 3461 30889-50 E-Mail: info@psm-merseburg.de Web: https://www.psm-merseburg.de |
| Our further education offers: https://www.psm-merseburg.de/weiterbildung |
| PSM on Wikipedia: https://de.wikipedia.org/wiki/Polymer Service Merseburg |
C-scan technique
General information
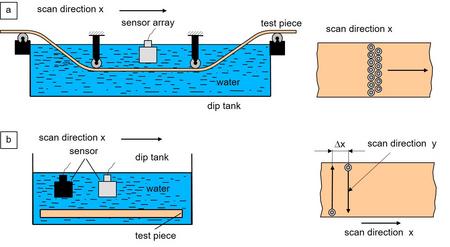
The C-scan is an ultrasonic testing and evaluation method for two-dimensional imaging of the acoustic properties of a test specimen volume. It is composed of A-scans that have been recorded using a grid of equidistant measuring points. A colour or gray value is assigned to the sum of the recorded amplitudes. This gives each A-scan a pixel as a colour or gray value. In the C-scan, these pixels are assembled, and the colour values are graded relative to the scale of the colour palette used [1, 2]. The tests required for the C-scan can be performed using air ultrasound, the squirter technique, or in an immersion bath. If a moving test object is present, e.g., a passing sheet metal, then a fixed sensor array can be used; otherwise, the sensor (see: ultrasonic sensors) performs a meandering scanning movement on the stationary test object (Fig. 1). C-scans can also be recorded using ultrasonic phased array technique.
| Fig. 1: | Schematic diagram of the passive (a) and active (b) scanning process on a plate to generate the C-scan |
Construction of a C-scan
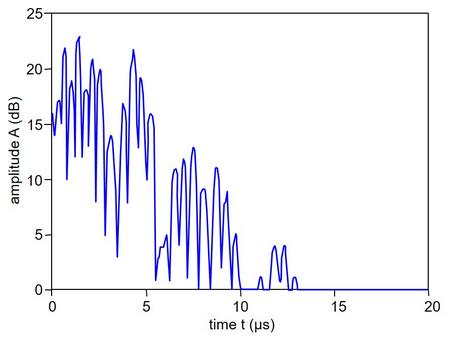
A manipulator (scanner) scans the test piece to be examined according to the previously specified grid definition. The HF-scans are recorded at the grid points. In order to generate a C-scan from the HF-scans, the amplitude values are used to generate an A-scan (Fig. 2).
The determined amplitude sums are arranged in a matrix according to the scanned grid (Fig. 3a). The sums are then colour-coded using a colour palette. The extremes of the selected colour palette are assigned the extreme values (maximum and minimum) of the sums, resulting in a relative assignment of the colour to the sum values of different scans (Fig. 3b). These values are often smoothed, as shown in Fig. 3c, to increase the resolution using a subpixel variant (see also: colour).
| Fig. 2: | A-scan of an ultrasonic signal on glass fibre-reinforced plastic (GFRP) (d = 15 mm) |
| Fig. 3: | Example of a matrix of amplitude sums of the A-scans (a), colour-coded matrix (b), and smoothed presentation of the colour matrix (c) |
Practical relevance of the C-scan
The C-scan is very important for testing near-surface defects in a component. Its special feature compared to the volume scan is that it examines a test piece layer by layer. This allows, for example, impact damage to plates to be examined layer by layer in order to characterize the effects of impacts with different energy contents.
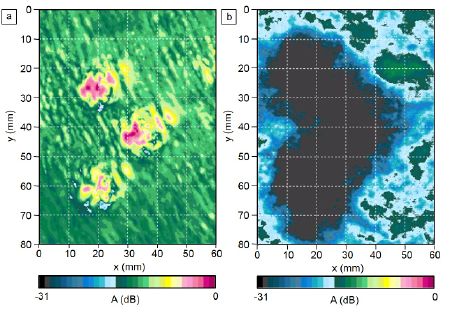
| Fig. 4: | Example of an ultrasonic examination of a glass fibre reinforced component damaged by three impacts; (a) surface and (b) rear wall |
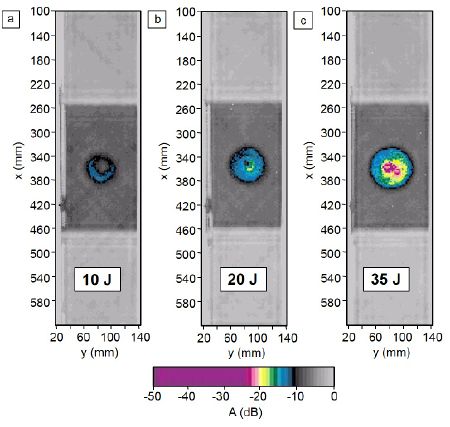
| Fig. 5: | Example of an ultrasonic examination of sandwich components damaged by different energy levels |
Figure 4 shows the C-scans of the surface (a) and the back wall (b). This is made possible by selecting the appropriate time intervals of the response signal using apertures. The impact positions on the surface are clearly visible. Fig. 4b shows the typical impact behaviour of short-fibre reinforced composites, where the damage spreads conically (impact trombe) towards the back wall and a closed damage area (delamination) can be seen (see also: compression after impact (CAI) test).
In accordance with the different reflection properties on impact-damaged surfaces, the dependence of the amplitude values on the energy content of impacts can also be determined during the ultrasonic examinations while maintaining the test parameters (Fig. 5).
Other types of C-scan generation
The phased array transducer generates the C-scan based on its B-scan construction with a one-dimensional movement. The phased array transducer can be moved using a manipulator, whereby another option is to move the test object, as is the case with ultrasonic testing systems used in the production of sheet metal and strips [3]. In the phased array, individual transducers are arranged equidistantly in the form of a line array, which can be addressed individually or in groups by the testing software or can be focused differently. The movement described above is simulated by a constant time offset.
See also
- A-scan technique
- B-scan technique
- Imaging ultrasonic testing
- D-scan technique
- F-scan technique
- HF-scan
- Ultrasound testing
References
| [1] | Matthies, K., Gohlke, D.: Der Ultraschall-Volumenscan als Werkzeug zur Prüfung komplizierter Geometrien und komplexer Gefüge. DGZfP-Jahrestagung 2007 |
| [2] | Deutsch, V., Platte, M., Vogt, M.: Ultraschallprüfung – Grundlagen und industrielle Anwendungen. Springer Verlag, Berlin Heidelberg (1997), (ISBN 3-540-62072-9; see AMK-Library under M 45) |
| [3] | John, M., Schlimper, R., Mudra, Chr.: Deformation and Failure Behaviour of Pre-damaged Foam-core Sandwich Structures in a Four-point Bending Configuration. ECCM17 – 17th European Conference on Composite Materials, Munich, Germany, 26-30th June 2016 |
| [4] | http://www.karldeutsch.de/KD_GENERAL_DL_Contents_DE_M1.html (last access on 2.11.2025) |


